> ## Documentation Index
> Fetch the complete documentation index at: https://chatbase.co/docs/llms.txt
> Use this file to discover all available pages before exploring further.
# Settings
Open an AI agent and click **Settings** in the sidebar. The page has seven tabs: **General**, **Voice**, **Email**, **Helpdesk**, **Custom domains**, **Webhooks**, and **Notifications**.
## General
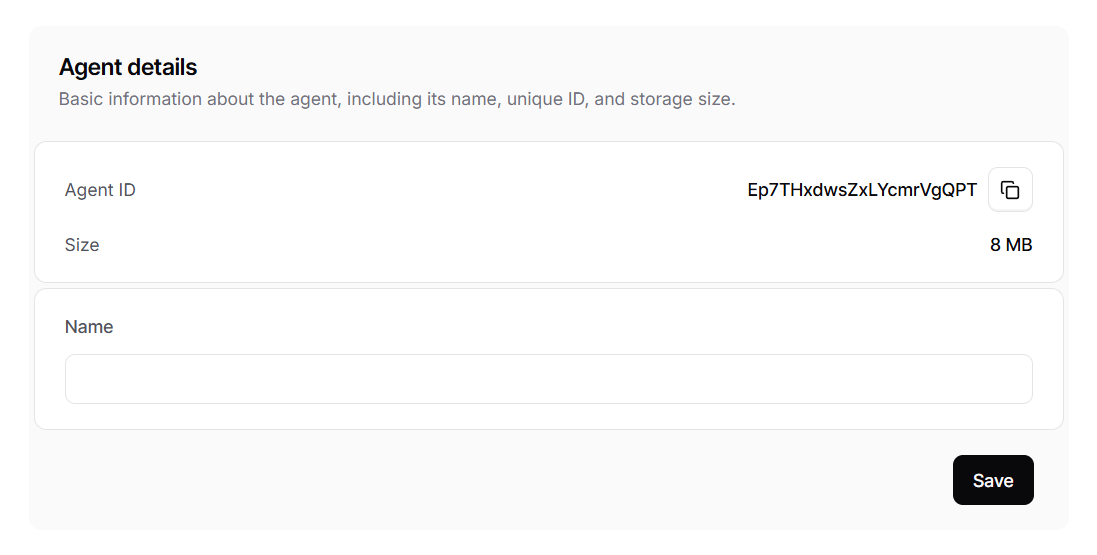
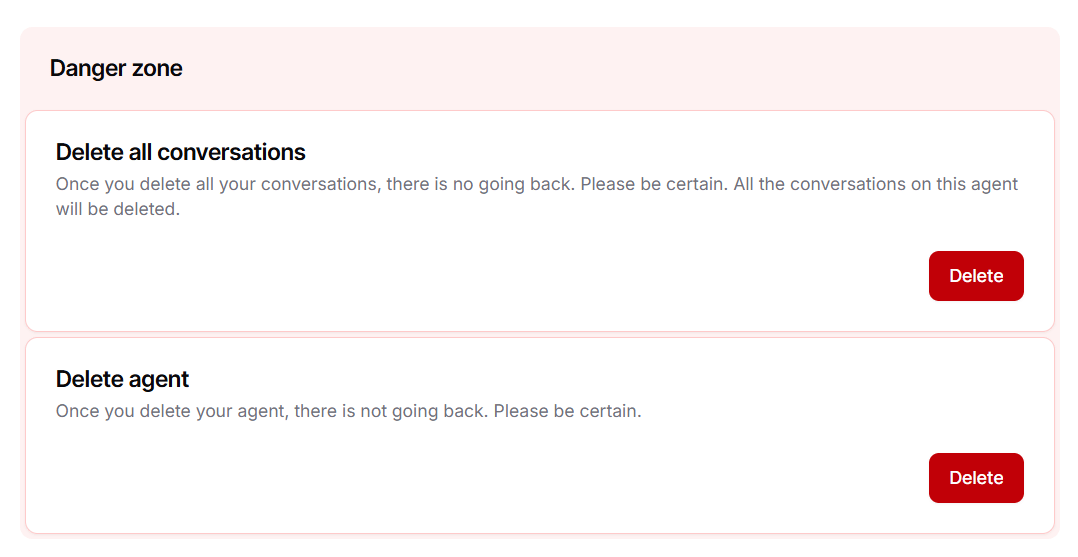
The **General** tab has three cards: **Agent details** (Agent ID, Size, Name), **Credits limit**, and **Danger zone** (Delete all conversations, Delete AI agent).
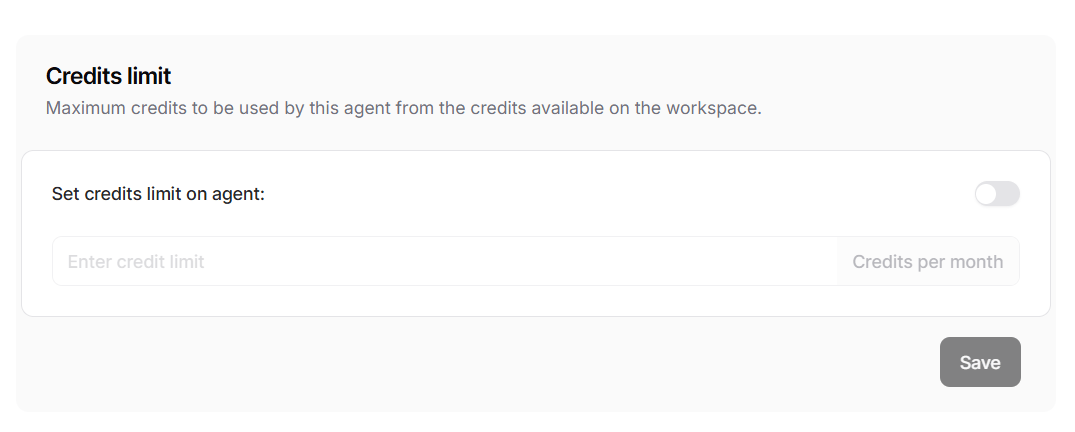
 In the **Credits limit** card, enable **Set credits limit on AI agent** to cap how many of the workspace’s credits this AI agent can consume.
 ***DANGER ZONE***
The actions done in the section aren’t reversible. If you deleted the AI agent or the conversations, you can’t retrieve them moving forward.
***DANGER ZONE***
The actions done in the section aren’t reversible. If you deleted the AI agent or the conversations, you can’t retrieve them moving forward.
 ## Voice
This section allows you to configure how your AI agent sounds and behaves during voice conversations.
### Credit Usage
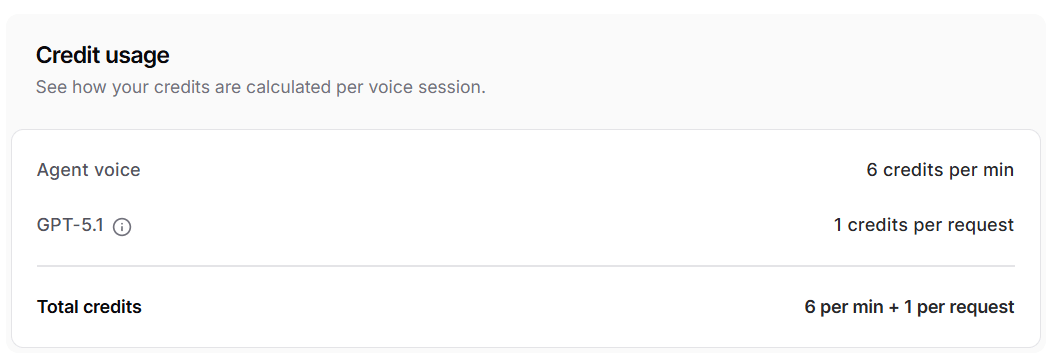
Voice sessions consume credits based on two components:
* **AI agent voice**: Every voice session consumes **6 message credits per minute**. This is a per-minute cost regardless of the actual messages exchanged.
* **AI model**: Each response from the AI agent during a voice session consumes message credits based on the model used, just like in text conversations. See the [full list of models and their message credit costs](./build#ai-model).
The total credit cost of a voice session is the sum of both components.
## Voice
This section allows you to configure how your AI agent sounds and behaves during voice conversations.
### Credit Usage
Voice sessions consume credits based on two components:
* **AI agent voice**: Every voice session consumes **6 message credits per minute**. This is a per-minute cost regardless of the actual messages exchanged.
* **AI model**: Each response from the AI agent during a voice session consumes message credits based on the model used, just like in text conversations. See the [full list of models and their message credit costs](./build#ai-model).
The total credit cost of a voice session is the sum of both components.
 Suppose your voice AI agent uses **GPT-5.6 Luna** (1 message credit per request).
If a user has a **10-minute voice call** with **15 AI requests**:
| Component | Calculation | Message Credits |
| ----------------------- | ------------------------------ | --------------- |
| AI agent voice | 10 min x 6 credits/min | 60 |
| AI model (GPT-5.6 Luna) | 15 requests x 1 credit/request | 15 |
| **Total** | | **75** |
### Voice Model
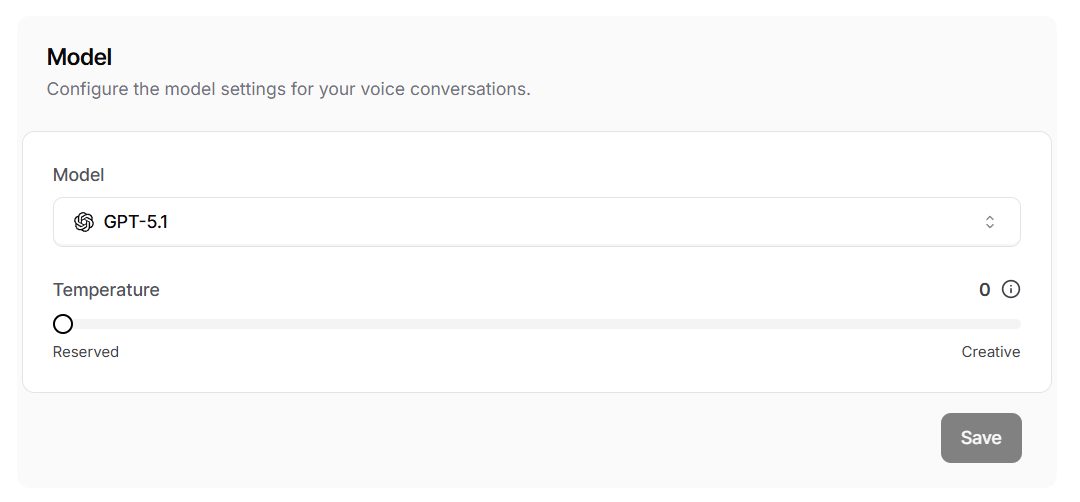
Select the AI model used specifically for voice sessions. This model is separate from the one used for text-based conversations and only applies when users interact with your AI agent through voice.
You can also adjust the **Temperature** to control how creative or reserved the AI agent's responses are during voice conversations.
Suppose your voice AI agent uses **GPT-5.6 Luna** (1 message credit per request).
If a user has a **10-minute voice call** with **15 AI requests**:
| Component | Calculation | Message Credits |
| ----------------------- | ------------------------------ | --------------- |
| AI agent voice | 10 min x 6 credits/min | 60 |
| AI model (GPT-5.6 Luna) | 15 requests x 1 credit/request | 15 |
| **Total** | | **75** |
### Voice Model
Select the AI model used specifically for voice sessions. This model is separate from the one used for text-based conversations and only applies when users interact with your AI agent through voice.
You can also adjust the **Temperature** to control how creative or reserved the AI agent's responses are during voice conversations.
 ### Transcriber
Choose the model used to transcribe user speech during voice conversations.
### Transcriber
Choose the model used to transcribe user speech during voice conversations.
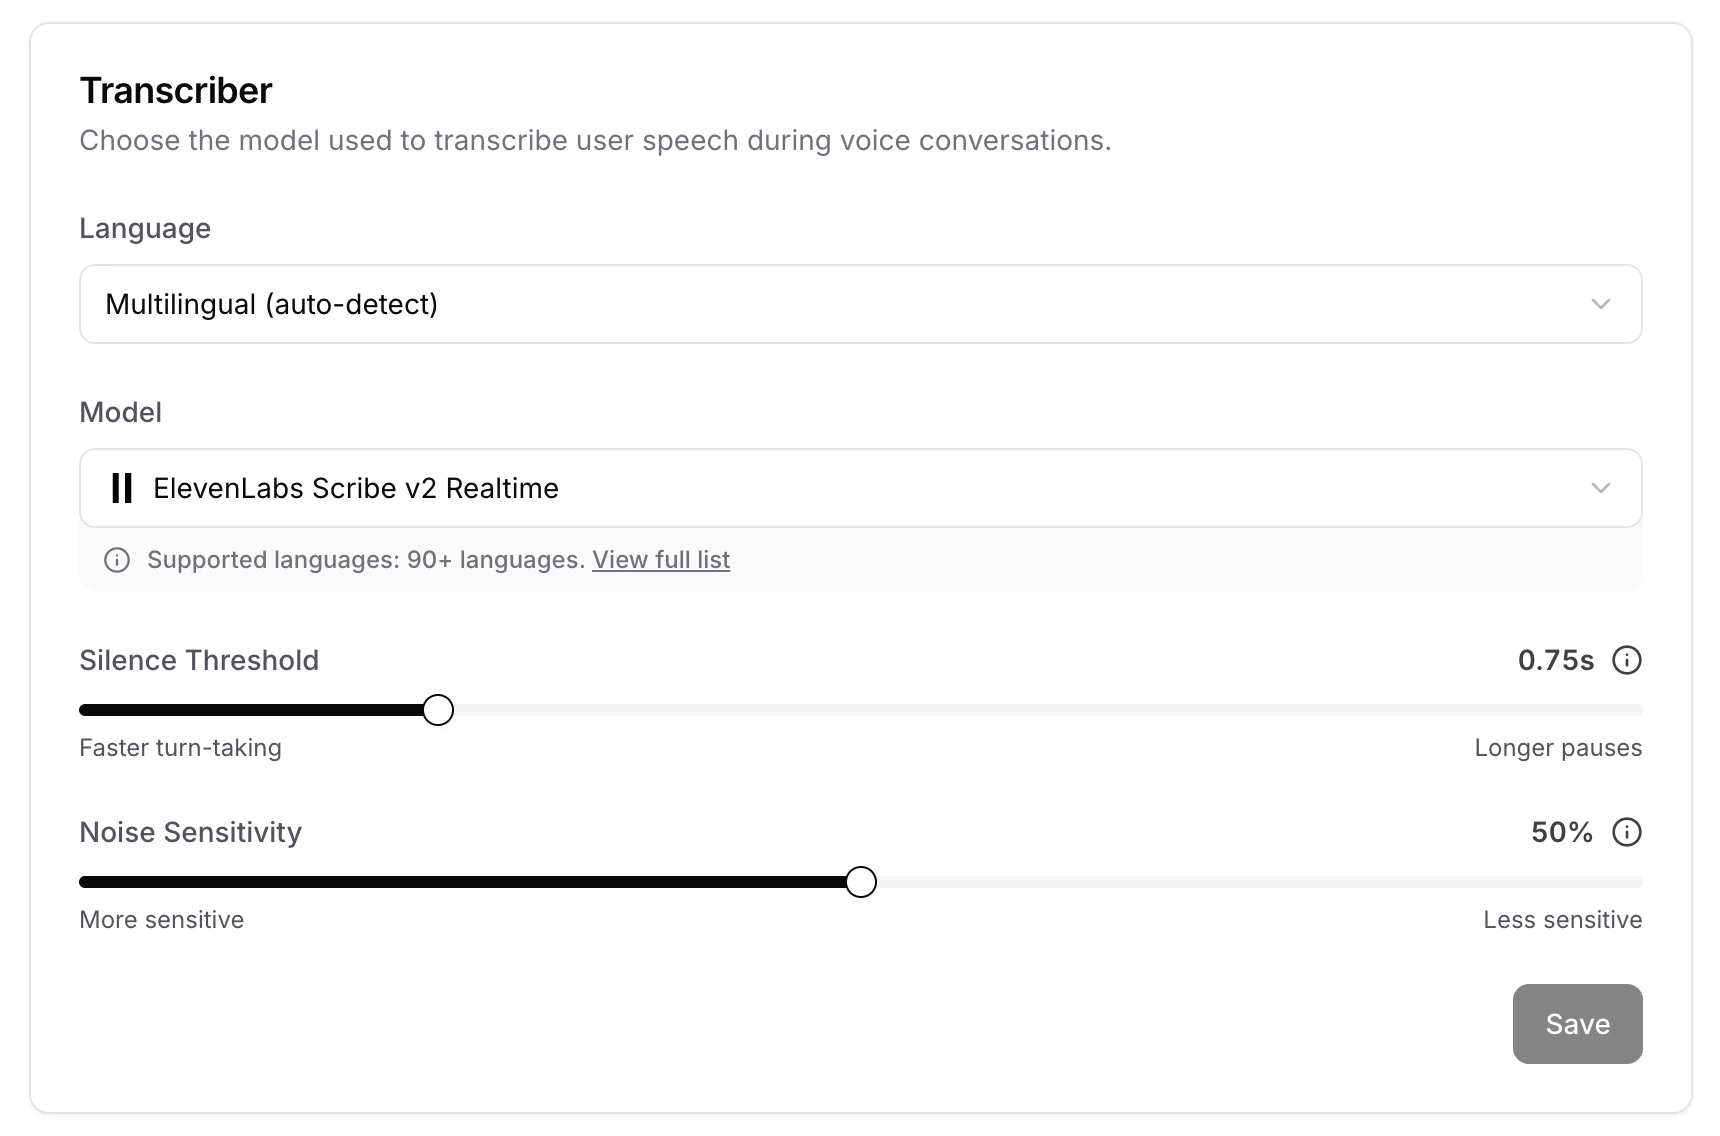 * **Language**: The language used to transcribe user speech. Select **Multilingual (auto-detect)** to let the transcriber detect the language automatically, or pick a specific language to improve accuracy.
* **Model**: The speech-to-text model that converts user audio into text. Each model supports a different range of languages.
* **Silence Threshold**: Seconds of silence before the AI agent considers the user has finished speaking. Lower values switch turns faster but may cut off pauses mid-thought.
* **Noise Sensitivity**: Controls how loud audio must be to count as speech. Lower values pick up quieter speech but are more sensitive to background noise. Higher values filter out noise but may miss soft-spoken users.
**Multiple transcription languages:** When using the default **Soniox v5** model, you can select up to **8 languages**. Limiting the set of possible languages helps the transcriber focus on the selected languages, improving transcription accuracy.
### AI Agent Voice
Choose a voice for your AI agent and fine-tune how it sounds during voice conversations.
* **Language**: The language used to transcribe user speech. Select **Multilingual (auto-detect)** to let the transcriber detect the language automatically, or pick a specific language to improve accuracy.
* **Model**: The speech-to-text model that converts user audio into text. Each model supports a different range of languages.
* **Silence Threshold**: Seconds of silence before the AI agent considers the user has finished speaking. Lower values switch turns faster but may cut off pauses mid-thought.
* **Noise Sensitivity**: Controls how loud audio must be to count as speech. Lower values pick up quieter speech but are more sensitive to background noise. Higher values filter out noise but may miss soft-spoken users.
**Multiple transcription languages:** When using the default **Soniox v5** model, you can select up to **8 languages**. Limiting the set of possible languages helps the transcriber focus on the selected languages, improving transcription accuracy.
### AI Agent Voice
Choose a voice for your AI agent and fine-tune how it sounds during voice conversations.
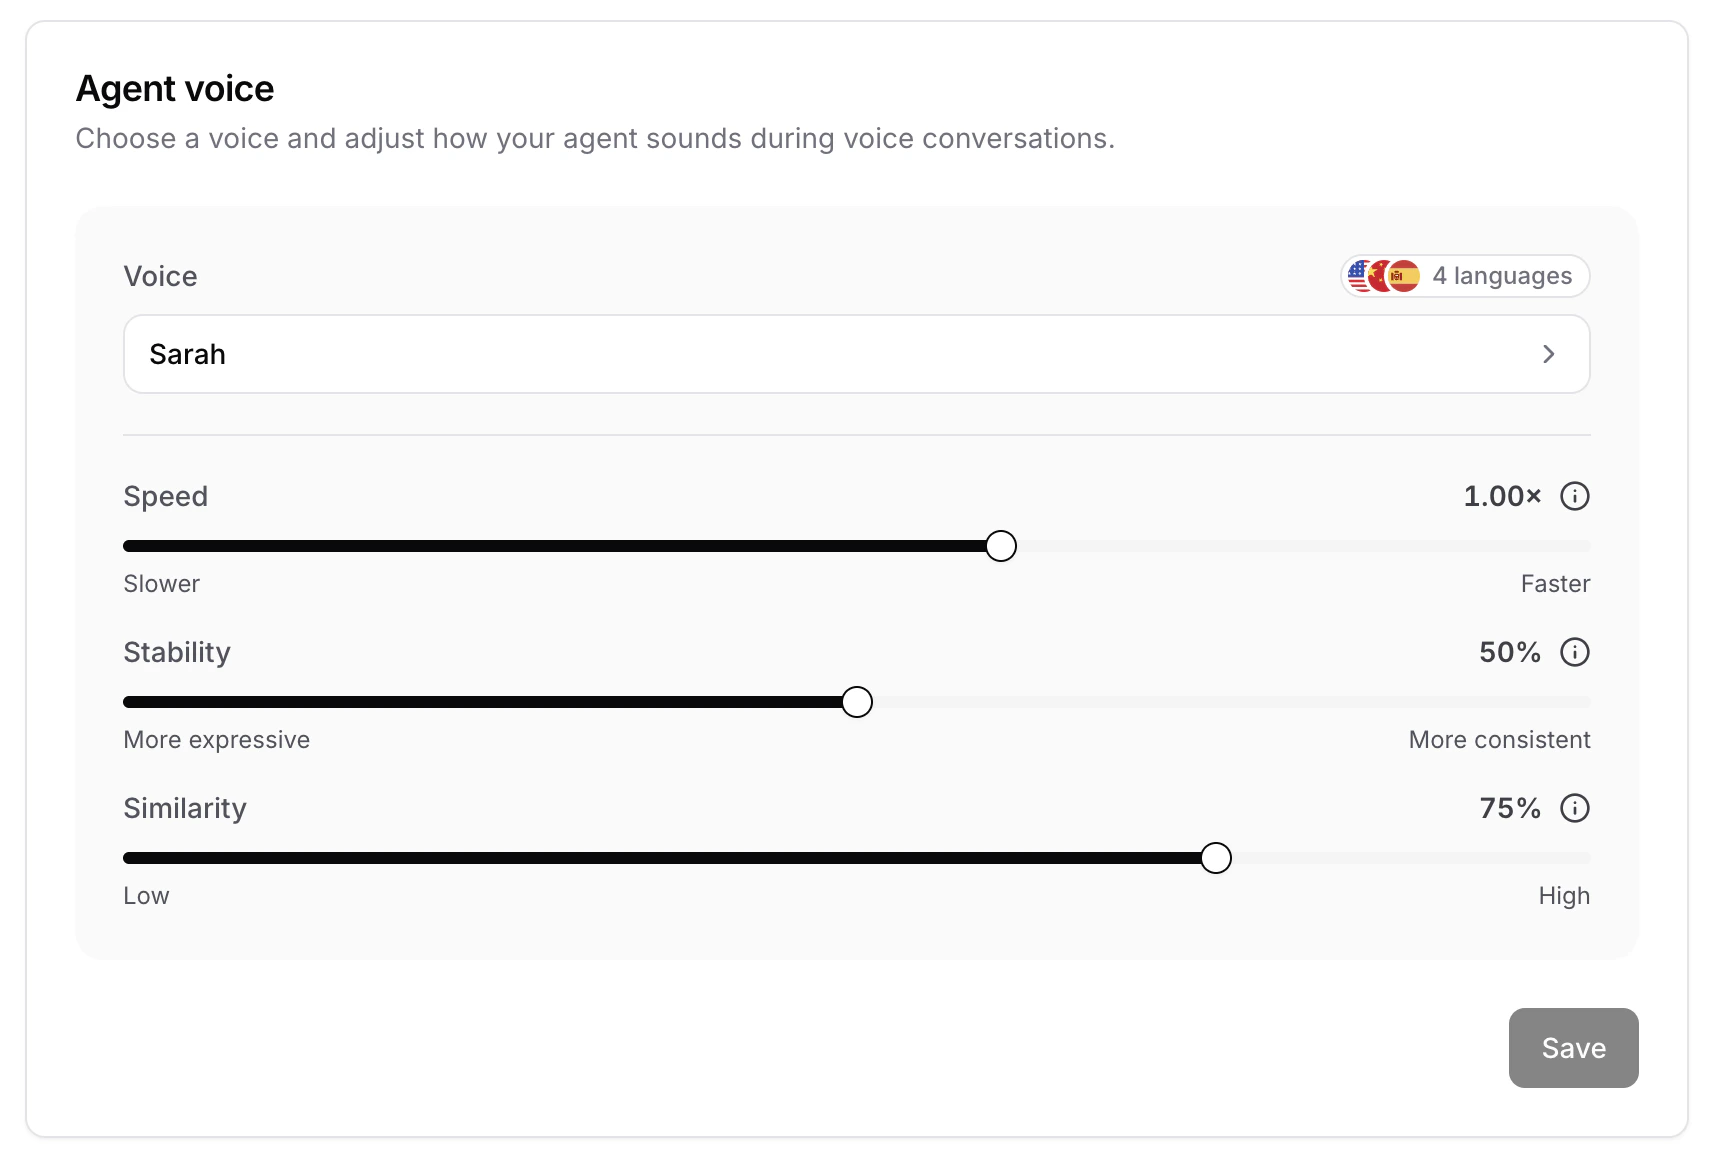 Click on the voice selector to open the voice picker, then fine-tune how the selected voice sounds. The available controls depend on the voice you picked, some voices expose sliders such as speed, stability, and similarity, while others let you describe the desired delivery. A few examples:
* **Speed**: Controls how fast or slow the AI agent speaks. Adjust the slider between slower and faster to match your preferred pace.
* **Stability**: Determines how stable the voice is. Lower values introduce a broader emotional range, while higher values produce a more consistent, monotone delivery with limited emotion.
* **Similarity**: Determines how closely the AI adheres to the original voice when replicating it. Higher values result in a closer match to the selected voice.
* **Voice instructions**: For voices that support it, enter a short prompt describing the tone, style, or dialect you want the AI agent to use when speaking.
Make sure to click **Save** on the voice card to apply your changes.
#### Selecting a voice
The voice picker has two tabs: **All voices** for browsing pre-recorded voices, and **Custom voice** for bringing a custom voice from a supported provider.
Click on the voice selector to open the voice picker, then fine-tune how the selected voice sounds. The available controls depend on the voice you picked, some voices expose sliders such as speed, stability, and similarity, while others let you describe the desired delivery. A few examples:
* **Speed**: Controls how fast or slow the AI agent speaks. Adjust the slider between slower and faster to match your preferred pace.
* **Stability**: Determines how stable the voice is. Lower values introduce a broader emotional range, while higher values produce a more consistent, monotone delivery with limited emotion.
* **Similarity**: Determines how closely the AI adheres to the original voice when replicating it. Higher values result in a closer match to the selected voice.
* **Voice instructions**: For voices that support it, enter a short prompt describing the tone, style, or dialect you want the AI agent to use when speaking.
Make sure to click **Save** on the voice card to apply your changes.
#### Selecting a voice
The voice picker has two tabs: **All voices** for browsing pre-recorded voices, and **Custom voice** for bringing a custom voice from a supported provider.
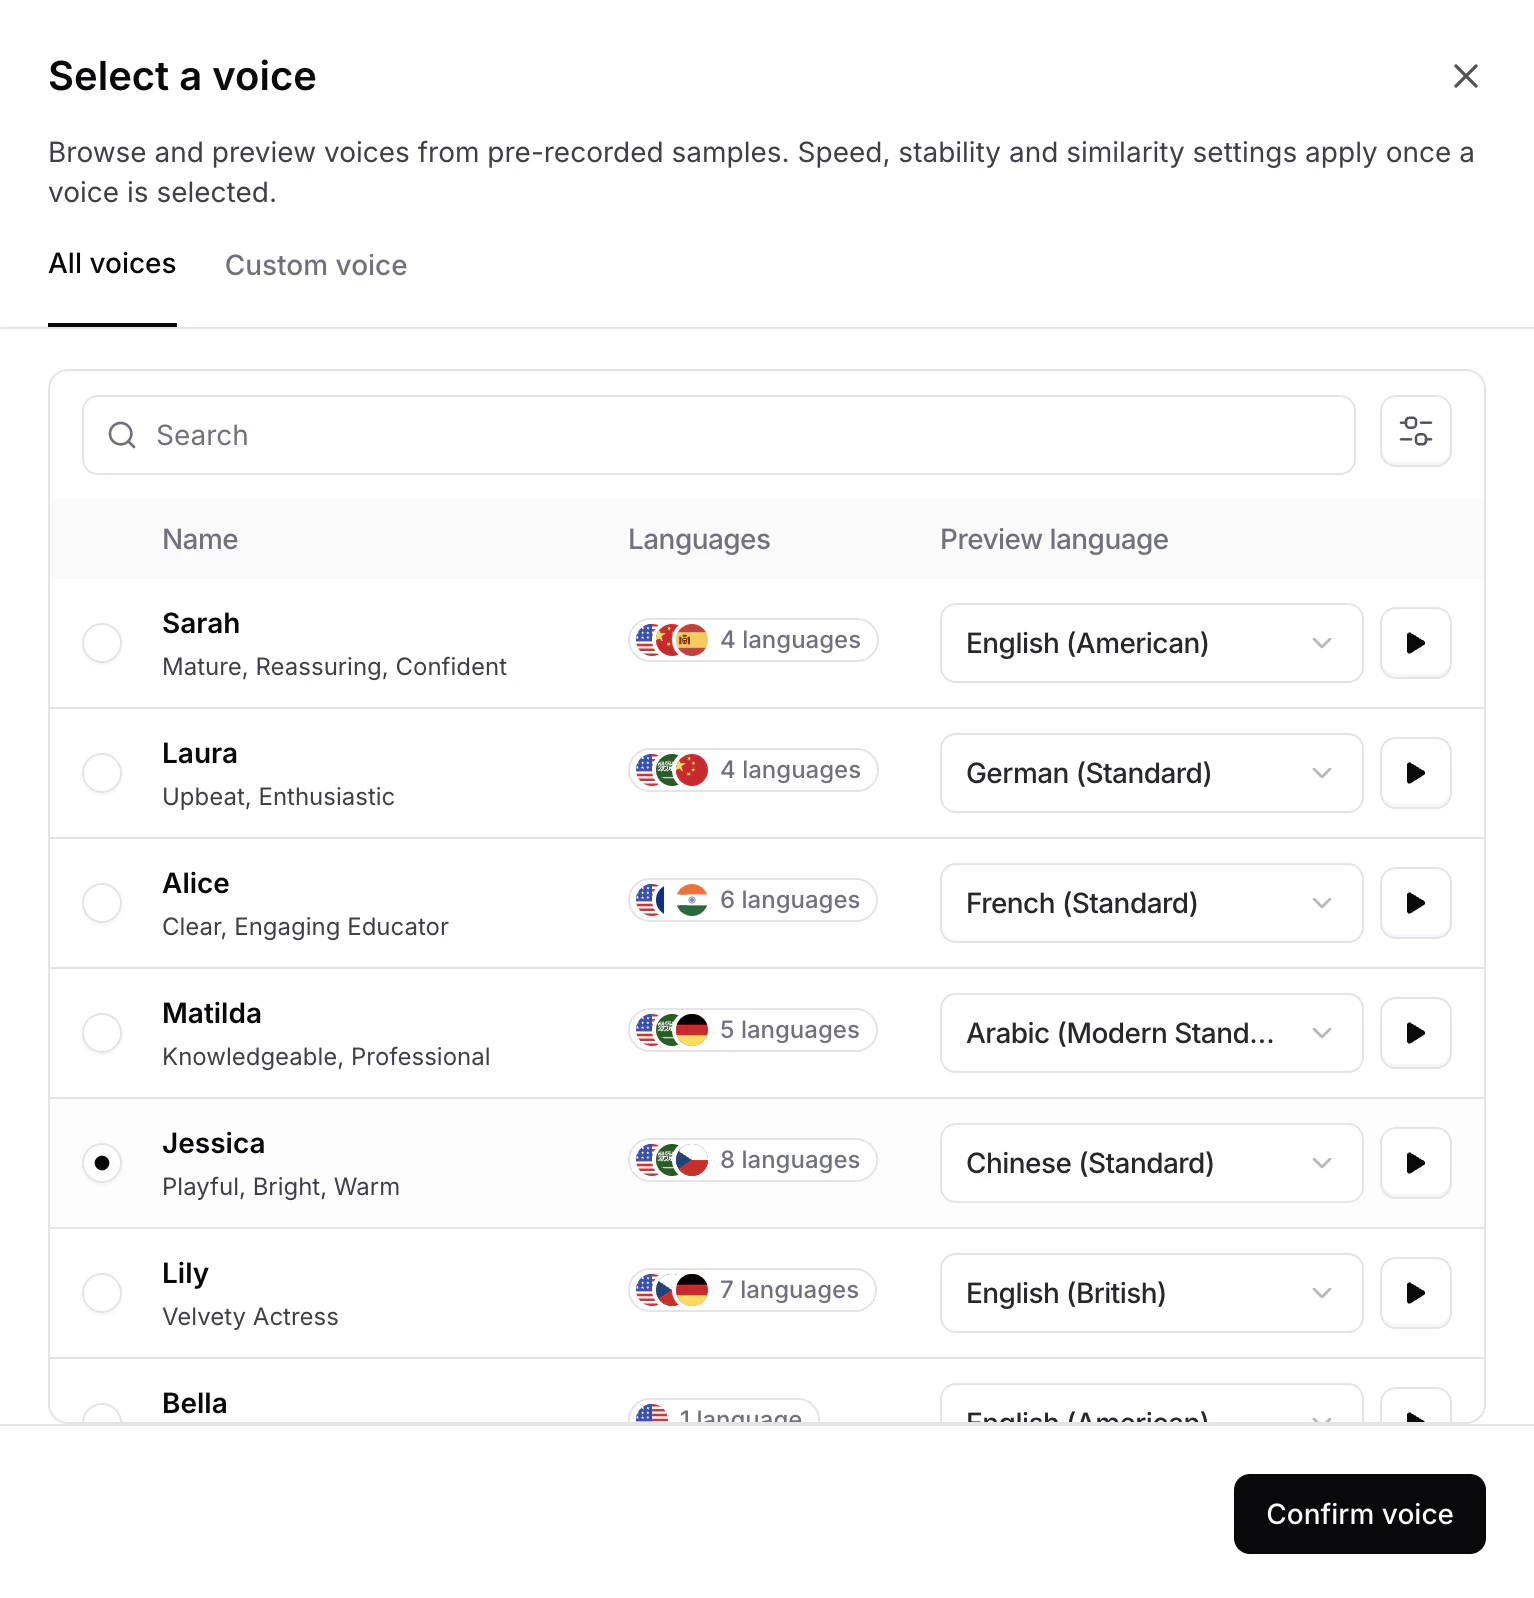 Under **All voices**, you can search by name and filter voices by language, accent, age, and gender. Each row shows the voice's supported languages and a **Preview language** dropdown, pick a language and click the play button to hear a sample of the voice speaking it. Select a voice and click **Confirm voice** to apply it to your AI agent.
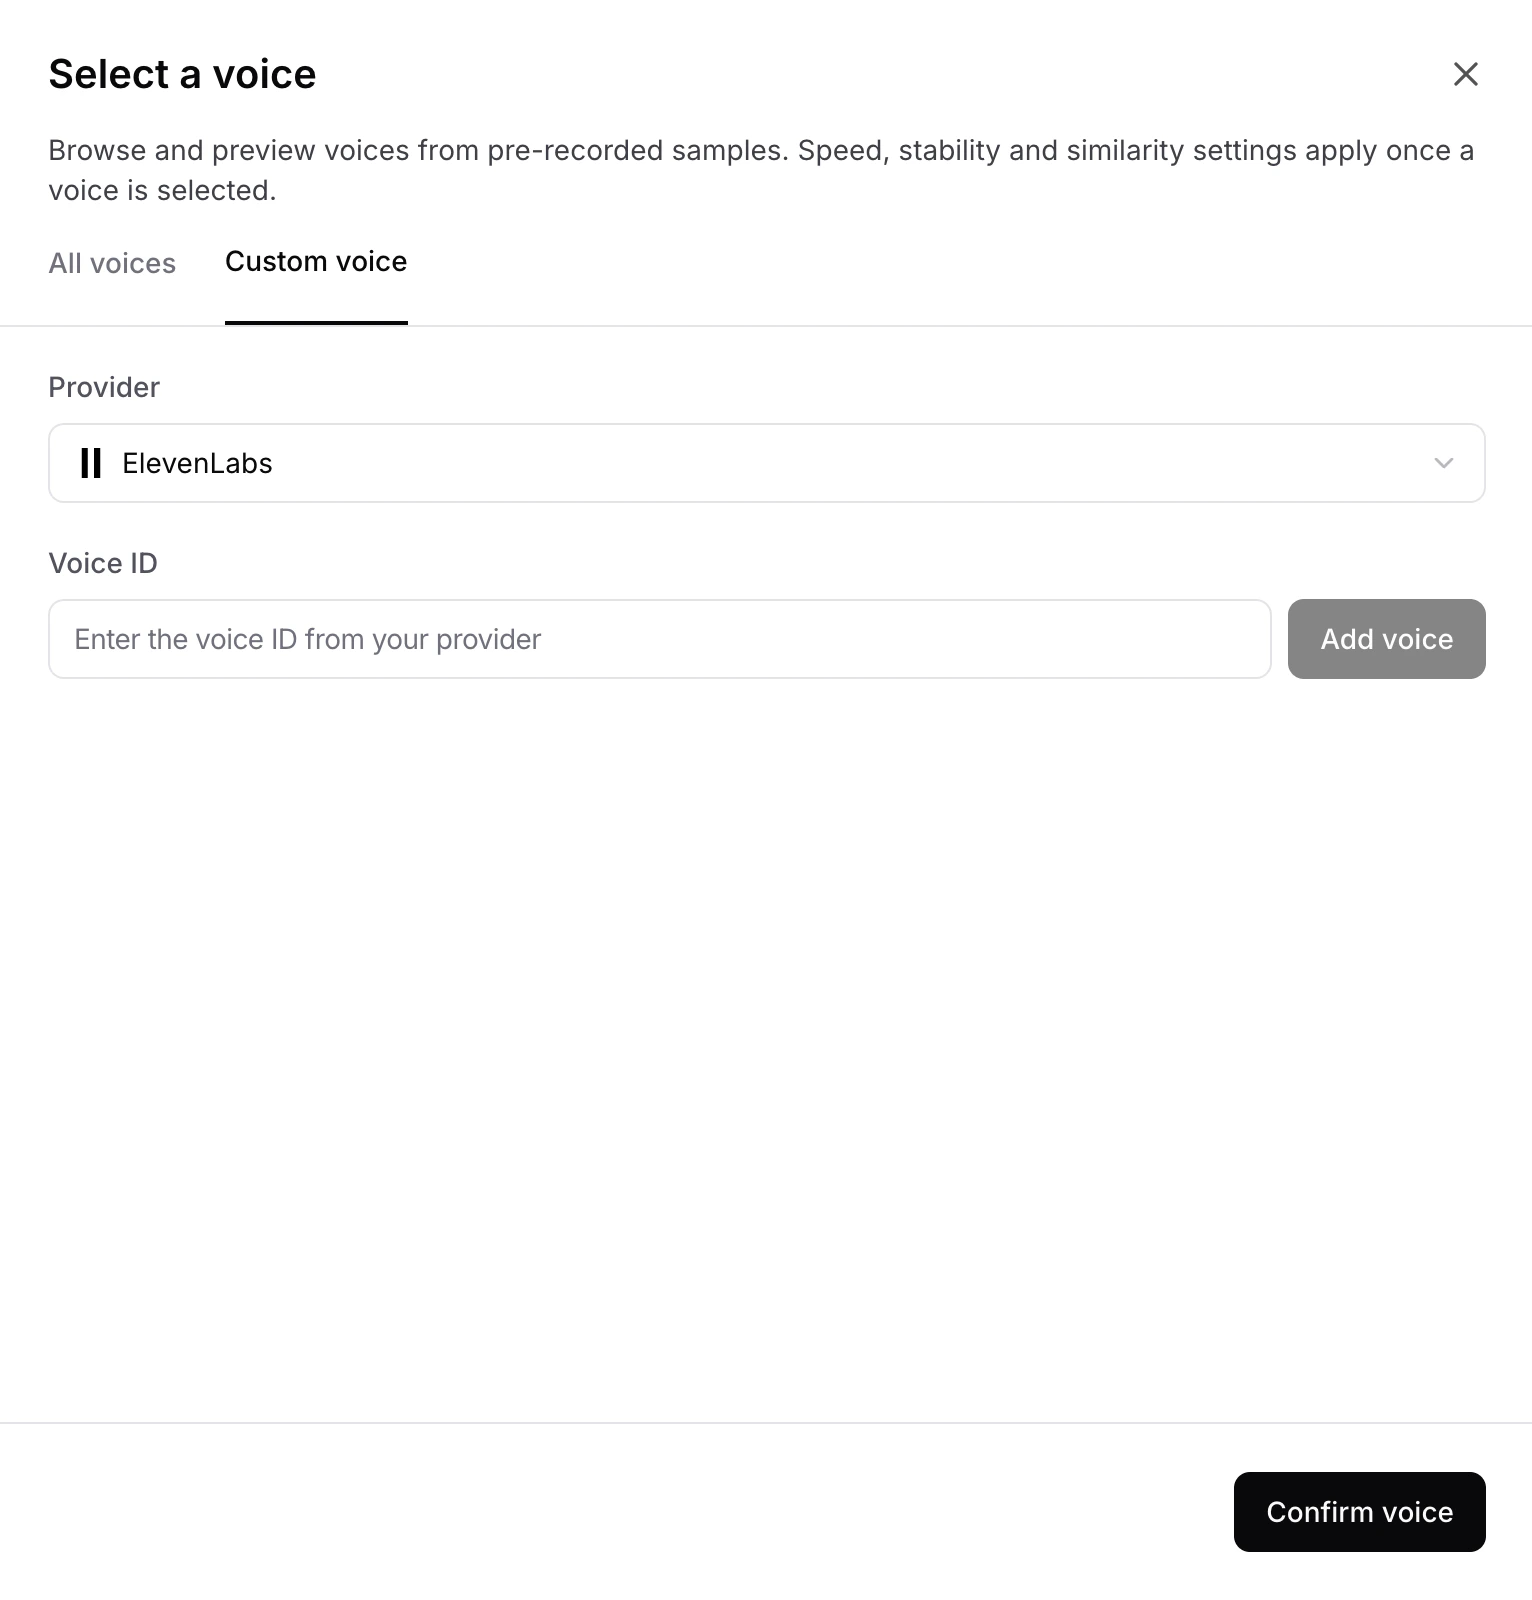 Under **Custom voice**, you can add a custom public voice that isn't in the pre-recorded list by referencing it directly from your provider:
* **Provider**: The voice provider that hosts the custom voice (for example, ElevenLabs).
* **Voice ID**: The identifier of the voice in the provider's account. Paste it in and click **Add voice** to make it available for selection, then click **Confirm voice** to apply it to your AI agent.
Custom voices only work with **publicly available shared voices** from your provider. Private voices in your provider account are not supported.
#### Using Dialects and Regional Accents
Some voices support custom dialects and accents through Voice Instructions.
Look for voices marked with the ✨ sparkle icon. These voices can adapt their accent, dialect, pacing, and speaking style based on the instructions you provide.
Under **Custom voice**, you can add a custom public voice that isn't in the pre-recorded list by referencing it directly from your provider:
* **Provider**: The voice provider that hosts the custom voice (for example, ElevenLabs).
* **Voice ID**: The identifier of the voice in the provider's account. Paste it in and click **Add voice** to make it available for selection, then click **Confirm voice** to apply it to your AI agent.
Custom voices only work with **publicly available shared voices** from your provider. Private voices in your provider account are not supported.
#### Using Dialects and Regional Accents
Some voices support custom dialects and accents through Voice Instructions.
Look for voices marked with the ✨ sparkle icon. These voices can adapt their accent, dialect, pacing, and speaking style based on the instructions you provide.
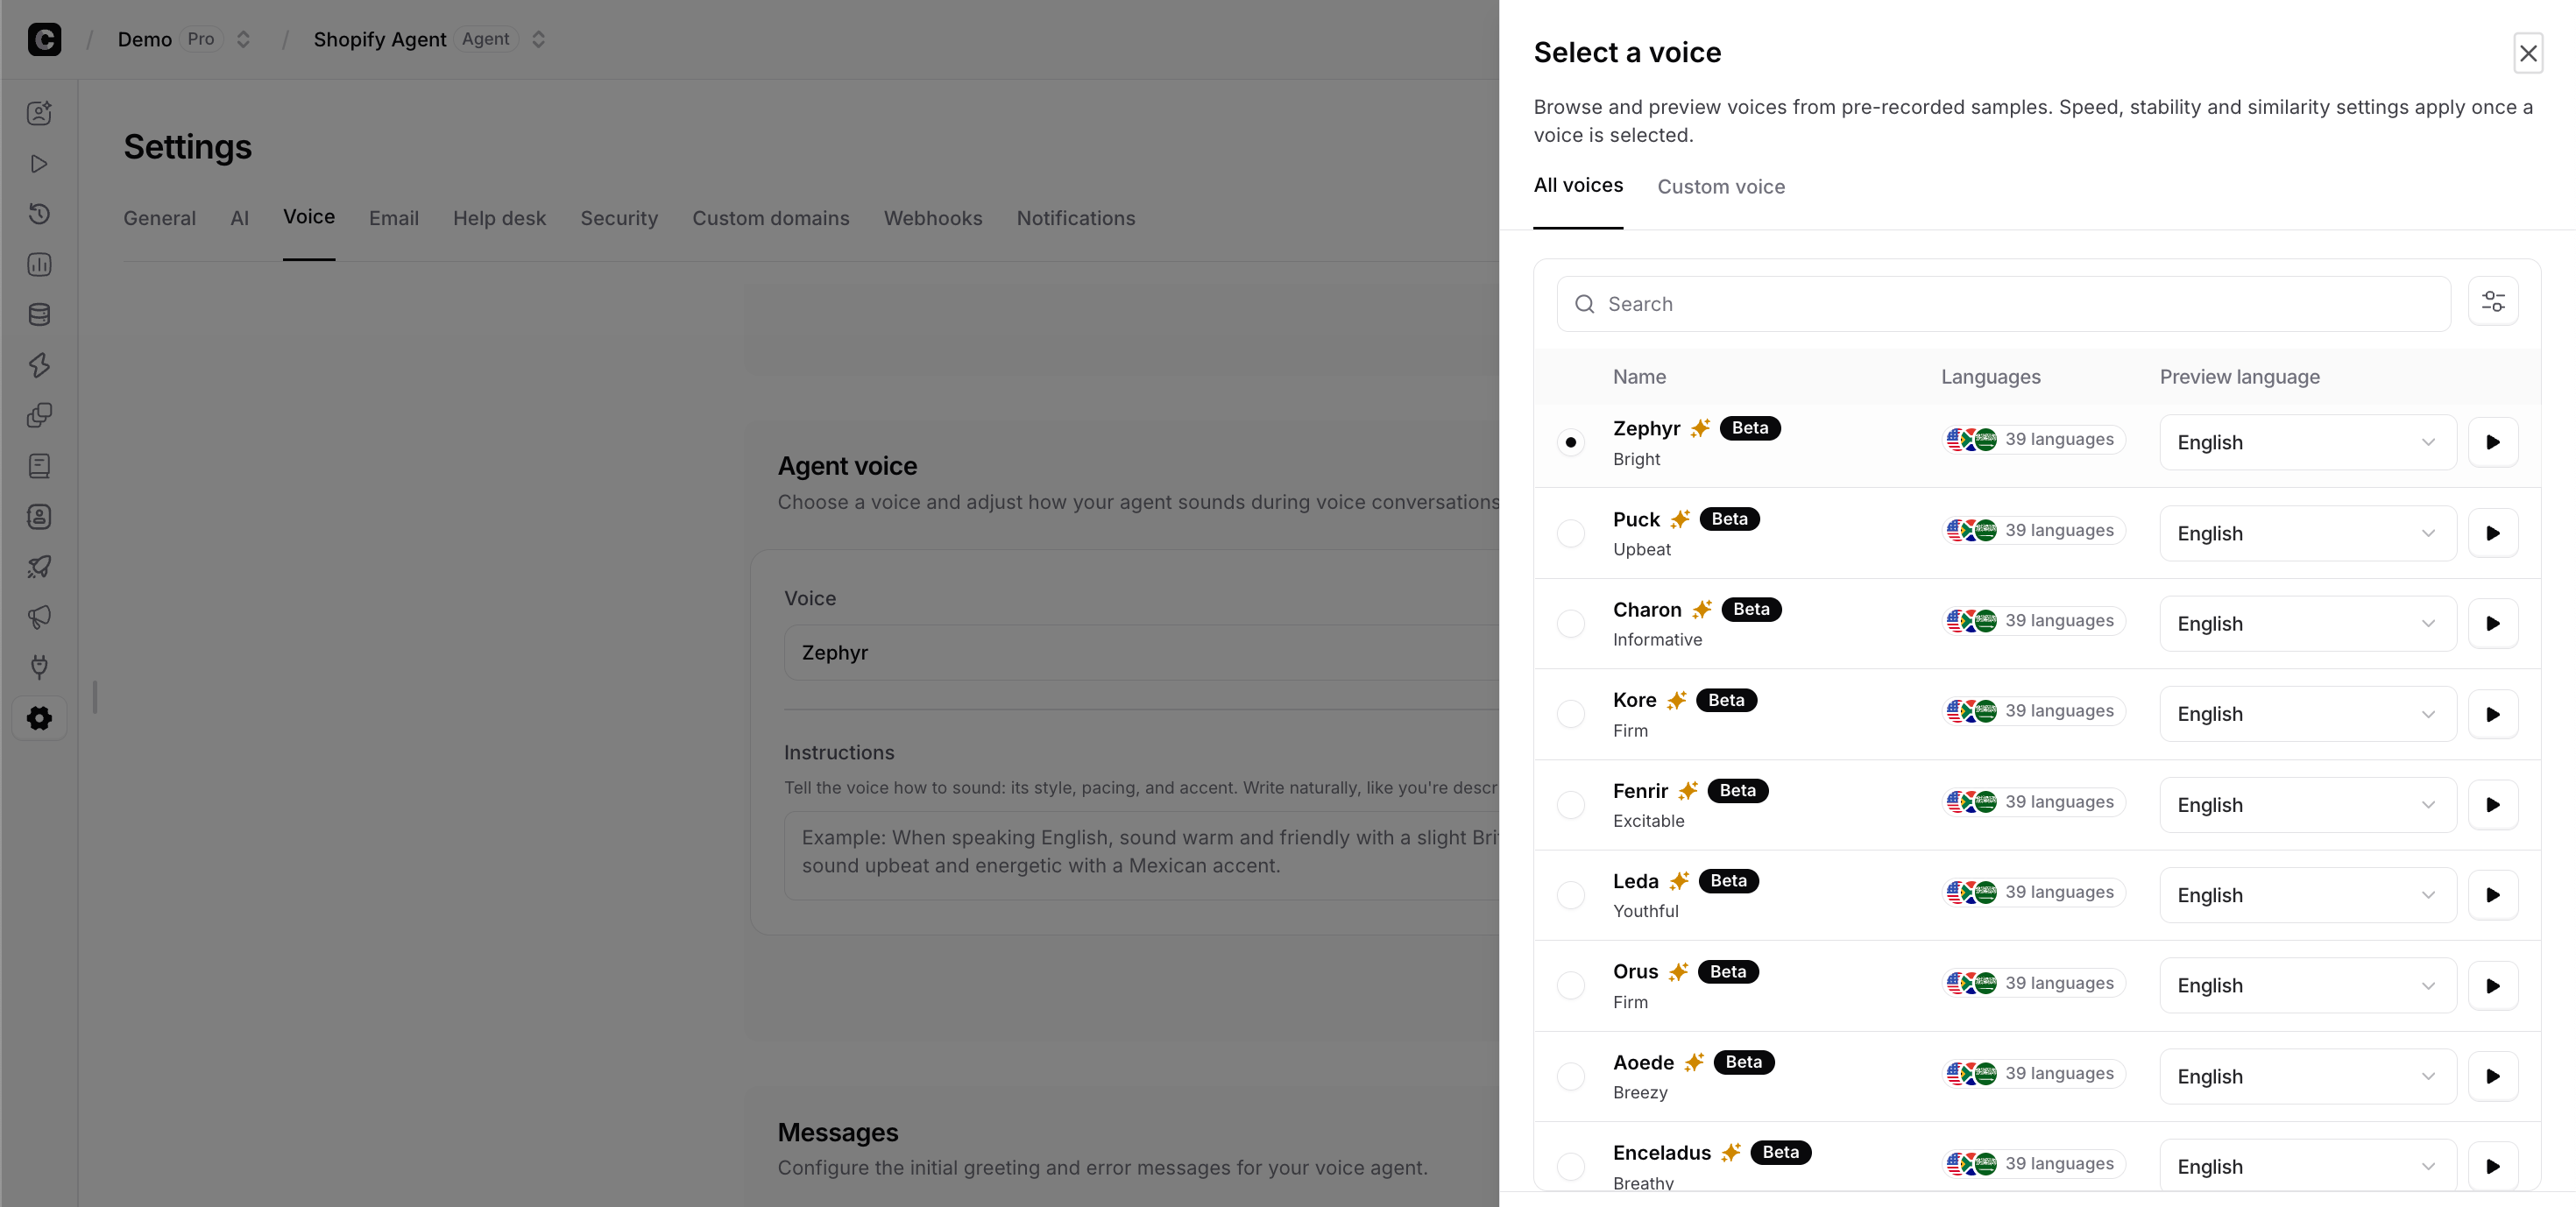 After selecting the desired voice, in the Instructions field, describe how you want the voice to sound.
**Recommended Settings**
* Transcriber: Soniox
* Voice LLM: GPT-5.6 Luna or Gemini 3.5 Flash
### Messages
Configure the initial greeting and error messages for your voice AI agent.
After selecting the desired voice, in the Instructions field, describe how you want the voice to sound.
**Recommended Settings**
* Transcriber: Soniox
* Voice LLM: GPT-5.6 Luna or Gemini 3.5 Flash
### Messages
Configure the initial greeting and error messages for your voice AI agent.
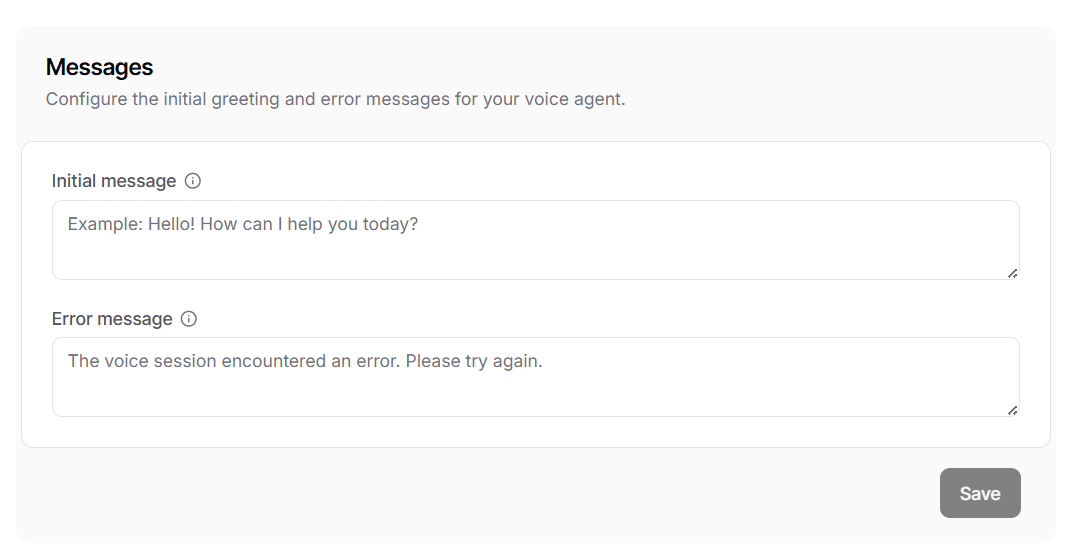 * **Initial message**: The first message the AI agent speaks when a voice session begins. If left empty, the voice AI agent will wait for the user to speak first.
* **Error message**: The message played if the voice session encounters an error. If left empty, the default error message "The voice session encountered an error. Please try again." will be used.
### Session Configurations
Control how the AI agent handles interruptions, silence, and text input during active voice calls.
* **Initial message**: The first message the AI agent speaks when a voice session begins. If left empty, the voice AI agent will wait for the user to speak first.
* **Error message**: The message played if the voice session encounters an error. If left empty, the default error message "The voice session encountered an error. Please try again." will be used.
### Session Configurations
Control how the AI agent handles interruptions, silence, and text input during active voice calls.
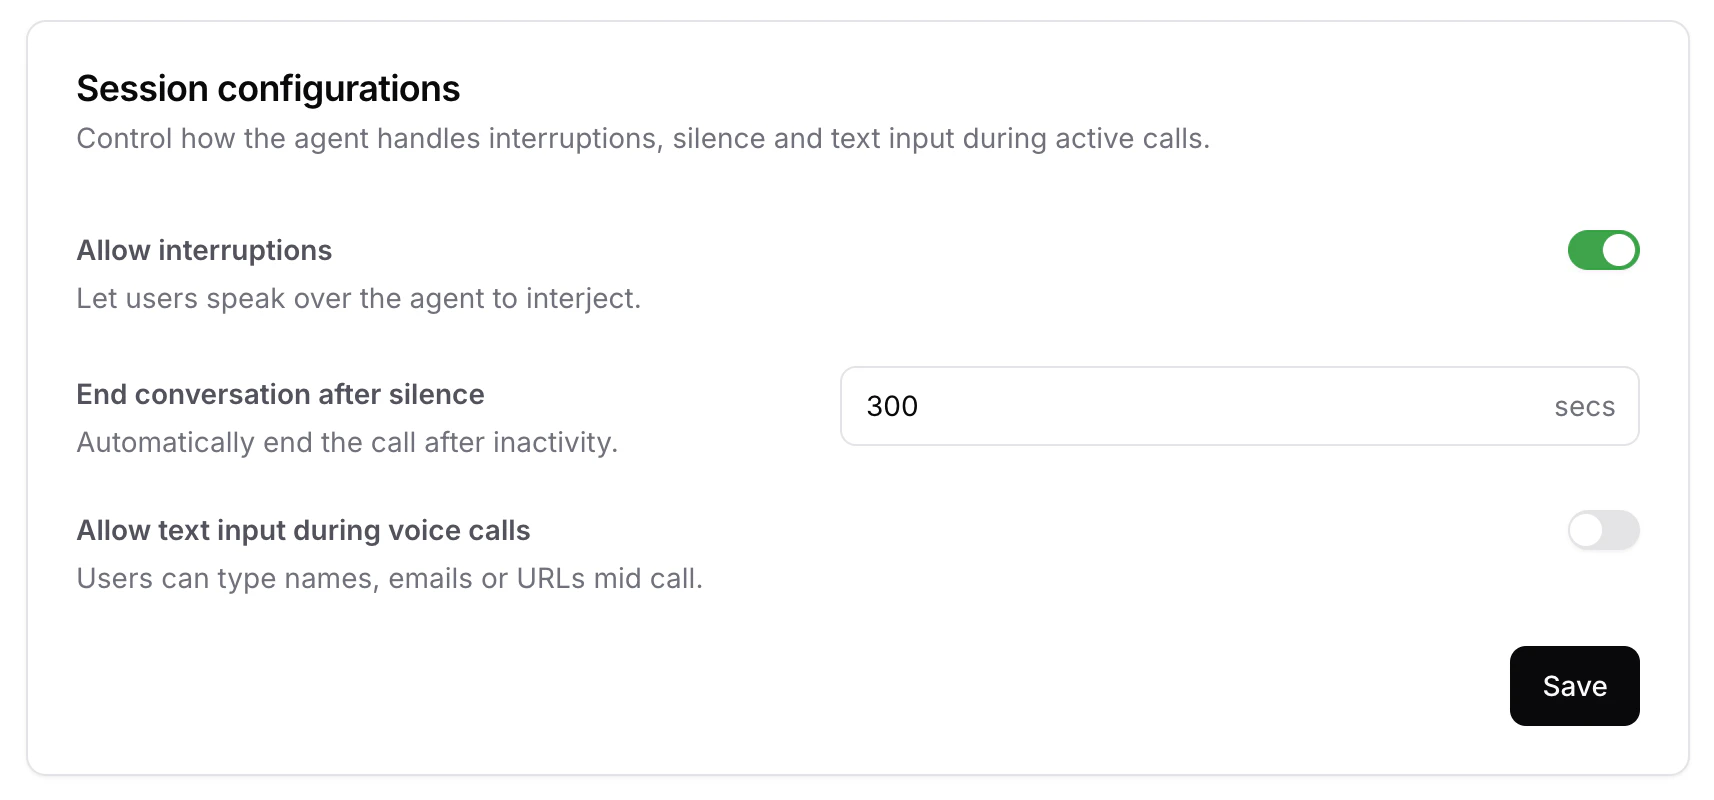 * **Allow interruptions**: When enabled, users can speak over the AI agent to interject mid-response. Disable this if you'd prefer the AI agent to always finish speaking before listening for the user's next turn. Defaults to **enabled**.
* **End conversation after silence**: The number of seconds of inactivity after which the call is automatically ended. Useful for closing out abandoned sessions and avoiding unnecessary credit usage. Defaults to **300 seconds**.
* **Allow text input during voice calls**: When enabled, users can type messages mid-call alongside speaking. Helpful for entering details that are easier to type than to say, such as names, emails, or URLs. Defaults to **disabled**.
### Recordings
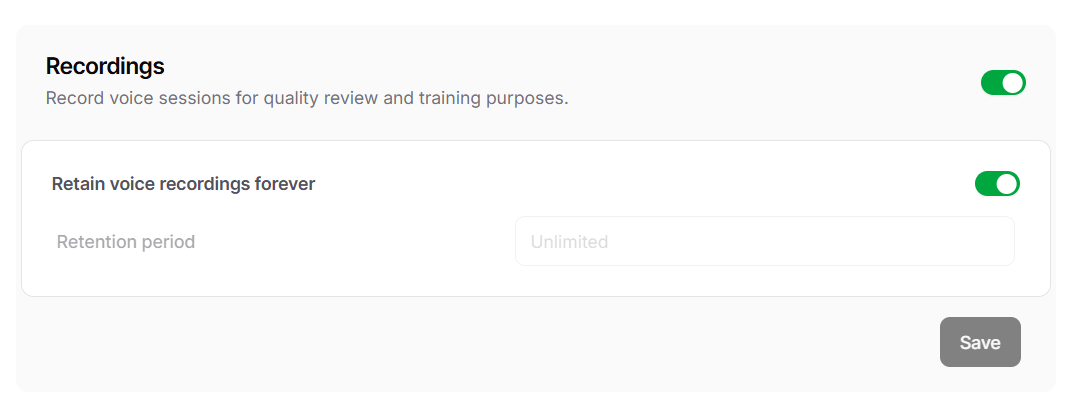
Enable recording of voice sessions for quality review and training purposes. You can also toggle **Retain voice recordings forever** to keep recordings indefinitely, or set a custom retention period.
* **Allow interruptions**: When enabled, users can speak over the AI agent to interject mid-response. Disable this if you'd prefer the AI agent to always finish speaking before listening for the user's next turn. Defaults to **enabled**.
* **End conversation after silence**: The number of seconds of inactivity after which the call is automatically ended. Useful for closing out abandoned sessions and avoiding unnecessary credit usage. Defaults to **300 seconds**.
* **Allow text input during voice calls**: When enabled, users can type messages mid-call alongside speaking. Helpful for entering details that are easier to type than to say, such as names, emails, or URLs. Defaults to **disabled**.
### Recordings
Enable recording of voice sessions for quality review and training purposes. You can also toggle **Retain voice recordings forever** to keep recordings indefinitely, or set a custom retention period.
 ### Limits
Control session volume and duration to manage costs and performance.
### Limits
Control session volume and duration to manage costs and performance.
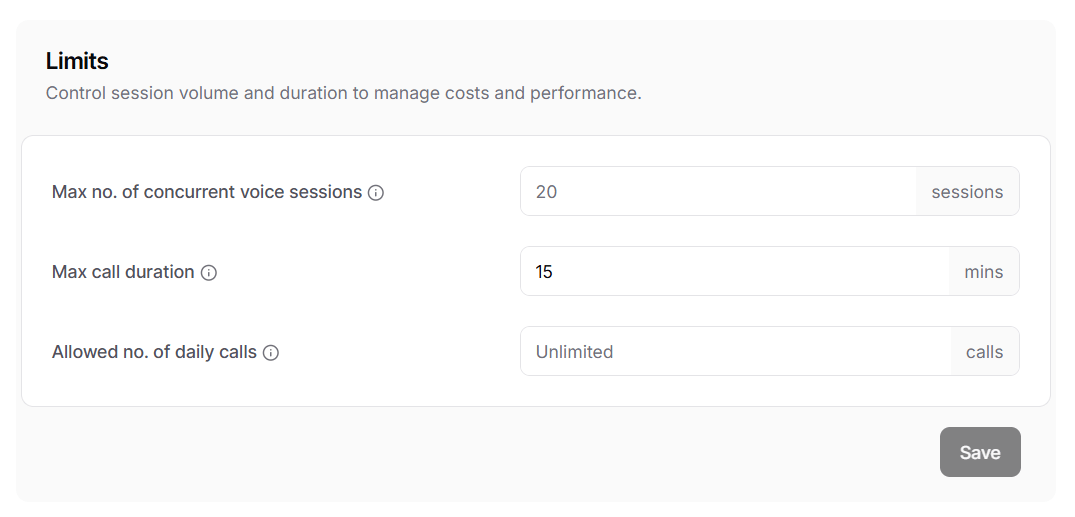 * **Max no. of concurrent voice sessions**: The maximum number of voice sessions that can run at the same time. If left empty, your plan's default limit will apply.
* **Max call duration**: The maximum length of a single voice call in minutes. The default is 15 minutes.
* **Allowed no. of daily calls**: The total number of voice calls allowed each day. If left empty, your plan's default limit will apply.
Your subscription plan enforces account-level limits for daily sessions and concurrent sessions across all your AI agents. You can set agent-specific limits here to further restrict usage for individual AI agents.
## Email
The **Email** tab has two cards:
* **Agent email address** - your AI agent's dedicated `agent@….chatbase-mail.com` address for receiving and replying to customer emails, with a copy button next to it.
* **Email configuration** - the addresses on your own domains that send and receive email. Click **New email address** to add one. Existing addresses are listed under their domain, with the domain's authentication status, each address's **Automatic forwarding** status, and edit and delete icons per row.
See [Email settings](/docs/user-guides/chatbot/email-settings) for the full setup walkthrough.
## Helpdesk
The **Helpdesk** tab has its own sub-navigation. Each entry opens the settings for one part of your helpdesk:
* **Email** - the address that receives tickets and sends replies, and who is alerted about delivery failures. See [Email sub-tab](#email-sub-tab) below.
* **Members** - every AI agent with their teams and availability status. See [Assignment algorithm](/docs/user-guides/chatbot/help-desk/assignment-algorithm#agent-availability).
* **Teams & assignment** - create teams and set each team's auto-assignment rules. See [Teams](/docs/user-guides/chatbot/help-desk/teams).
* **Scheduling** - shifts, AI agent schedules, and time off. See [Scheduling](/docs/user-guides/chatbot/help-desk/scheduling).
* **Triggers** - automation rules that run when tickets are created or updated. See [Triggers](/docs/user-guides/chatbot/help-desk/triggers).
* **Ticket statuses** - add your own statuses alongside the built-in ones. See [Helpdesk overview](/docs/user-guides/chatbot/help-desk/help-desk-overview).
* **Tags** - define the labels your team applies to tickets. See [Tags](/docs/user-guides/chatbot/help-desk/tags).
* **Translation** - detect and translate customer messages automatically. See [Translation](/docs/user-guides/chatbot/help-desk/translation).
* **AI draft replies** - generate suggested responses that AI agents review before sending. See [AI draft replies](/docs/user-guides/chatbot/help-desk/ai-draft-replies).
### Email sub-tab
The **Email** sub-tab opens on the **Configuration** card, which controls which addresses receive and create support tickets:
* **Helpdesk email address** - the address tickets arrive at and replies are sent from. Until you add your own domain, this is the auto-generated Chatbase address (`agent@….chatbase-mail.com`), shown with a copy button next to it. Click **Configure email settings** to add and verify your own domain so replies come from your email instead. Once you have verified addresses, this card lets you pick one or more of them as helpdesk inboxes. See [Email settings](/docs/user-guides/chatbot/help-desk/email-settings).
* **Deliverability alert contact** - the team member who is notified when outgoing helpdesk emails bounce or fail to deliver. Defaults to **None**, in which case nobody is alerted.
Click **Save** to apply your changes. Below the Configuration card are three more cards, each with its own **Save** button:
* **Display name** - the name recipients see in the "From" field: the responding support associate's name, or a custom name. See [Display name](/docs/user-guides/chatbot/help-desk/email-settings#display-name).
* **Signature** - a rich-text signature appended to every email your helpdesk sends. See [Email signature](/docs/user-guides/chatbot/help-desk/email-settings#email-signature).
* **Preview** - a sample email showing how the sender name, address, and footer will look to recipients. See [Preview](/docs/user-guides/chatbot/help-desk/email-settings#preview).
## Custom domains
White label the embed script so it loads from a domain you own instead of a Chatbase URL. See [Custom domains](/docs/developer-guides/custom-domains).
## Webhooks
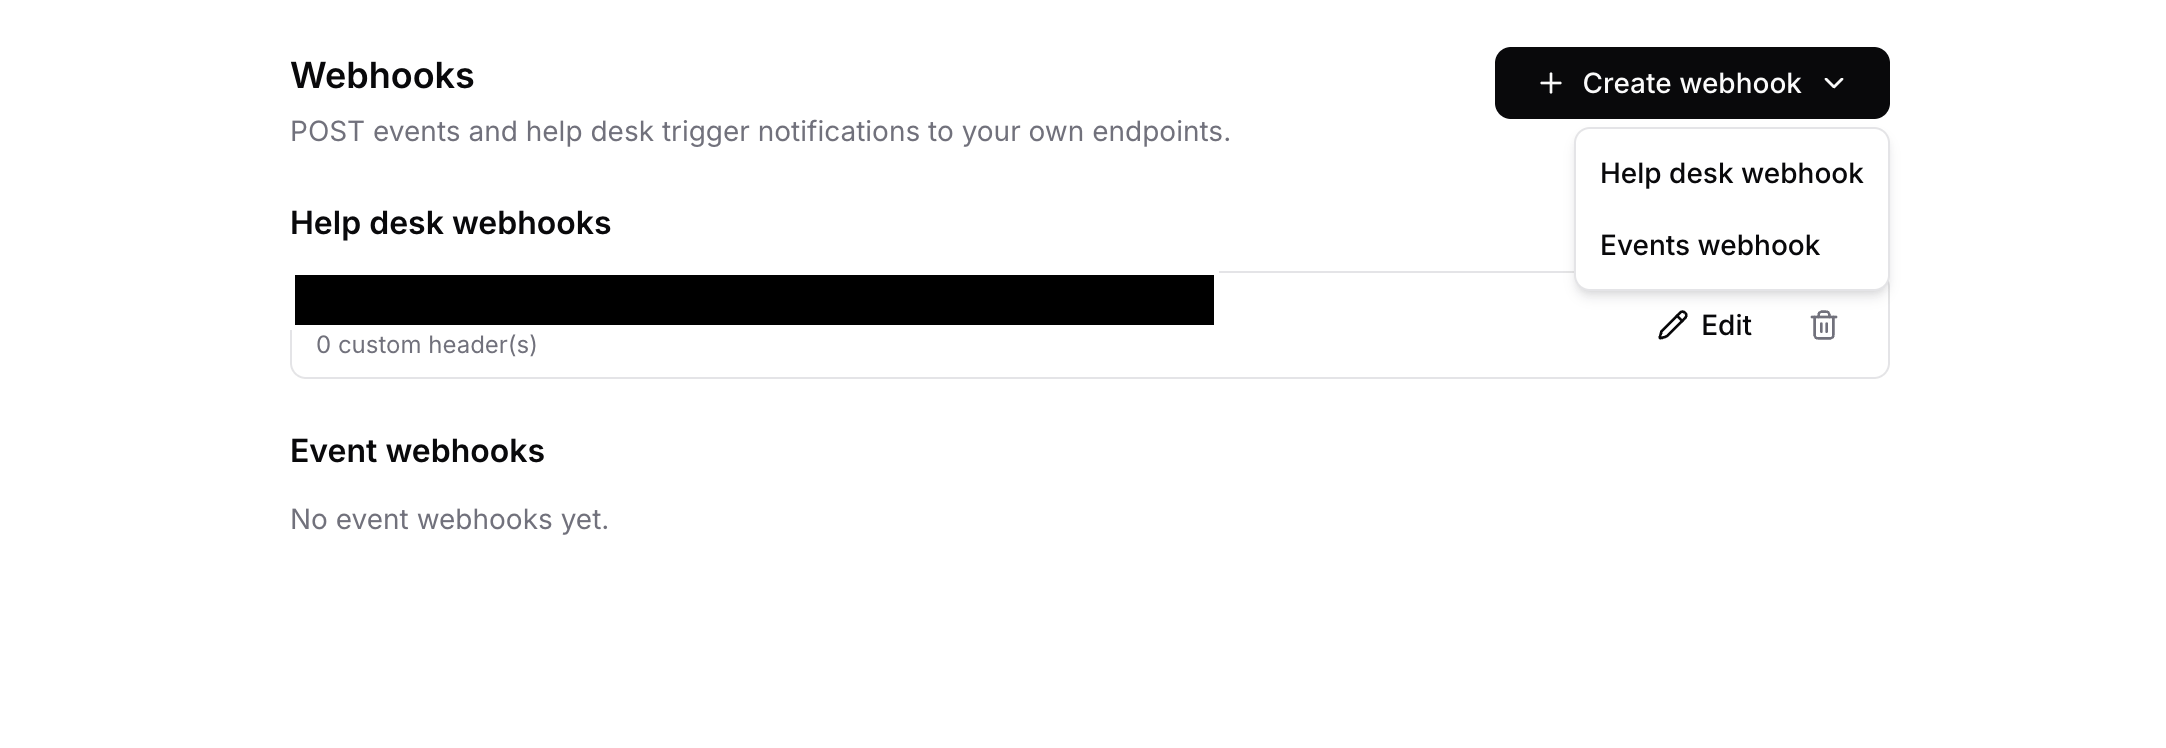
The **Webhooks** tab POSTs AI agent events and helpdesk trigger notifications to your own endpoints. It has two cards:
### Event webhooks
Fires a POST when a subscribed event occurs. Today the available events are [custom form](/docs/developer-guides/client-side-custom-forms) submissions, so the **Events** list is empty until you create and enable at least one custom form action.
1. Under **Events**, tick the form submissions you want to listen for.
2. Enter the URL that receives them in **Endpoint**.
3. Click **Create webhook**.
Each webhook you create is listed below the form with its endpoint and subscribed events. Use the **⋯** menu on a row to edit or delete it.
When a user submits a subscribed form, Chatbase sends a POST request containing the form data to your endpoint. Use it to integrate with third-party services, store submissions in your own systems, or trigger custom business logic. See [Webhooks integration](/docs/developer-guides/client-side-custom-forms#webhooks-integration) for the payload.
Webhooks for collected leads and collected data are not configured here. Open the action itself and use its **Destinations** section. See [Collect Leads](/docs/user-guides/chatbot/actions/collect-leads#webhooks).
### Helpdesk webhooks
Reusable connections that helpdesk [Triggers](/docs/user-guides/chatbot/help-desk/triggers#send-webhook) POST to when their conditions match. Click **Create webhook** on the card and set the endpoint URL, optional custom headers, and a request body template (insert ticket fields with `{{ticket.*}}` placeholders). When you create one, Chatbase shows a signing **secret** once - every delivery carries an `X-Chatbase-Signature` header your endpoint can verify with it.
Existing connections are listed on the card, where you can edit or delete them. To actually send a webhook, pick the connection in a trigger's **Send webhook** action.
* **Max no. of concurrent voice sessions**: The maximum number of voice sessions that can run at the same time. If left empty, your plan's default limit will apply.
* **Max call duration**: The maximum length of a single voice call in minutes. The default is 15 minutes.
* **Allowed no. of daily calls**: The total number of voice calls allowed each day. If left empty, your plan's default limit will apply.
Your subscription plan enforces account-level limits for daily sessions and concurrent sessions across all your AI agents. You can set agent-specific limits here to further restrict usage for individual AI agents.
## Email
The **Email** tab has two cards:
* **Agent email address** - your AI agent's dedicated `agent@….chatbase-mail.com` address for receiving and replying to customer emails, with a copy button next to it.
* **Email configuration** - the addresses on your own domains that send and receive email. Click **New email address** to add one. Existing addresses are listed under their domain, with the domain's authentication status, each address's **Automatic forwarding** status, and edit and delete icons per row.
See [Email settings](/docs/user-guides/chatbot/email-settings) for the full setup walkthrough.
## Helpdesk
The **Helpdesk** tab has its own sub-navigation. Each entry opens the settings for one part of your helpdesk:
* **Email** - the address that receives tickets and sends replies, and who is alerted about delivery failures. See [Email sub-tab](#email-sub-tab) below.
* **Members** - every AI agent with their teams and availability status. See [Assignment algorithm](/docs/user-guides/chatbot/help-desk/assignment-algorithm#agent-availability).
* **Teams & assignment** - create teams and set each team's auto-assignment rules. See [Teams](/docs/user-guides/chatbot/help-desk/teams).
* **Scheduling** - shifts, AI agent schedules, and time off. See [Scheduling](/docs/user-guides/chatbot/help-desk/scheduling).
* **Triggers** - automation rules that run when tickets are created or updated. See [Triggers](/docs/user-guides/chatbot/help-desk/triggers).
* **Ticket statuses** - add your own statuses alongside the built-in ones. See [Helpdesk overview](/docs/user-guides/chatbot/help-desk/help-desk-overview).
* **Tags** - define the labels your team applies to tickets. See [Tags](/docs/user-guides/chatbot/help-desk/tags).
* **Translation** - detect and translate customer messages automatically. See [Translation](/docs/user-guides/chatbot/help-desk/translation).
* **AI draft replies** - generate suggested responses that AI agents review before sending. See [AI draft replies](/docs/user-guides/chatbot/help-desk/ai-draft-replies).
### Email sub-tab
The **Email** sub-tab opens on the **Configuration** card, which controls which addresses receive and create support tickets:
* **Helpdesk email address** - the address tickets arrive at and replies are sent from. Until you add your own domain, this is the auto-generated Chatbase address (`agent@….chatbase-mail.com`), shown with a copy button next to it. Click **Configure email settings** to add and verify your own domain so replies come from your email instead. Once you have verified addresses, this card lets you pick one or more of them as helpdesk inboxes. See [Email settings](/docs/user-guides/chatbot/help-desk/email-settings).
* **Deliverability alert contact** - the team member who is notified when outgoing helpdesk emails bounce or fail to deliver. Defaults to **None**, in which case nobody is alerted.
Click **Save** to apply your changes. Below the Configuration card are three more cards, each with its own **Save** button:
* **Display name** - the name recipients see in the "From" field: the responding support associate's name, or a custom name. See [Display name](/docs/user-guides/chatbot/help-desk/email-settings#display-name).
* **Signature** - a rich-text signature appended to every email your helpdesk sends. See [Email signature](/docs/user-guides/chatbot/help-desk/email-settings#email-signature).
* **Preview** - a sample email showing how the sender name, address, and footer will look to recipients. See [Preview](/docs/user-guides/chatbot/help-desk/email-settings#preview).
## Custom domains
White label the embed script so it loads from a domain you own instead of a Chatbase URL. See [Custom domains](/docs/developer-guides/custom-domains).
## Webhooks
The **Webhooks** tab POSTs AI agent events and helpdesk trigger notifications to your own endpoints. It has two cards:
### Event webhooks
Fires a POST when a subscribed event occurs. Today the available events are [custom form](/docs/developer-guides/client-side-custom-forms) submissions, so the **Events** list is empty until you create and enable at least one custom form action.
1. Under **Events**, tick the form submissions you want to listen for.
2. Enter the URL that receives them in **Endpoint**.
3. Click **Create webhook**.
Each webhook you create is listed below the form with its endpoint and subscribed events. Use the **⋯** menu on a row to edit or delete it.
When a user submits a subscribed form, Chatbase sends a POST request containing the form data to your endpoint. Use it to integrate with third-party services, store submissions in your own systems, or trigger custom business logic. See [Webhooks integration](/docs/developer-guides/client-side-custom-forms#webhooks-integration) for the payload.
Webhooks for collected leads and collected data are not configured here. Open the action itself and use its **Destinations** section. See [Collect Leads](/docs/user-guides/chatbot/actions/collect-leads#webhooks).
### Helpdesk webhooks
Reusable connections that helpdesk [Triggers](/docs/user-guides/chatbot/help-desk/triggers#send-webhook) POST to when their conditions match. Click **Create webhook** on the card and set the endpoint URL, optional custom headers, and a request body template (insert ticket fields with `{{ticket.*}}` placeholders). When you create one, Chatbase shows a signing **secret** once - every delivery carries an `X-Chatbase-Signature` header your endpoint can verify with it.
Existing connections are listed on the card, where you can edit or delete them. To actually send a webhook, pick the connection in a trigger's **Send webhook** action.
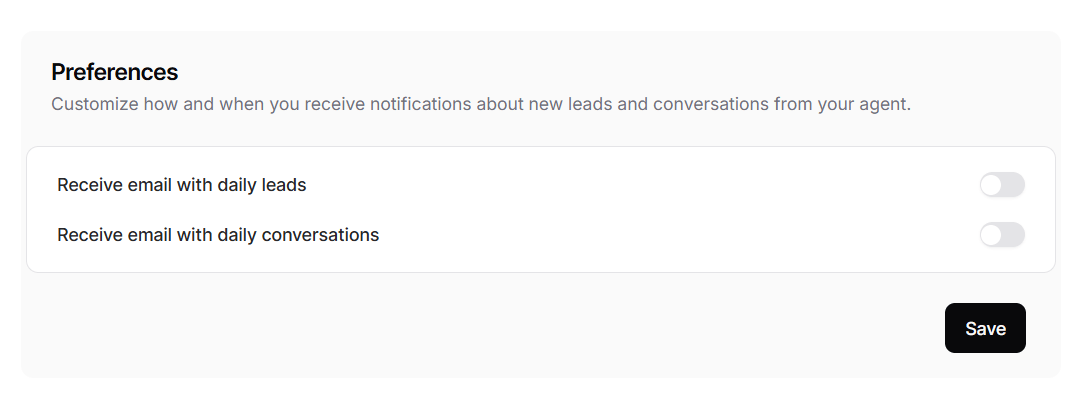
 ## Notifications
From this page, you can configure the notifications you get from the AI agent. You can either opt for getting one email per day that contains all the leads submitted for that day. You can also opt for another email that sends you a daily email with the conversations done on that day.
You can add multiple email addresses to receive these emails if needed.
## Notifications
From this page, you can configure the notifications you get from the AI agent. You can either opt for getting one email per day that contains all the leads submitted for that day. You can also opt for another email that sends you a daily email with the conversations done on that day.
You can add multiple email addresses to receive these emails if needed.