> ## Documentation Index
> Fetch the complete documentation index at: https://chatbase.co/docs/llms.txt
> Use this file to discover all available pages before exploring further.
# Helpdesk Overview
> Manage customer support tickets from a centralized dashboard.
## Introduction
The Helpdesk is a centralized support dashboard where your team can manage customer tickets across every channel - bubble, email, WhatsApp, and API - in one place. Agents can triage, assign, and resolve tickets without switching between tools, keeping response times low and customer satisfaction high.
 ### Sidebar
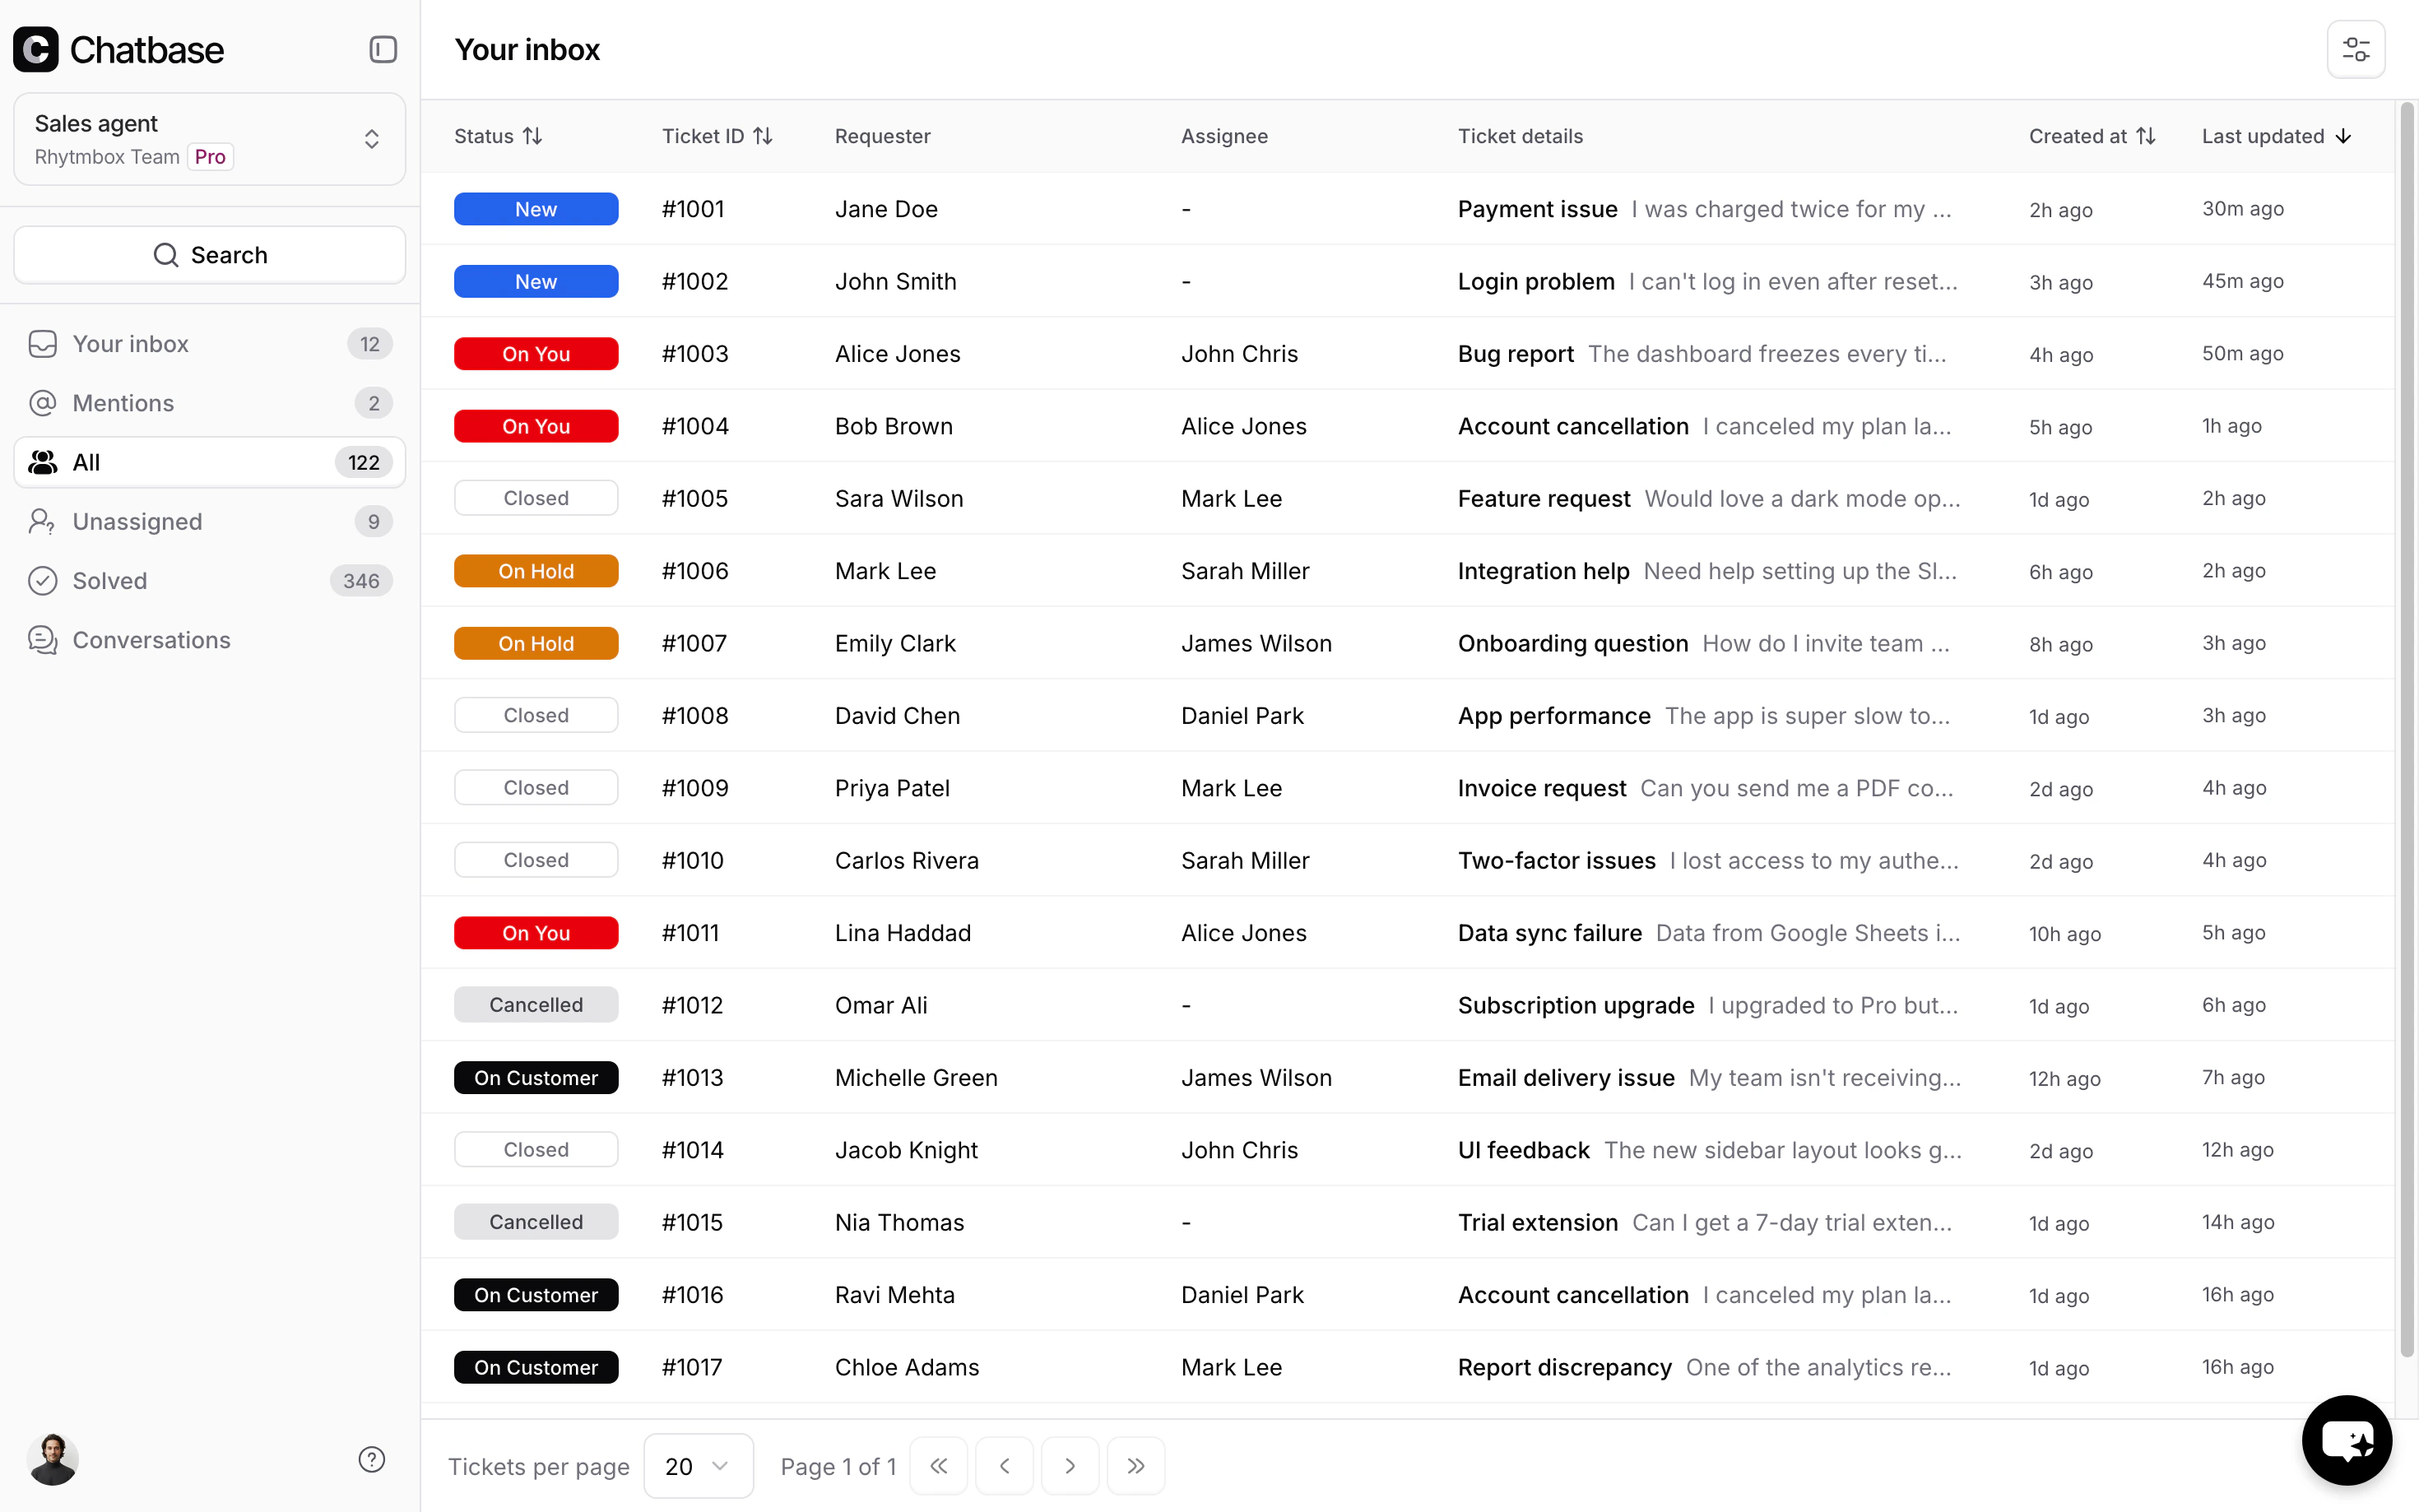
The sidebar is your primary navigation. It can be collapsed into icon-only mode for more screen space.
* **My inbox** - tickets assigned to you
* **Mentions** - tickets where you have been @mentioned in an internal note. The badge count shows how many unread mentions you have.
* **All** - every ticket across agents that is not Closed or Cancelled
* **Unassigned** - tickets with no agent assigned
* **Solved** - tickets that are Closed or Cancelled
* **Conversations** - all AI agent conversations, including those that have not been escalated to tickets
Each view displays a badge count when there are items requiring attention.
Below the built-in views, your saved views appear in two groups, **Shared views** and **My views**. Each group shows the first 5 views, with a **Show more** control to expand the rest. A search box filters views by name, and a **New view** button creates one. See [Saved views](/docs/user-guides/chatbot/help-desk/saved-views) for details.
### User Profile
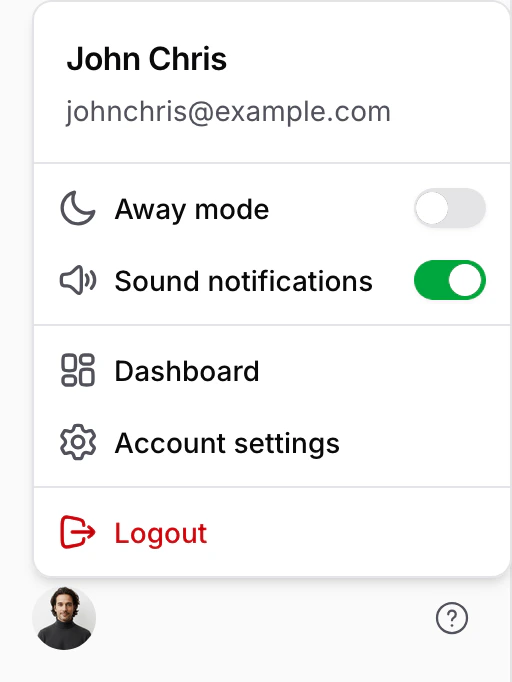
Click your avatar at the bottom of the sidebar to open the profile menu:
* **Away mode** - toggle to mark yourself as unavailable for auto-assignment. This only appears if an admin has turned on "Allow teammates to be able to change their availability status" on the Members page. Agents on a shift schedule don't see it, since their shift sets their availability
* **Sound notifications** - toggle notification sounds on or off
* **Dashboard** - navigate to the main Chatbase dashboard
* **Account settings** - manage your account
* **Logout** - sign out of the helpdesk
### Sidebar
The sidebar is your primary navigation. It can be collapsed into icon-only mode for more screen space.
* **My inbox** - tickets assigned to you
* **Mentions** - tickets where you have been @mentioned in an internal note. The badge count shows how many unread mentions you have.
* **All** - every ticket across agents that is not Closed or Cancelled
* **Unassigned** - tickets with no agent assigned
* **Solved** - tickets that are Closed or Cancelled
* **Conversations** - all AI agent conversations, including those that have not been escalated to tickets
Each view displays a badge count when there are items requiring attention.
Below the built-in views, your saved views appear in two groups, **Shared views** and **My views**. Each group shows the first 5 views, with a **Show more** control to expand the rest. A search box filters views by name, and a **New view** button creates one. See [Saved views](/docs/user-guides/chatbot/help-desk/saved-views) for details.
### User Profile
Click your avatar at the bottom of the sidebar to open the profile menu:
* **Away mode** - toggle to mark yourself as unavailable for auto-assignment. This only appears if an admin has turned on "Allow teammates to be able to change their availability status" on the Members page. Agents on a shift schedule don't see it, since their shift sets their availability
* **Sound notifications** - toggle notification sounds on or off
* **Dashboard** - navigate to the main Chatbase dashboard
* **Account settings** - manage your account
* **Logout** - sign out of the helpdesk
 ### Notifications
New activity on any ticket assigned to you triggers two notifications, wherever you are in the helpdesk:
* **Sound** - a notification sound plays (if sound notifications are enabled in your profile menu)
* **Tab badge** - the browser tab title updates to show the unread count, e.g. `(2) Helpdesk`
This works even when the tab is not in focus.
### Search
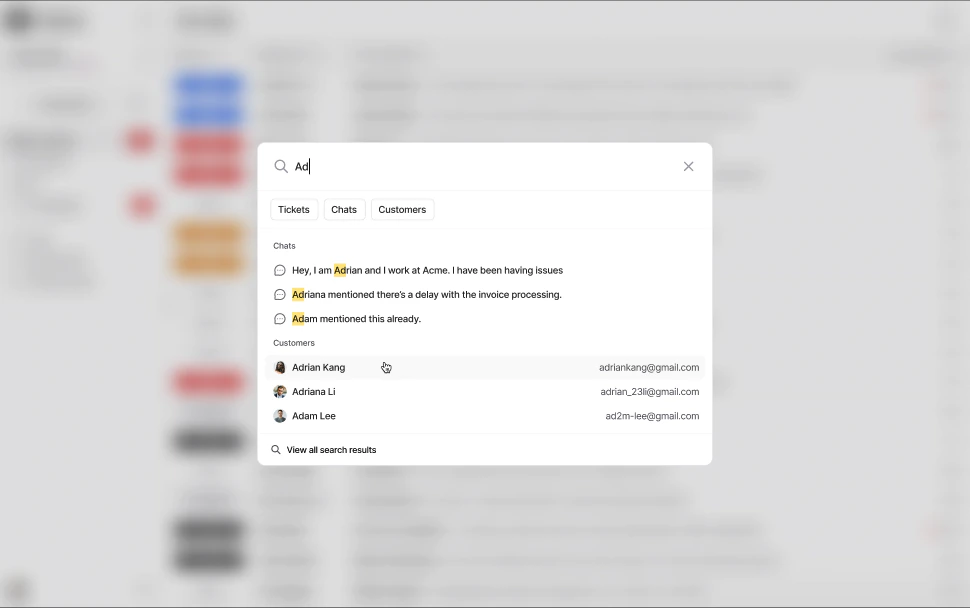
Click the search button to open a search modal with two tabs: **Tickets** and **Customers**. Results update in real time as you type, and you can click through to the full search results page.
### Notifications
New activity on any ticket assigned to you triggers two notifications, wherever you are in the helpdesk:
* **Sound** - a notification sound plays (if sound notifications are enabled in your profile menu)
* **Tab badge** - the browser tab title updates to show the unread count, e.g. `(2) Helpdesk`
This works even when the tab is not in focus.
### Search
Click the search button to open a search modal with two tabs: **Tickets** and **Customers**. Results update in real time as you type, and you can click through to the full search results page.
 ## Tickets Inbox
### Table Columns
The ticket list displays the following columns:
| Column | Description |
| -------------- | --------------------------------------------------------------- |
| Status | Color-coded badge indicating the ticket's current state |
| Ticket ID | Unique identifier, formatted as `#123` |
| Requester | The customer who submitted the ticket (name or email) |
| Assignee | The agent responsible for the ticket, or `-` if unassigned |
| Team | The team the ticket is assigned to, or `-` if none |
| Ticket Details | Subject line and a preview of the last message |
| Created At | When the ticket was created (relative time, e.g. "2 hours ago") |
| Last Updated | When the most recent message was sent (relative time) |
Click any row to open the ticket.
### Filters
Click the **Filter** button in the top right, above the ticket list, to narrow the results within the current view without changing it. Add one or more conditions, each made of a field, an operator, and a value. A badge next to the button shows how many conditions are active; **Clear all** resets them and **Apply** confirms your selection. Filters here are temporary, scoped to your session, and do not modify the underlying view.
To make a filter combination permanent, save it as a [saved view](/docs/user-guides/chatbot/help-desk/saved-views), which persists conditions alongside a sort order, columns, and visibility. The full list of fields, operators, and values is documented in the [Filters reference](/docs/user-guides/chatbot/help-desk/filters).
## Ticket Statuses
Every ticket has a status that reflects where it is in the support lifecycle. Statuses are grouped into **active** (New, On You, On Customer, On Hold) and **closed** (Closed, Cancelled). You can also configure your own custom status by clicking **Add status** on the **Settings → Helpdesk → Ticket statuses** page.
A freshly created ticket that hasn't been picked up by any agent yet. New tickets appear in the **Unassigned** view until an agent claims them.
The ticket requires action from the assigned agent. This is the default status when an agent picks up a ticket or when a customer replies.
The agent has replied and is waiting for the customer to respond. Use this status after sending a reply so your team knows no agent action is needed right now.
The ticket is paused because of an external dependency - for example, waiting on a third-party service or an internal escalation. Use this sparingly and add a note explaining the reason.
The issue has been resolved. Closed tickets move out of the active queue.
The ticket was spam, a duplicate, or opened in error. Cancelled tickets are removed from the active queue.
## Requester and Assignee
* **Requester** - the end user who submitted the ticket. Their profile can include a name, email, external ID, and phone number.
* **Assignee** - the agent responsible for handling the ticket. Tickets can be assigned manually or through auto-assignment.
Configure auto-assignment rules for each team on the **Settings → Helpdesk → Teams & assignment** page. See [Assignment algorithm](/docs/user-guides/chatbot/help-desk/assignment-algorithm) for how tickets get routed to available agents.
## Viewing a Ticket
When you open a ticket, the view splits into a **conversation thread** on the left and a **details panel** on the right.
### Conversation Thread
The conversation thread displays three types of entries:
* **Replies** - customer-visible messages from either the customer or an agent
* **Notes** - internal-only messages visible to your team (shown with an amber background)
* **Events** - system-generated entries for status changes and assignment updates
## Tickets Inbox
### Table Columns
The ticket list displays the following columns:
| Column | Description |
| -------------- | --------------------------------------------------------------- |
| Status | Color-coded badge indicating the ticket's current state |
| Ticket ID | Unique identifier, formatted as `#123` |
| Requester | The customer who submitted the ticket (name or email) |
| Assignee | The agent responsible for the ticket, or `-` if unassigned |
| Team | The team the ticket is assigned to, or `-` if none |
| Ticket Details | Subject line and a preview of the last message |
| Created At | When the ticket was created (relative time, e.g. "2 hours ago") |
| Last Updated | When the most recent message was sent (relative time) |
Click any row to open the ticket.
### Filters
Click the **Filter** button in the top right, above the ticket list, to narrow the results within the current view without changing it. Add one or more conditions, each made of a field, an operator, and a value. A badge next to the button shows how many conditions are active; **Clear all** resets them and **Apply** confirms your selection. Filters here are temporary, scoped to your session, and do not modify the underlying view.
To make a filter combination permanent, save it as a [saved view](/docs/user-guides/chatbot/help-desk/saved-views), which persists conditions alongside a sort order, columns, and visibility. The full list of fields, operators, and values is documented in the [Filters reference](/docs/user-guides/chatbot/help-desk/filters).
## Ticket Statuses
Every ticket has a status that reflects where it is in the support lifecycle. Statuses are grouped into **active** (New, On You, On Customer, On Hold) and **closed** (Closed, Cancelled). You can also configure your own custom status by clicking **Add status** on the **Settings → Helpdesk → Ticket statuses** page.
A freshly created ticket that hasn't been picked up by any agent yet. New tickets appear in the **Unassigned** view until an agent claims them.
The ticket requires action from the assigned agent. This is the default status when an agent picks up a ticket or when a customer replies.
The agent has replied and is waiting for the customer to respond. Use this status after sending a reply so your team knows no agent action is needed right now.
The ticket is paused because of an external dependency - for example, waiting on a third-party service or an internal escalation. Use this sparingly and add a note explaining the reason.
The issue has been resolved. Closed tickets move out of the active queue.
The ticket was spam, a duplicate, or opened in error. Cancelled tickets are removed from the active queue.
## Requester and Assignee
* **Requester** - the end user who submitted the ticket. Their profile can include a name, email, external ID, and phone number.
* **Assignee** - the agent responsible for handling the ticket. Tickets can be assigned manually or through auto-assignment.
Configure auto-assignment rules for each team on the **Settings → Helpdesk → Teams & assignment** page. See [Assignment algorithm](/docs/user-guides/chatbot/help-desk/assignment-algorithm) for how tickets get routed to available agents.
## Viewing a Ticket
When you open a ticket, the view splits into a **conversation thread** on the left and a **details panel** on the right.
### Conversation Thread
The conversation thread displays three types of entries:
* **Replies** - customer-visible messages from either the customer or an agent
* **Notes** - internal-only messages visible to your team (shown with an amber background)
* **Events** - system-generated entries for status changes and assignment updates
 ### Ticket Details Panel
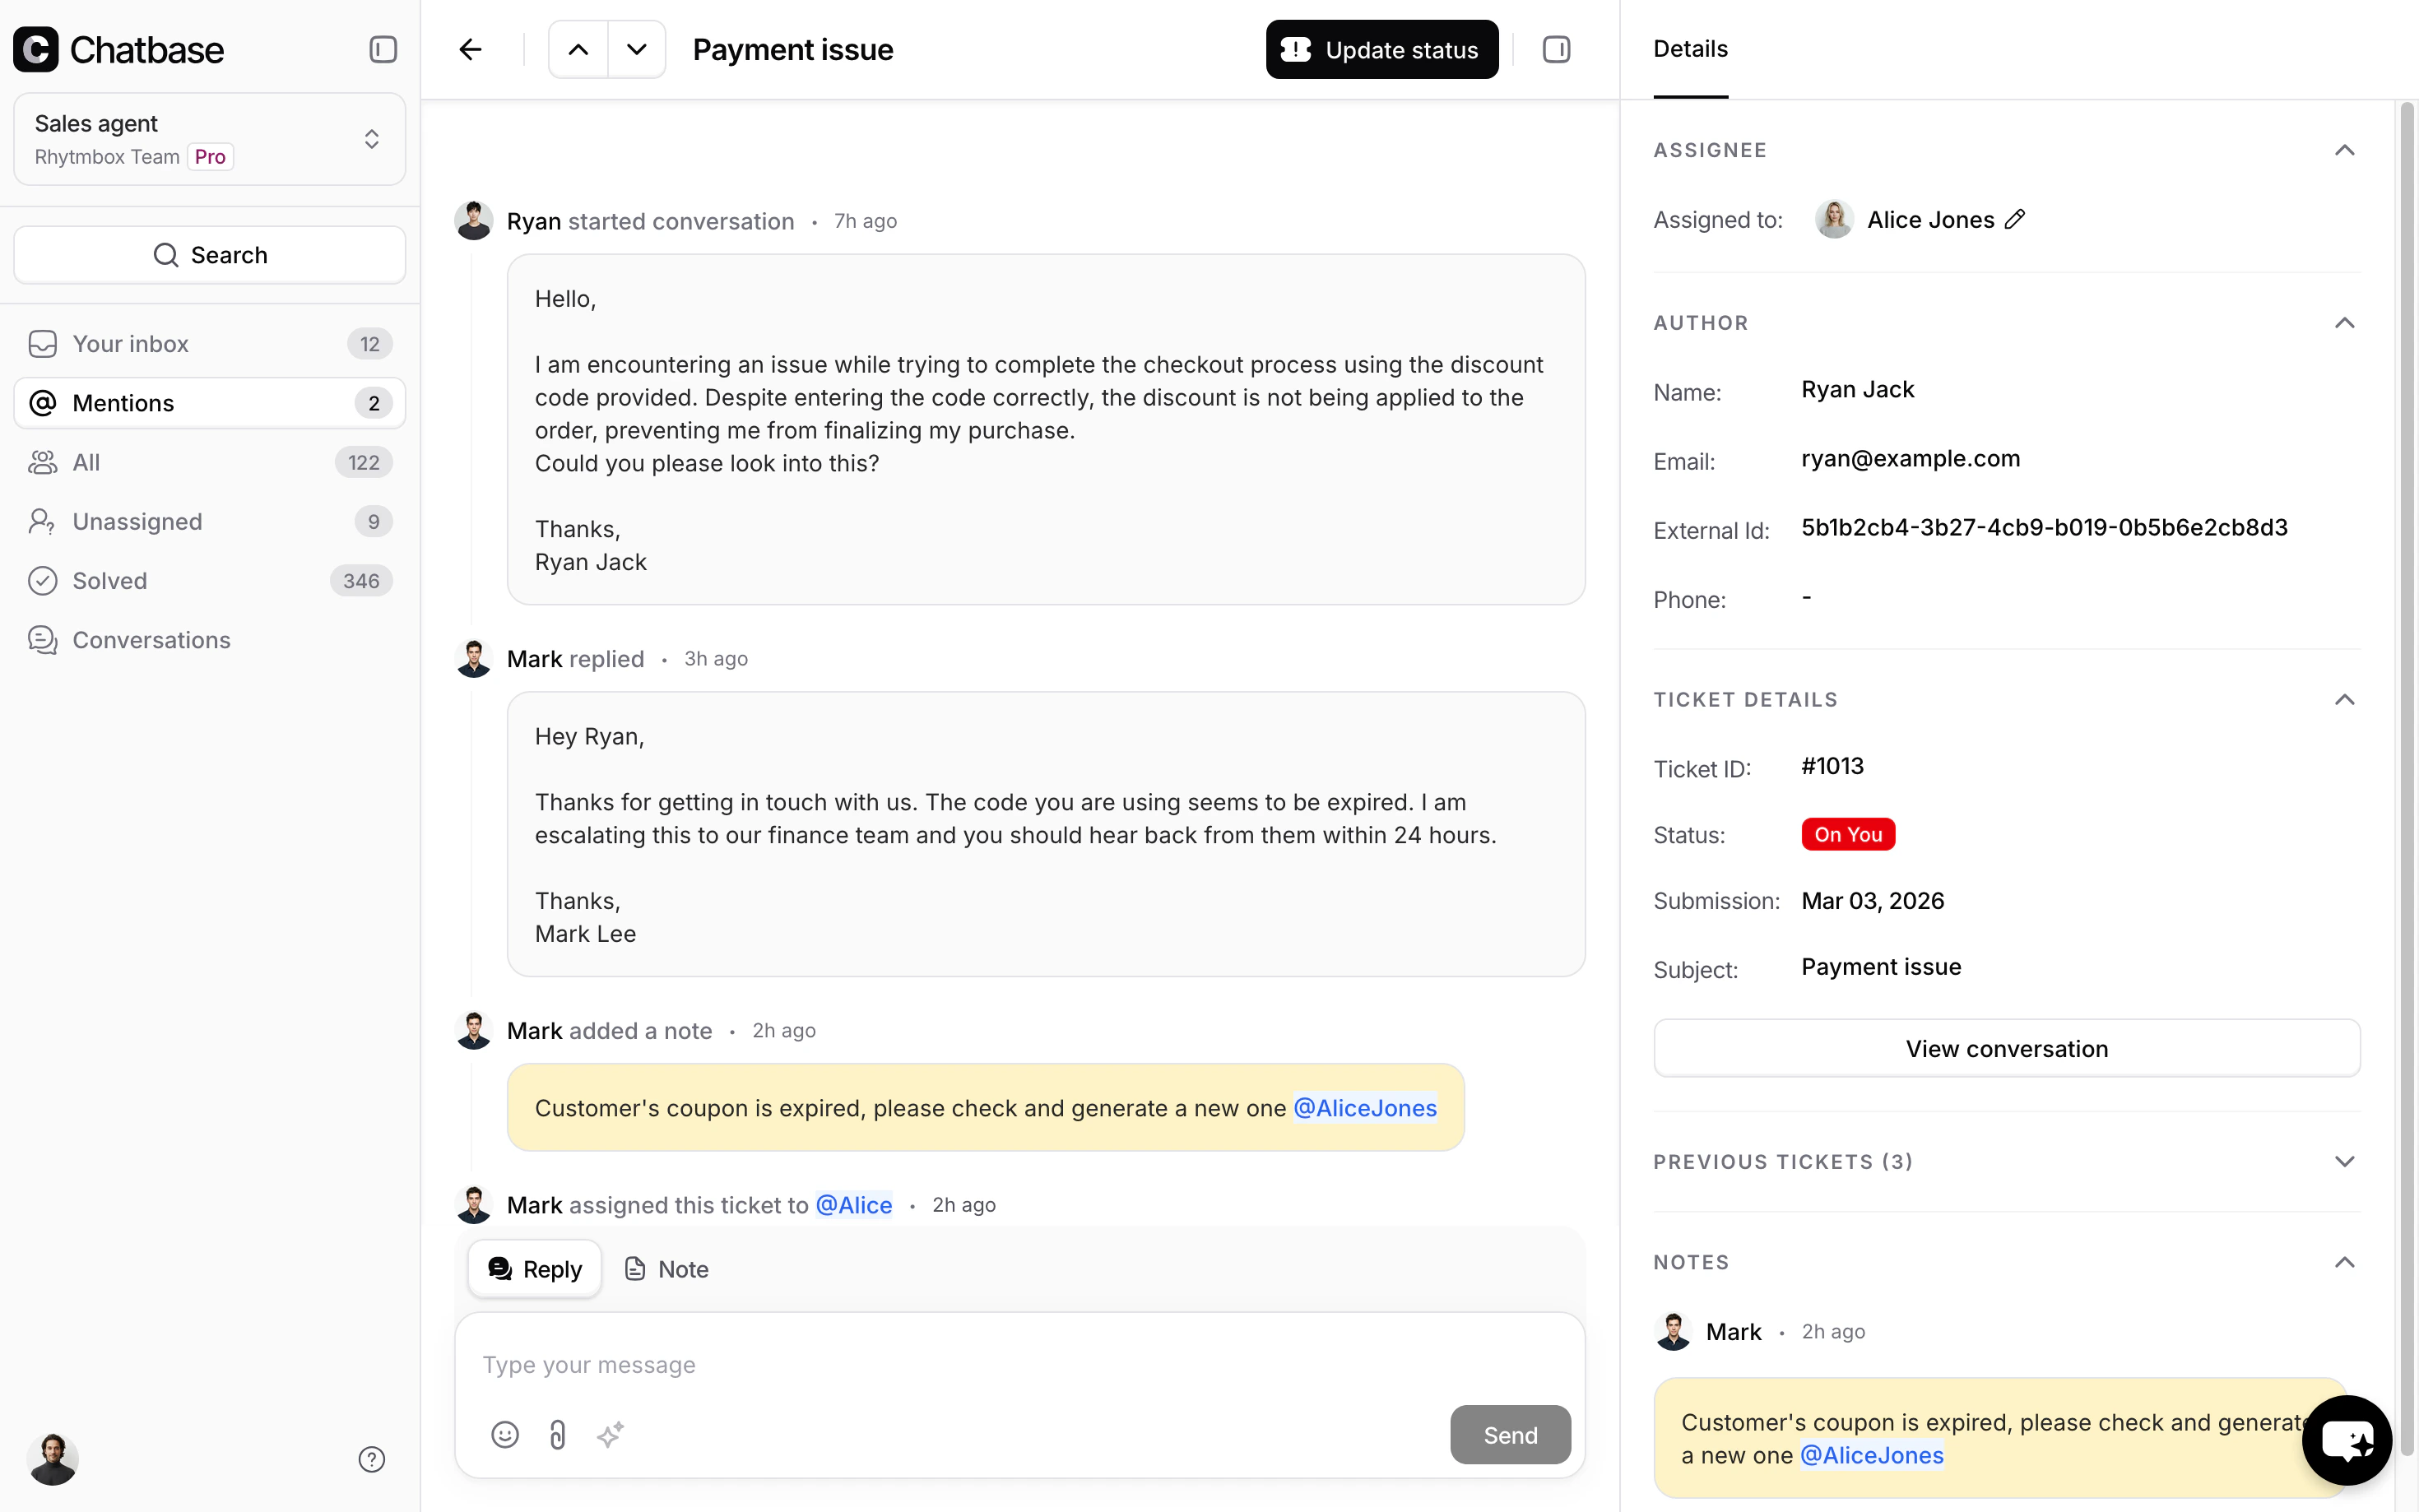
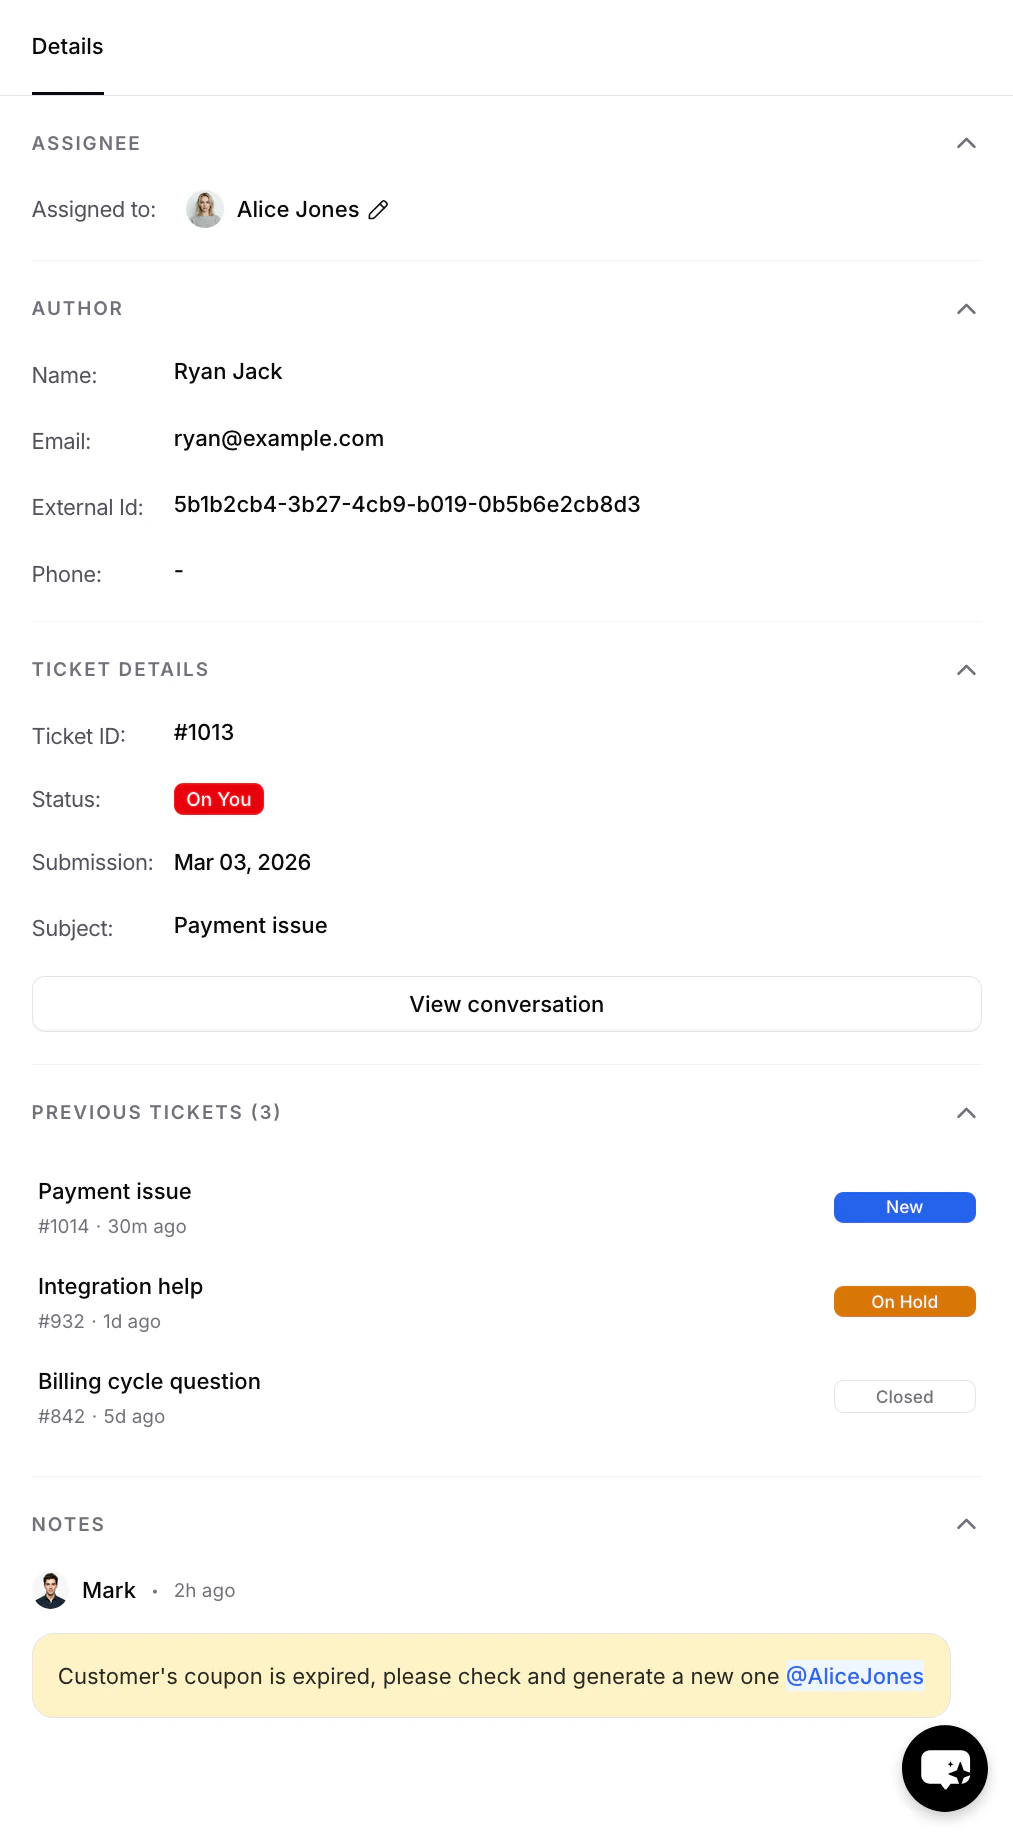
The right sidebar contains the following collapsible sections:
1. **Assignee** - view or change the assigned agent. Click the edit icon to reassign to another agent or unassign the ticket entirely.
2. **Author** - the requester's information: name, email, external ID, and phone number.
3. **Ticket Details** - ticket ID, status badge, [priority](/docs/user-guides/chatbot/help-desk/priority), [tags](/docs/user-guides/chatbot/help-desk/tags), submission date, subject, and a **View conversation** button that links to the original AI agent conversation that created the ticket.
4. **Customer History** - a list of other tickets from the same customer, showing subject, ticket ID, time, and status badge. This gives agents quick context on the customer's support history.
5. **Notes** - a list of internal notes attached to the ticket, including any @mentions.
Connected integrations can add their own panels, such as the **Shopify Orders** panel when a Shopify store is connected. See [Shopify integration](/docs/user-guides/chatbot/help-desk/integrations/shopify) for details.
### Ticket Details Panel
The right sidebar contains the following collapsible sections:
1. **Assignee** - view or change the assigned agent. Click the edit icon to reassign to another agent or unassign the ticket entirely.
2. **Author** - the requester's information: name, email, external ID, and phone number.
3. **Ticket Details** - ticket ID, status badge, [priority](/docs/user-guides/chatbot/help-desk/priority), [tags](/docs/user-guides/chatbot/help-desk/tags), submission date, subject, and a **View conversation** button that links to the original AI agent conversation that created the ticket.
4. **Customer History** - a list of other tickets from the same customer, showing subject, ticket ID, time, and status badge. This gives agents quick context on the customer's support history.
5. **Notes** - a list of internal notes attached to the ticket, including any @mentions.
Connected integrations can add their own panels, such as the **Shopify Orders** panel when a Shopify store is connected. See [Shopify integration](/docs/user-guides/chatbot/help-desk/integrations/shopify) for details.
 ## Replying to Tickets
### Reply vs Note
The message composer at the bottom of the conversation thread has two tabs:
* **Reply** - sends a public message to the customer through the same channel they used to contact you.
* **Note** - saves an internal-only message (shown with an amber background) that only your team can see.
Always double-check which tab is selected before sending. Notes are internal-only, but replies go directly to the customer.
### @Mentions
Type `@` in the note composer to mention a team member. A dropdown appears listing available agents along with a colored dot indicating their current availability status. Select an agent to insert the mention into your note.
## Replying to Tickets
### Reply vs Note
The message composer at the bottom of the conversation thread has two tabs:
* **Reply** - sends a public message to the customer through the same channel they used to contact you.
* **Note** - saves an internal-only message (shown with an amber background) that only your team can see.
Always double-check which tab is selected before sending. Notes are internal-only, but replies go directly to the customer.
### @Mentions
Type `@` in the note composer to mention a team member. A dropdown appears listing available agents along with a colored dot indicating their current availability status. Select an agent to insert the mention into your note.
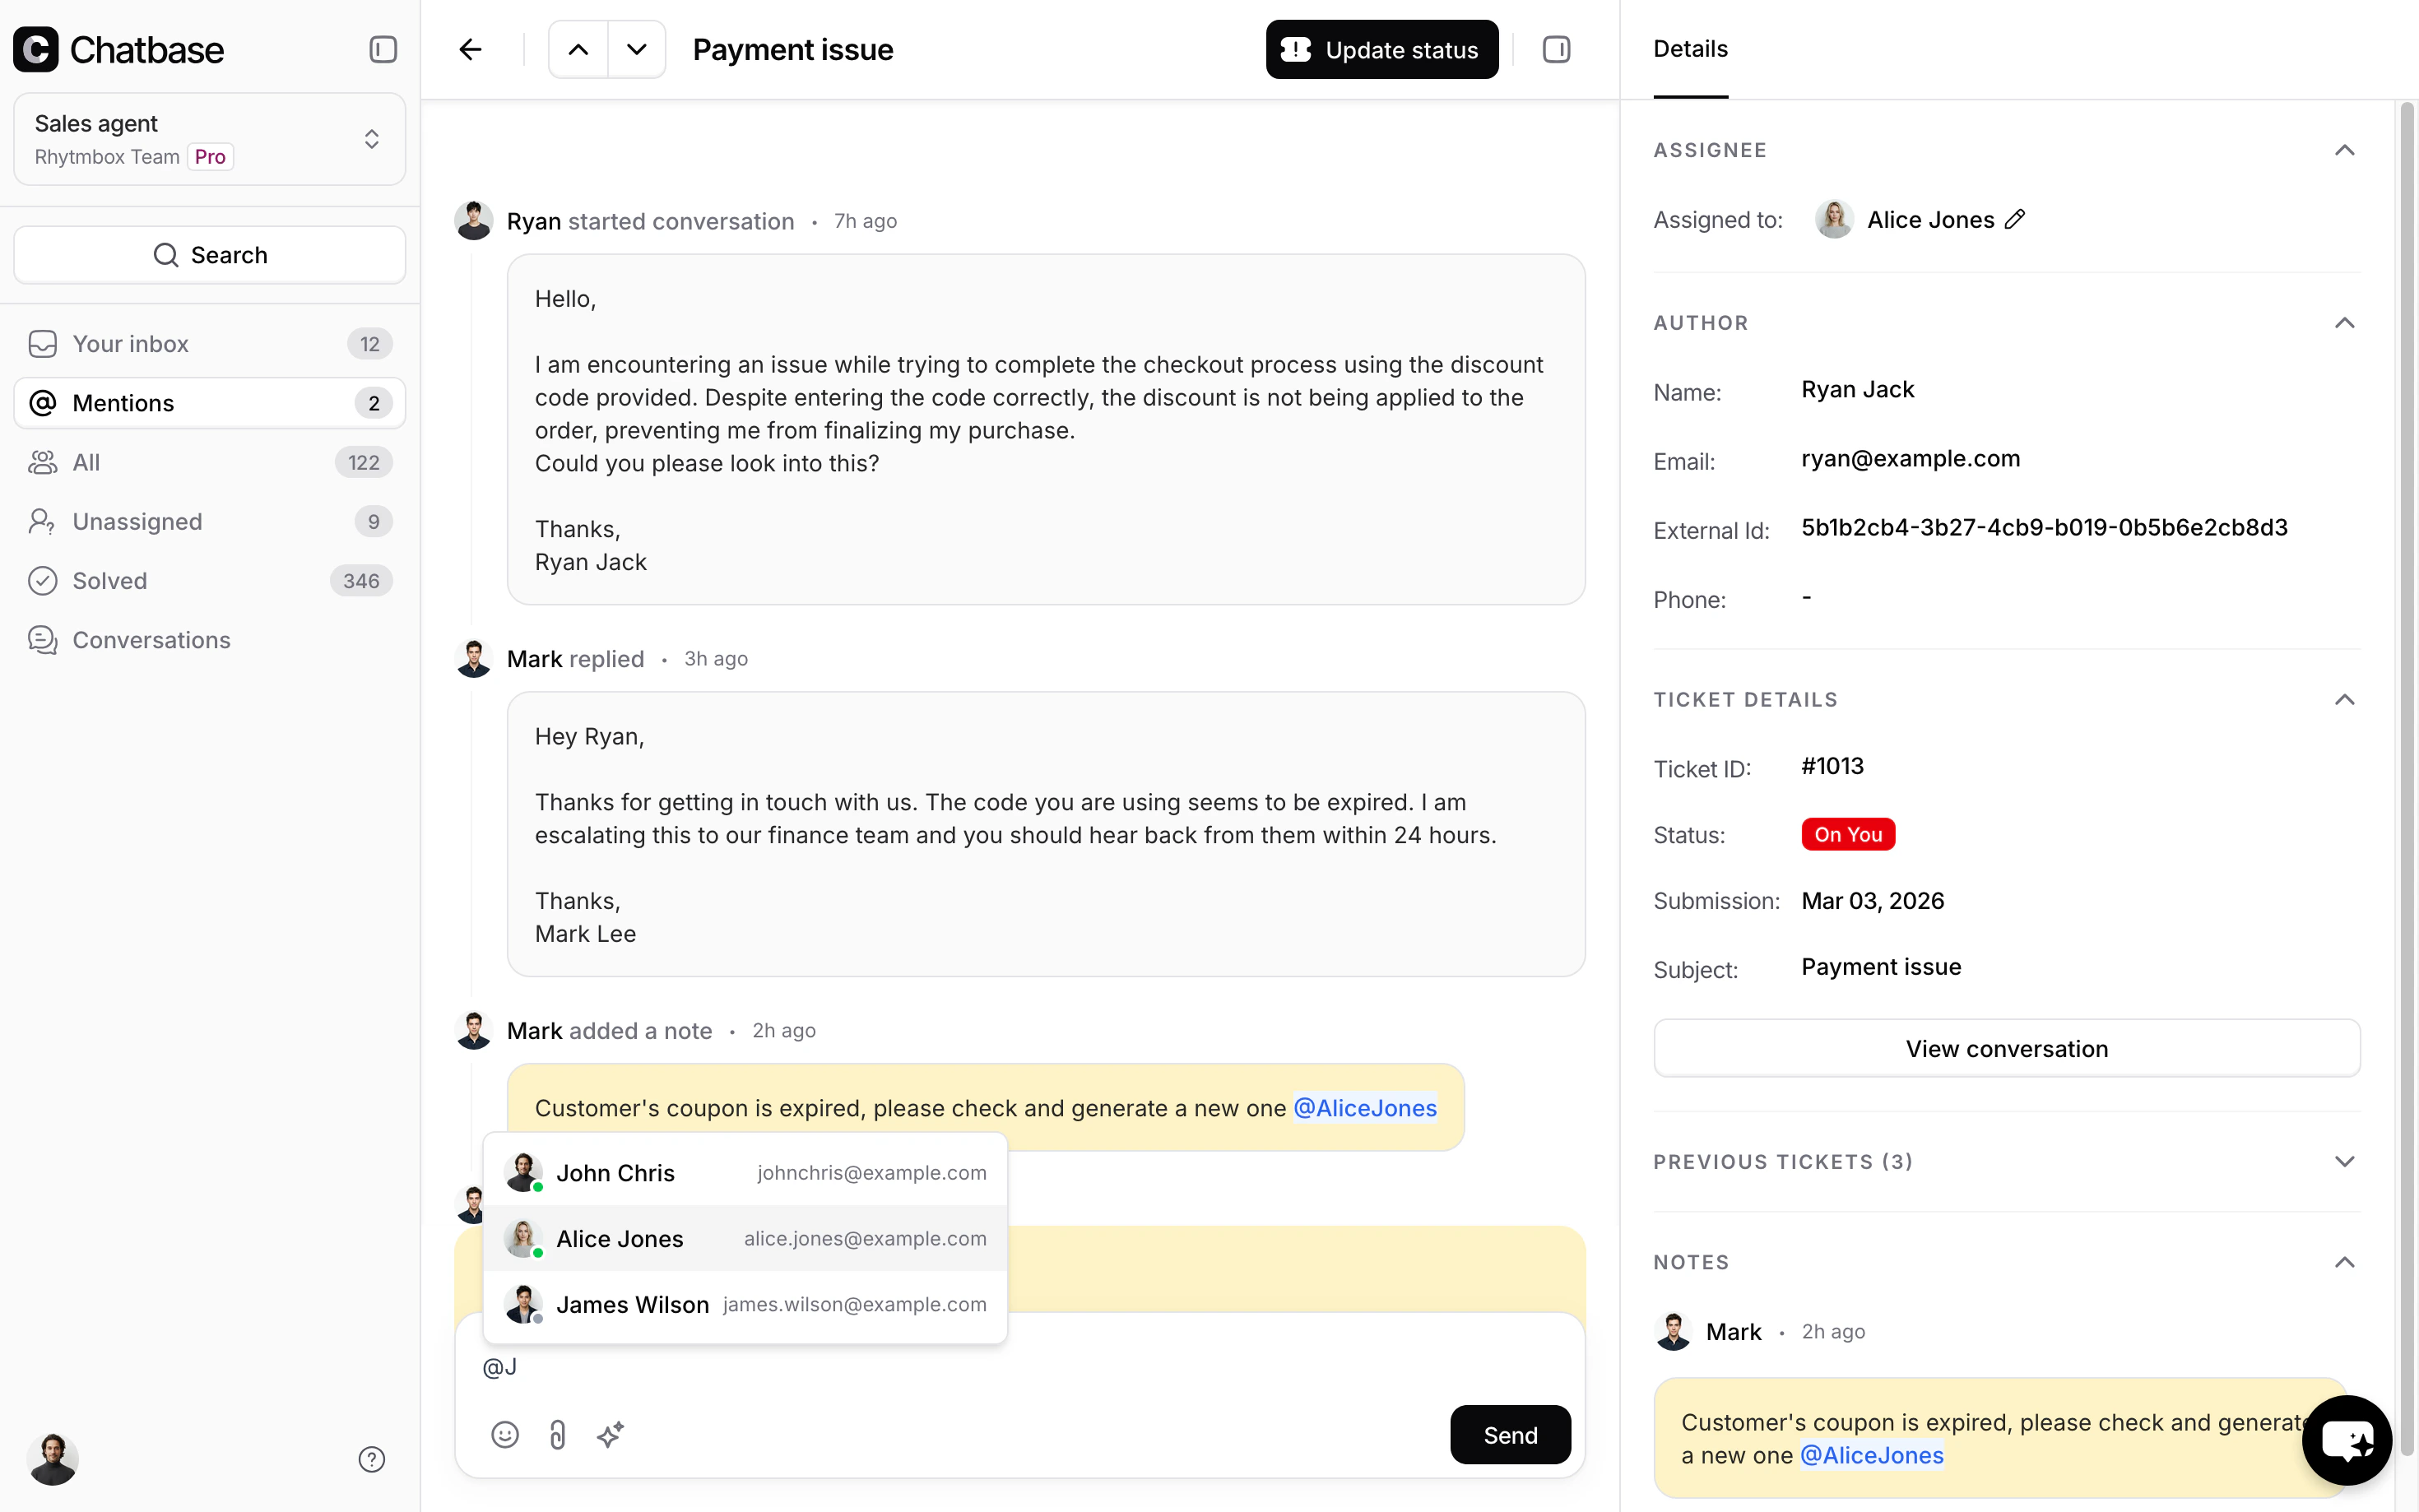 When you @mention someone:
* The mentioned agent receives a notification
* The ticket appears in their **Mentions** sidebar view
* The mention is rendered as a clickable link in the note
Use @mentions to loop in colleagues, escalate to another agent, or flag a ticket for someone's attention without reassigning it.
When you @mention someone:
* The mentioned agent receives a notification
* The ticket appears in their **Mentions** sidebar view
* The mention is rendered as a clickable link in the note
Use @mentions to loop in colleagues, escalate to another agent, or flag a ticket for someone's attention without reassigning it.
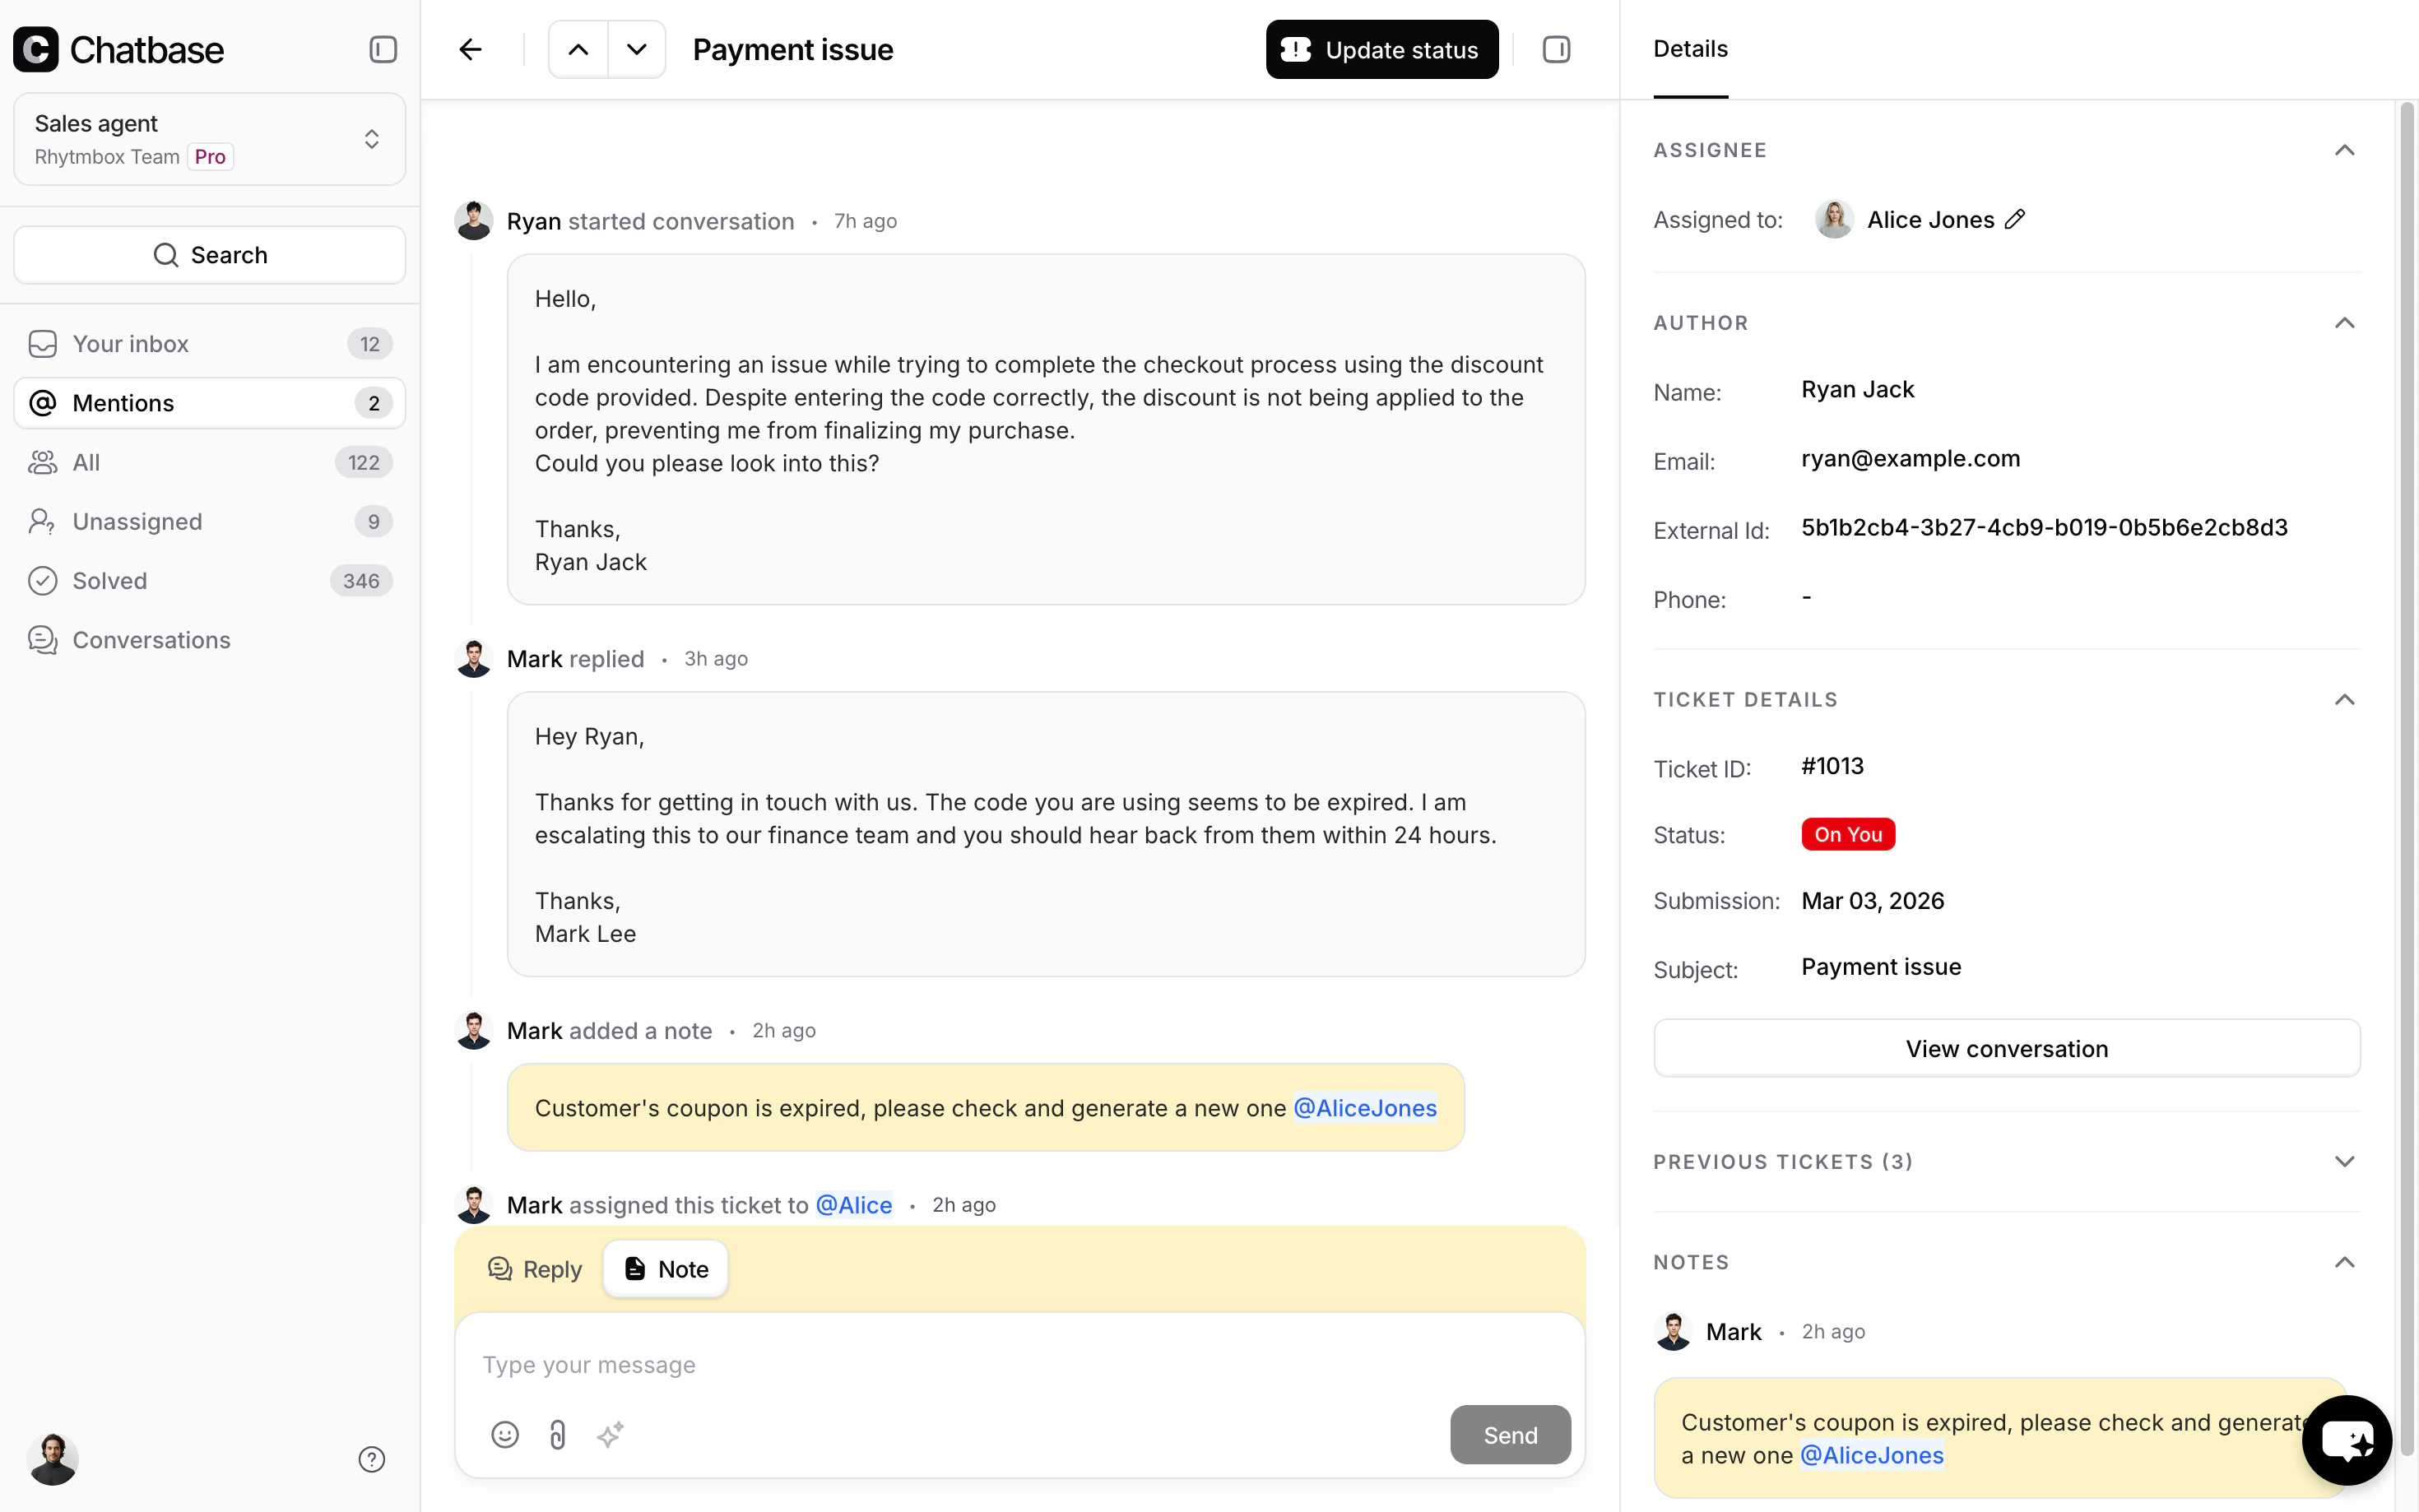 @mentions are only available in **Notes** (internal messages). They are not supported in customer-facing replies.
### Attachments
Click the **paperclip** icon to attach files to a reply or note. Any file type works, and you can remove an attachment before sending.
### Macros
Click the **lightning bolt** icon in the composer toolbar to insert a saved reply. Pick one from the list and it lands at your cursor as editable text. See [Macros](/docs/user-guides/chatbot/help-desk/macros) for writing macros and the variables they can carry.
### AI Compose
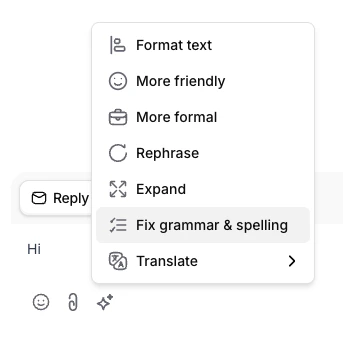
Click the **magic wand** icon in the composer toolbar to open the AI writing assistant. It offers the following options:
| Option | Description |
| ---------------------- | ----------------------------------------------------------------- |
| Format text | Cleans up formatting and structure |
| More friendly | Adjusts the tone to be warmer and more approachable |
| More formal | Adjusts the tone to be more professional |
| Rephrase | Rewords the text while keeping the same meaning |
| Expand | Adds more detail and length |
| Fix grammar & spelling | Corrects grammar and spelling errors |
| Translate | Translates the text to another language (opens a language picker) |
You need to have text in the editor for AI Compose to be available.
@mentions are only available in **Notes** (internal messages). They are not supported in customer-facing replies.
### Attachments
Click the **paperclip** icon to attach files to a reply or note. Any file type works, and you can remove an attachment before sending.
### Macros
Click the **lightning bolt** icon in the composer toolbar to insert a saved reply. Pick one from the list and it lands at your cursor as editable text. See [Macros](/docs/user-guides/chatbot/help-desk/macros) for writing macros and the variables they can carry.
### AI Compose
Click the **magic wand** icon in the composer toolbar to open the AI writing assistant. It offers the following options:
| Option | Description |
| ---------------------- | ----------------------------------------------------------------- |
| Format text | Cleans up formatting and structure |
| More friendly | Adjusts the tone to be warmer and more approachable |
| More formal | Adjusts the tone to be more professional |
| Rephrase | Rewords the text while keeping the same meaning |
| Expand | Adds more detail and length |
| Fix grammar & spelling | Corrects grammar and spelling errors |
| Translate | Translates the text to another language (opens a language picker) |
You need to have text in the editor for AI Compose to be available.
 ## Recommended Ticket Workflow
A typical ticket lifecycle follows these steps:
1. A customer submits a request → ticket is created as **New**
2. An agent picks up the ticket → status changes to **On You**
3. The agent sends a reply → agent sets status to **On Customer**
4. The customer responds → status returns to **On You**
5. An external blocker is identified → agent sets status to **On Hold**
6. The issue is resolved → agent sets status to **Closed**
7. The ticket is spam or a duplicate → agent sets status to **Cancelled**
**Best practices:**
* Set the status to **On Customer** after every reply so your team knows you're waiting for a response.
* Use **On Hold** sparingly - add a Note explaining what you're waiting on.
* Add **Notes** to document your investigation steps, so other agents can pick up where you left off.
## Ticket Channels
Tickets can arrive from multiple channels. The channel is shown on each ticket so agents know where the conversation originated:
* **Email** - received via email forwarding
* **Help desk** - created manually by an agent directly in the help desk
* Using "Escalations" Action:
* **Chat bubble** - submitted through the AI agent on your website
* **WhatsApp** - from a WhatsApp conversation
* **API** - created programmatically through the API
* **Messenger** - from Facebook Messenger direct message.
* **Instagram** - from Instagram direct message.
* **Center stage** - submitted through the full-focus chat experience centered over your website
* **Phone** - from an inbound phone call handled by your AI agent
When you reply to a ticket created from the chat bubble, the customer receives your reply in two places: their email **and** the chat bubble itself. To see it in the chat bubble, the customer opens the three-dot menu (•••) and selects **View tickets**.
## Recommended Ticket Workflow
A typical ticket lifecycle follows these steps:
1. A customer submits a request → ticket is created as **New**
2. An agent picks up the ticket → status changes to **On You**
3. The agent sends a reply → agent sets status to **On Customer**
4. The customer responds → status returns to **On You**
5. An external blocker is identified → agent sets status to **On Hold**
6. The issue is resolved → agent sets status to **Closed**
7. The ticket is spam or a duplicate → agent sets status to **Cancelled**
**Best practices:**
* Set the status to **On Customer** after every reply so your team knows you're waiting for a response.
* Use **On Hold** sparingly - add a Note explaining what you're waiting on.
* Add **Notes** to document your investigation steps, so other agents can pick up where you left off.
## Ticket Channels
Tickets can arrive from multiple channels. The channel is shown on each ticket so agents know where the conversation originated:
* **Email** - received via email forwarding
* **Help desk** - created manually by an agent directly in the help desk
* Using "Escalations" Action:
* **Chat bubble** - submitted through the AI agent on your website
* **WhatsApp** - from a WhatsApp conversation
* **API** - created programmatically through the API
* **Messenger** - from Facebook Messenger direct message.
* **Instagram** - from Instagram direct message.
* **Center stage** - submitted through the full-focus chat experience centered over your website
* **Phone** - from an inbound phone call handled by your AI agent
When you reply to a ticket created from the chat bubble, the customer receives your reply in two places: their email **and** the chat bubble itself. To see it in the chat bubble, the customer opens the three-dot menu (•••) and selects **View tickets**.