> ## Documentation Index
> Fetch the complete documentation index at: https://chatbase.co/docs/llms.txt
> Use this file to discover all available pages before exploring further.
# Shopify Actions
> Help customers browse products, manage their cart, place orders, return and exchange items, track deliveries, and update their account through your AI agent
## Overview
Shopify Actions enable your AI agent to provide comprehensive e-commerce support directly within the chat interface. These actions give your AI agent access to your store's product catalog, cart, order information, and customer data, allowing it to assist shoppers throughout their entire journey, from discovering products to placing an order and following up afterwards.
You can test Shopify actions and see how they will look using the Chatbase Shopify demo store [here](https://chatbase-demo-store.myshopify.com/)
**Prerequisite:** Before using Shopify Actions, you must [set up the Shopify integration](/docs/user-guides/integrations/shopify) with your Chatbase account.
## Available Shopify Actions
| Action | What it does |
| ------------------------------------------------------------------------------------- | ------------------------------------------------------------------------------------------------------------------------------------- |
| [Retrieve and display products](#1-retrieve-and-display-products) | Search your catalog and show products the shopper can add to their cart |
| [Update cart](#2-update-cart) | Add, remove, or change the quantity of items in the cart |
| [Get cart](#3-get-cart) | Show the current contents and total of the shopper's cart |
| [Create order](#4-create-order) | Place an order from the cart or specific items, paid by checkout link, cash on delivery, or as a free order |
| [Create exchange (new order)](#5-create-exchange-new-order) | Swap items from a past order for replacements, on a new exchange draft order. Always waits for approval on a Chatbase Helpdesk ticket |
| [Create return or exchange (same order)](#6-create-return-or-exchange-same-order) | Refund or swap items on the customer's existing order. The only action that can take a plain return, and it completes automatically |
| [Retrieve and display orders](#7-retrieve-and-display-orders) | Look up order status, tracking, and purchase history |
| [Tag an order](#8-tag-an-order) | Add tags you choose to the signed-in customer's orders to record the outcome of a conversation |
| [Check account and send activation email](#9-check-account-and-send-activation-email) | Check whether the customer is signed in and email an activation link if their account was never activated |
| [Update customer profile](#10-update-customer-profile) | Change the signed-in customer's name, email, or phone number |
| [Update customer billing address](#11-update-customer-billing-address) | Add or update the signed-in customer's billing address |
## Signed-in and guest customers
Some actions read or change a specific customer's data, so they only work when the shopper is signed in to your Shopify store. Others work for anyone in the chat. Check this before you enable an action on a channel where shoppers are never signed in, such as Instagram or WhatsApp.
| Action | Who can use it |
| ------------------------------------------------------------------------------------- | --------------------------------------------------------------------------------------------------------- |
| [Retrieve and display products](#1-retrieve-and-display-products) | Anyone |
| [Update cart](#2-update-cart) | Anyone |
| [Get cart](#3-get-cart) | Anyone |
| [Create order](#4-create-order) | Anyone. The AI agent collects the details it needs during the conversation |
| [Check account and send activation email](#9-check-account-and-send-activation-email) | Anyone. This action exists to get guests signed in |
| [Retrieve and display orders](#7-retrieve-and-display-orders) | Anyone, but guests must verify the order (see below) |
| [Create exchange (new order)](#5-create-exchange-new-order) | Anyone who can identify the past order, using the same rules as order lookup |
| [Create return or exchange (same order)](#6-create-return-or-exchange-same-order) | Anyone, guests included. Guests identify the past order the same way they do for order lookup (see below) |
| [Tag an order](#8-tag-an-order) | **Signed-in customers only** |
| [Update customer profile](#10-update-customer-profile) | **Signed-in customers only** |
| [Update customer billing address](#11-update-customer-billing-address) | **Signed-in customers only** |
**How guests verify an order.** For authenticated customers, order lookup is automatic: no email address, phone number, or order number is required, and orders are retrieved directly from the signed-in account. Guest customers can look up orders using either:
* Checkout email + order number
* Phone number + order number
Actions marked **signed-in customers only** can't be tested in the Action Preview on the dashboard, because there is no authenticated customer there. Test them from a live channel, such as the Chat bubble, while signed in to your store.
## How to create a Shopify action
Every Shopify action is created the same way. The [action sections](#1-retrieve-and-display-products) below list only what differs: which template to pick, the default settings, and any extra configuration the action needs.
Go to your [Chatbase dashboard](https://www.chatbase.co/dashboard/) and select the AI agent connected to your Shopify store. Click **Build > Actions** in the left sidebar.
Click **Create action**, then on the **Shopify** card select the action named in its section below.
**Action Name** and **When to use** come pre-filled with working defaults. Leave them as-is unless you need to make a specific change; each action's defaults are listed in its section below.
To restrict the action to [procedure](/docs/user-guides/chatbot/procedures/procedures-overview) steps only, turn on [**Only use in procedures**](/docs/user-guides/chatbot/actions/actions-overview#only-use-in-procedures). When it's on, the **When to use** field is hidden, because the AI agent no longer decides when to call the action.
Click **Save and continue**.
A few actions add steps here. [Retrieve and display products](#1-retrieve-and-display-products) adds a **Products** step for syncing your catalog. [Create order](#4-create-order), [Create exchange (new order)](#5-create-exchange-new-order), and [Create return or exchange (same order)](#6-create-return-or-exchange-same-order) add a **Behavior** step that controls how the order or return is built and recorded in Shopify, and Create exchange (new order) adds an optional **Collect additional details** step. Every other action skips straight to channels.
Use **Channels** to control where the action is available. This step is optional: toggle the action on or off for each configured channel, then click **Save**. Some channels may be incompatible with the action and won't be available for selection.
Ensure the action is toggled to **Enabled**, then test it with the check listed in the action's section below.
For the Create order and Create exchange (new order) actions, you can create multiple actions of the same type, each with its own name and settings. See the [Create order](#4-create-order) section for a worked example.
## Actions
### 1. Retrieve and display products
Search and display products from your Shopify catalog. Customers can browse by category, search for specific items, and add products directly to their cart. Shoppers can also search by image: when they send a photo as an [attachment](/docs/user-guides/chatbot/channels#attachments), the AI agent finds matching products from your catalog, even when the product name doesn't appear in the image.
Helping customers discover products, answering questions about inventory, comparing items, and facilitating add-to-cart actions.
**Common Use Cases:**
* "Show me red dresses under \$50"
* "What laptops do you have in stock?"
* "How much is this?" (with a photo attached)
#### Settings
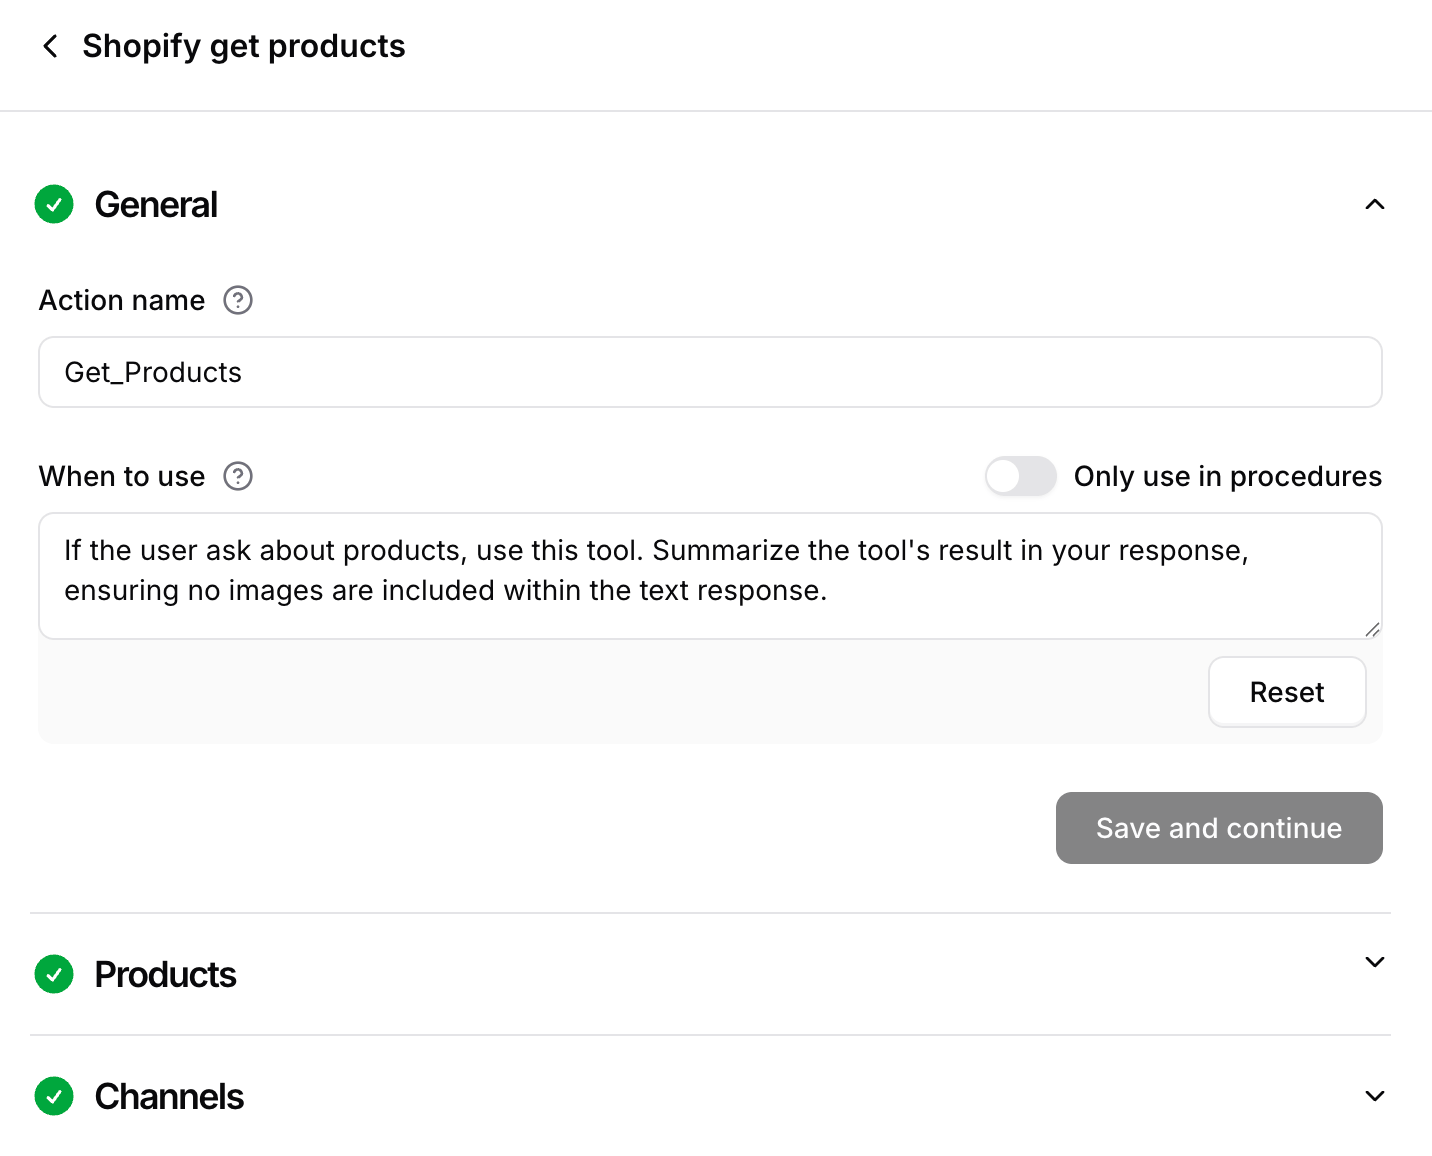
**Template:** **Retrieve and display products**. The action opens as **Shopify get products**.
**Action Name:** Get\_Products.
**When to use:** If the user ask about products, use this tool. Summarize the tool's result in your response, ensuring no images are included within the text response.
 #### Sync your products
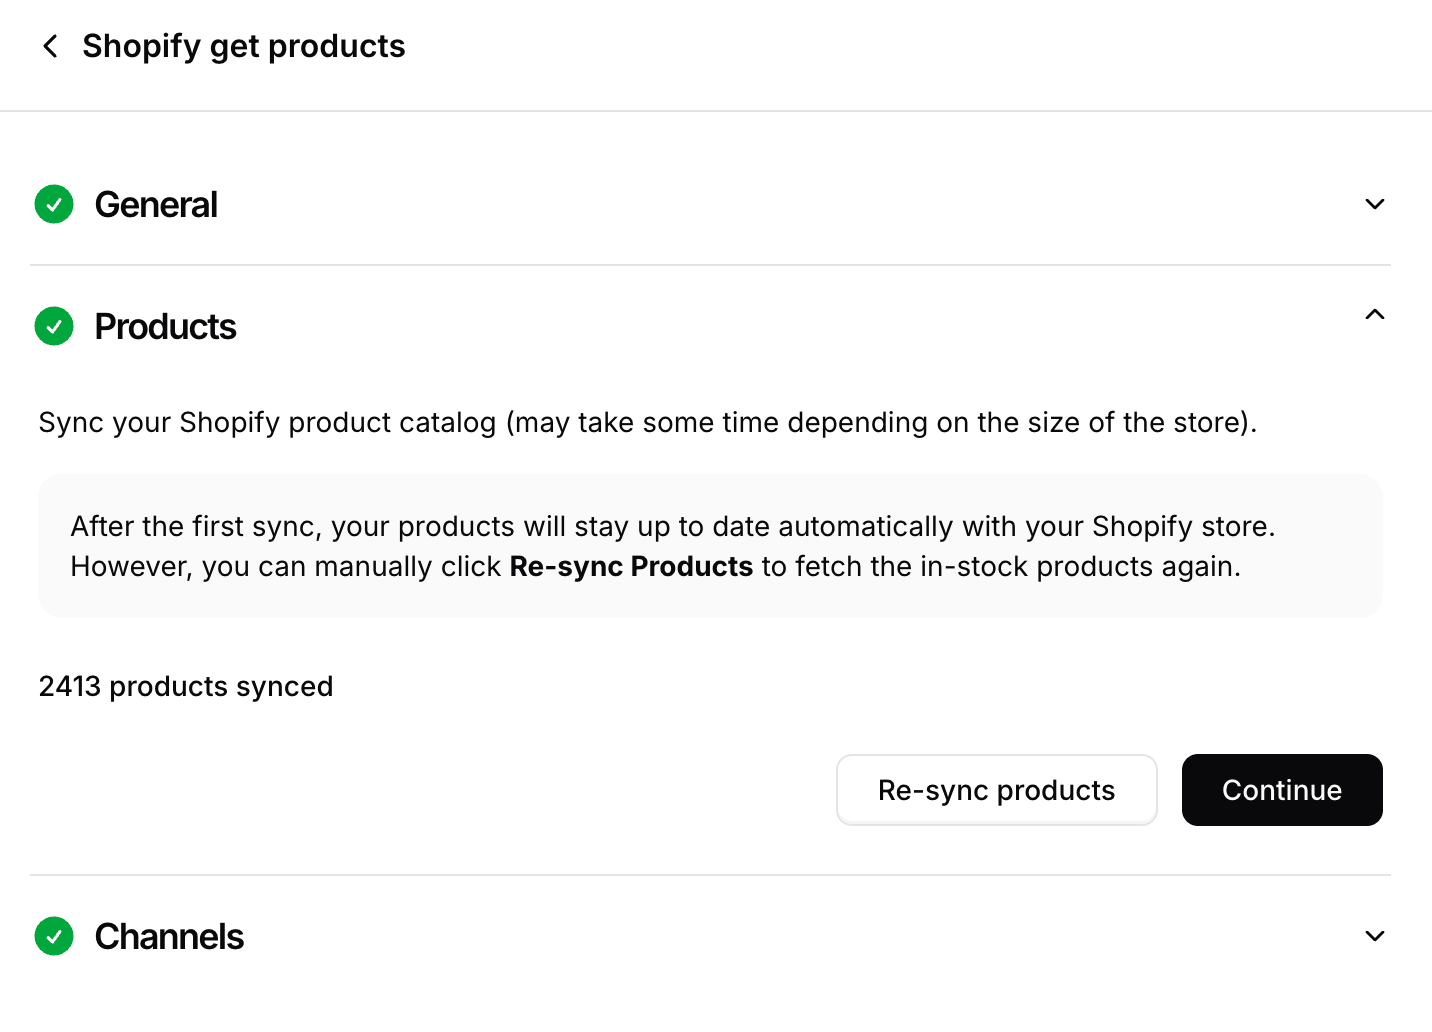
In the **Products** section, click **Sync products** to import your catalog. The initial sync may take some time depending on the size of your store. Once it finishes, the section shows how many products were synced.
After the first sync, your products stay up to date automatically. If you ever need to, click **Re-sync products** to fetch the in-stock products again. Click **Continue**.
#### Sync your products
In the **Products** section, click **Sync products** to import your catalog. The initial sync may take some time depending on the size of your store. Once it finishes, the section shows how many products were synced.
After the first sync, your products stay up to date automatically. If you ever need to, click **Re-sync products** to fetch the in-stock products again. Click **Continue**.
 Test the action by asking your AI agent product-related questions to verify it returns accurate results.
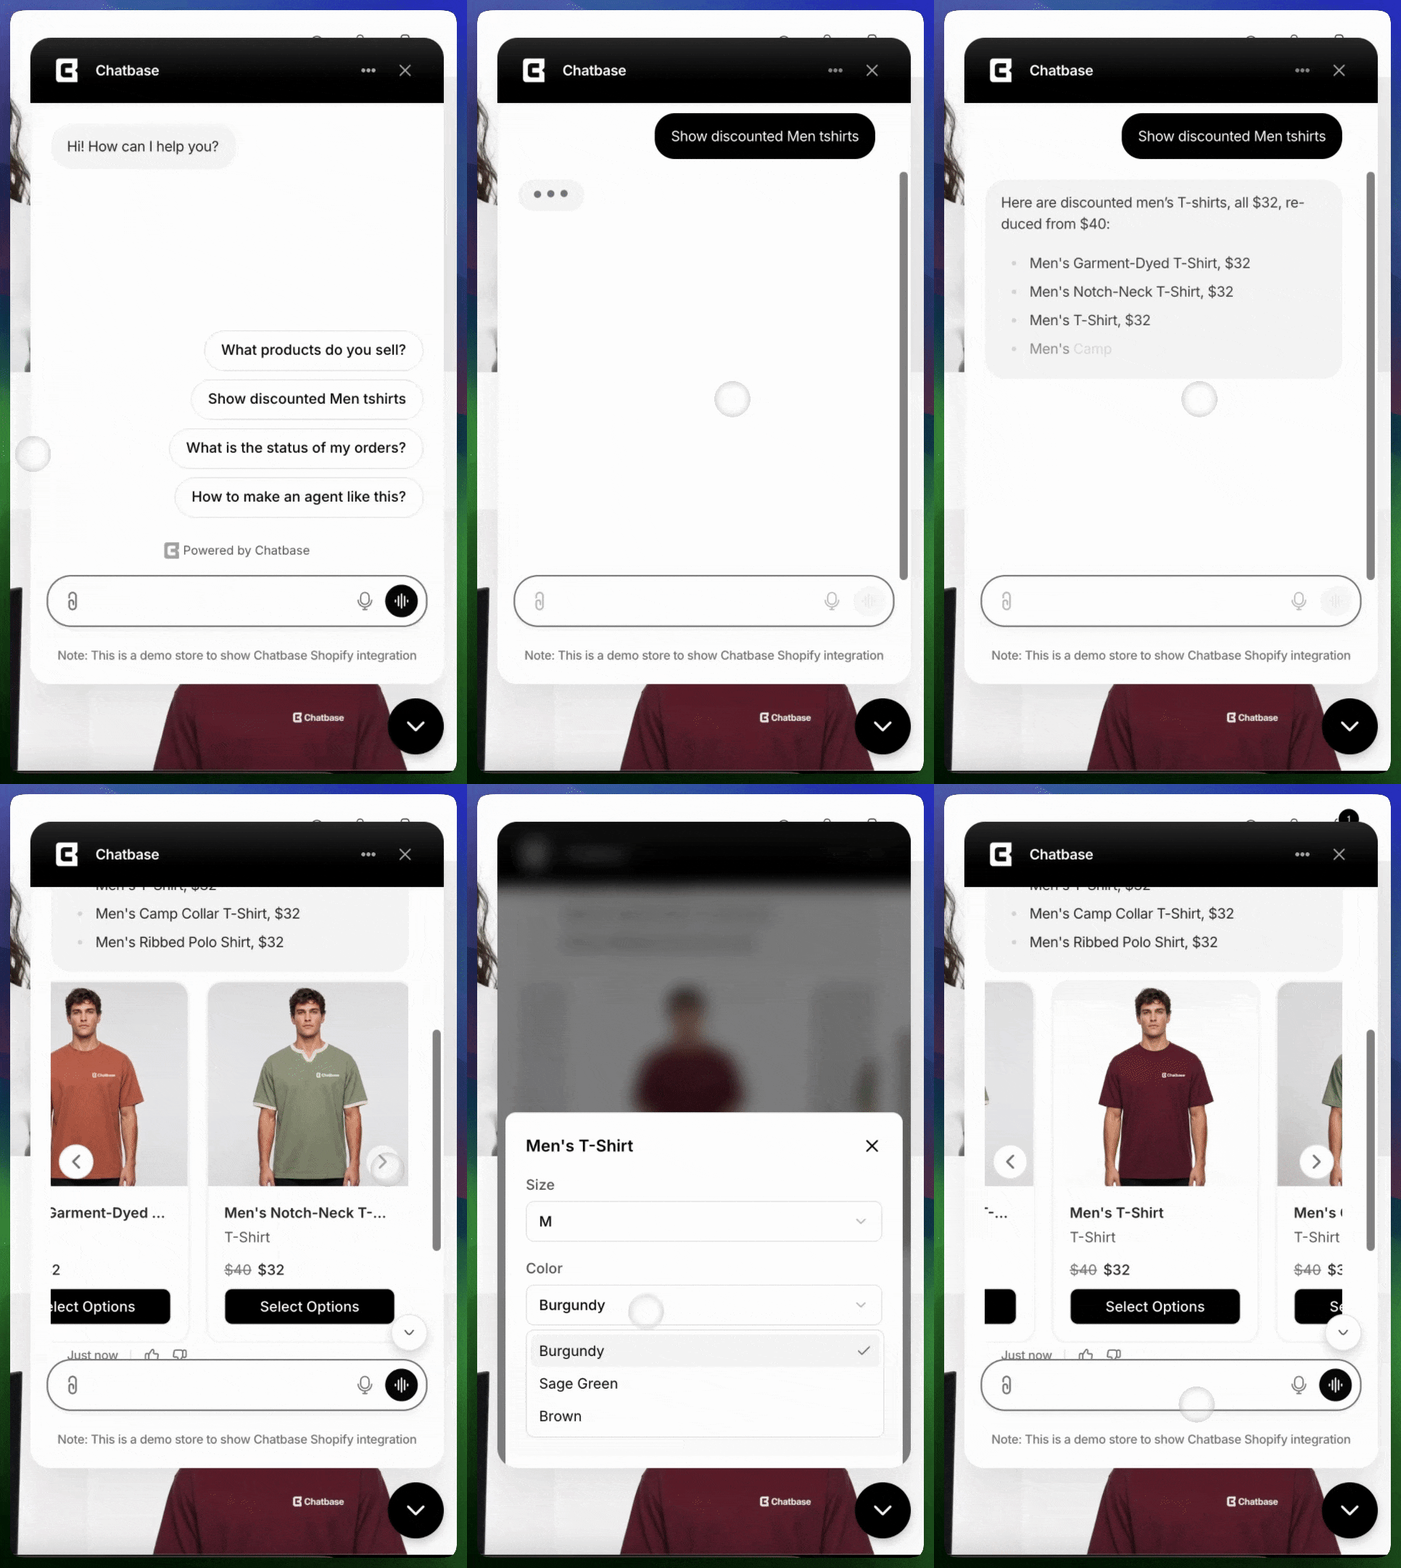 Shopify action buttons, such as **Add to cart** and **Select options**, are automatically translated based on your localization settings.
#### Exclude out-of-stock products
You can exclude **out-of-stock Shopify products** from the products available to the **Retrieve and display products** action.
By default, out-of-stock products are **included**, allowing your AI agent to recognize products that belong to your store but are currently unavailable. If your store has a large number of out-of-stock products, you can choose to exclude them.
To exclude out-of-stock products:
Under **Products**, enable the **Exclude out-of-stock products** toggle.
Click **Re-sync products** to apply the change.
Once re-synced, products with no in-stock variants will be removed from your AI agent's product catalog and hidden from product search.
#### Search by image
Shoppers don't need to know a product's name to find it. When a customer sends a photo as an [attachment](/docs/user-guides/chatbot/channels#attachments), for example a screenshot from social media, the AI agent identifies the matching products from your catalog and displays them with the usual **Add to cart** buttons.
This works because Chatbase trains on your product images as part of the product sync, not just on titles and descriptions. No extra setup is needed: once your products are synced, image search is available on every channel that supports attachments.
Test it by sending your AI agent a photo of one of your products, with or without text, and check that it returns the right item.
#### WhatsApp Catalog
When the **Retrieve and display products** action runs on a WhatsApp channel, it can send products as native WhatsApp product cards with cart support instead of plain text. This requires connecting your Shopify catalog to WhatsApp through Meta.
Follow the step-by-step guide to connect your Shopify product catalog to WhatsApp.
Products the AI agent adds to the cart in chat don't appear in the WhatsApp catalog cart, because Meta doesn't let businesses write to it. They're still in the shopper's Shopify cart, and [Get cart](#3-get-cart) shows them alongside anything the shopper sent from the WhatsApp cart. See [How the WhatsApp cart and the chat cart work together](/docs/user-guides/chatbot/actions/whatsapp-catalog#how-the-whatsapp-cart-and-the-chat-cart-work-together).
#### Keeping Your Theme's Cart Icon in Sync
By default, when a customer adds a product to their cart through the chat bubble, your theme's cart icon doesn't update until the page is reloaded. The item is added, but the cart count still shows 0 until the customer refreshes.
Chatbase dispatches custom DOM events whenever the AI agent changes the cart, so your theme can update its cart UI in real time. With a listener for these events in place, adding one product makes the cart count show 1 right away, with no refresh.
The following events are fired:
```js theme={null}
document.dispatchEvent(new CustomEvent('cart:updated', { detail: { newCart } }));
document.dispatchEvent(new CustomEvent('cart-update', { detail: { newCart } }));
document.dispatchEvent(new CustomEvent('cart:update', { detail: { newCart } }));
```
You can listen to any of these events in your theme's JavaScript to keep the cart UI **in sync**:
```js theme={null}
document.addEventListener('cart:updated', (event) => {
const cart = event.detail.newCart;
// Update your theme's cart count, e.g.:
document.querySelector('.cart-count').textContent = cart.item_count;
});
```
Multiple event names are dispatched to ensure compatibility across different Shopify themes. You only need to listen to one of them.
#### How Product Sync Works
To sync your catalog, open the **Products** section of the action and click **Sync products**. Chatbase will then retrieve all products from your Shopify store, including their images, which the AI agent uses to recognize products in photos shoppers send; this may take some time depending on the size of the store. After the initial import, Chatbase automatically listens for changes: whenever a product is added, updated, or deleted in your store, the data syncs in real time. This ensures your AI agent always has access to up-to-date product information. If you ever need to, click **Re-sync products** to fetch the in-stock products again. When you delete the action, Chatbase automatically removes its stored product data and stops syncing future updates.
Note that once this action is in use, your AI agent already has your product data through the sync, so you can **exclude** product pages from your website training source.
***
### 2. Update cart
Let shoppers manage their cart through the conversation: add products, remove them, or change quantities before checkout.
Adjusting quantities, removing items the shopper no longer wants, and adding recommended products without leaving the chat.
**Common Use Cases:**
* "Add two of these to my cart"
* "Remove the blue one from my cart"
* "Change the quantity of the sneakers to 3"
#### Settings
**Template:** **Shopify update cart**.
**Action Name:** Update\_Cart.
**When to use:** Call this tool when the user wants to add a product to their cart, change the quantity of an existing line, or remove a line from the cart. After updating the cart, ask the user if they want to add more products or proceed with creating the order?
Test the action by asking your AI agent to add a product to the cart, change its quantity, and remove it again. Cart updates don't work in the Playground, so test from a live channel such as the Chat bubble.
Pair **Update cart** with [Create order](#4-create-order). The default "When to use" prompt has the AI agent offer to proceed to the order as soon as the cart changes.
***
### 3. Get cart
Display the current contents of a customer's shopping cart, including items, quantities, prices, and totals.
Showing customers what's in their cart, displaying cart totals, and helping customers review items before checkout.
**Common Use Cases:**
* "What's in my cart?"
* "Show me my cart total"
* "How many items are in my cart?"
#### Settings
**Template:** **Shopify get cart**.
**Action Name:** Get\_Cart.
**When to use:** Call this tool when asked about the cart, including the items in the cart, the total price, the quantity of items.
Test the action by asking your AI agent to show cart contents.
Shopify action buttons, such as **Add to cart** and **Select options**, are automatically translated based on your localization settings.
#### Exclude out-of-stock products
You can exclude **out-of-stock Shopify products** from the products available to the **Retrieve and display products** action.
By default, out-of-stock products are **included**, allowing your AI agent to recognize products that belong to your store but are currently unavailable. If your store has a large number of out-of-stock products, you can choose to exclude them.
To exclude out-of-stock products:
Under **Products**, enable the **Exclude out-of-stock products** toggle.
Click **Re-sync products** to apply the change.
Once re-synced, products with no in-stock variants will be removed from your AI agent's product catalog and hidden from product search.
#### Search by image
Shoppers don't need to know a product's name to find it. When a customer sends a photo as an [attachment](/docs/user-guides/chatbot/channels#attachments), for example a screenshot from social media, the AI agent identifies the matching products from your catalog and displays them with the usual **Add to cart** buttons.
This works because Chatbase trains on your product images as part of the product sync, not just on titles and descriptions. No extra setup is needed: once your products are synced, image search is available on every channel that supports attachments.
Test it by sending your AI agent a photo of one of your products, with or without text, and check that it returns the right item.
#### WhatsApp Catalog
When the **Retrieve and display products** action runs on a WhatsApp channel, it can send products as native WhatsApp product cards with cart support instead of plain text. This requires connecting your Shopify catalog to WhatsApp through Meta.
Follow the step-by-step guide to connect your Shopify product catalog to WhatsApp.
Products the AI agent adds to the cart in chat don't appear in the WhatsApp catalog cart, because Meta doesn't let businesses write to it. They're still in the shopper's Shopify cart, and [Get cart](#3-get-cart) shows them alongside anything the shopper sent from the WhatsApp cart. See [How the WhatsApp cart and the chat cart work together](/docs/user-guides/chatbot/actions/whatsapp-catalog#how-the-whatsapp-cart-and-the-chat-cart-work-together).
#### Keeping Your Theme's Cart Icon in Sync
By default, when a customer adds a product to their cart through the chat bubble, your theme's cart icon doesn't update until the page is reloaded. The item is added, but the cart count still shows 0 until the customer refreshes.
Chatbase dispatches custom DOM events whenever the AI agent changes the cart, so your theme can update its cart UI in real time. With a listener for these events in place, adding one product makes the cart count show 1 right away, with no refresh.
The following events are fired:
```js theme={null}
document.dispatchEvent(new CustomEvent('cart:updated', { detail: { newCart } }));
document.dispatchEvent(new CustomEvent('cart-update', { detail: { newCart } }));
document.dispatchEvent(new CustomEvent('cart:update', { detail: { newCart } }));
```
You can listen to any of these events in your theme's JavaScript to keep the cart UI **in sync**:
```js theme={null}
document.addEventListener('cart:updated', (event) => {
const cart = event.detail.newCart;
// Update your theme's cart count, e.g.:
document.querySelector('.cart-count').textContent = cart.item_count;
});
```
Multiple event names are dispatched to ensure compatibility across different Shopify themes. You only need to listen to one of them.
#### How Product Sync Works
To sync your catalog, open the **Products** section of the action and click **Sync products**. Chatbase will then retrieve all products from your Shopify store, including their images, which the AI agent uses to recognize products in photos shoppers send; this may take some time depending on the size of the store. After the initial import, Chatbase automatically listens for changes: whenever a product is added, updated, or deleted in your store, the data syncs in real time. This ensures your AI agent always has access to up-to-date product information. If you ever need to, click **Re-sync products** to fetch the in-stock products again. When you delete the action, Chatbase automatically removes its stored product data and stops syncing future updates.
Note that once this action is in use, your AI agent already has your product data through the sync, so you can **exclude** product pages from your website training source.
***
### 2. Update cart
Let shoppers manage their cart through the conversation: add products, remove them, or change quantities before checkout.
Adjusting quantities, removing items the shopper no longer wants, and adding recommended products without leaving the chat.
**Common Use Cases:**
* "Add two of these to my cart"
* "Remove the blue one from my cart"
* "Change the quantity of the sneakers to 3"
#### Settings
**Template:** **Shopify update cart**.
**Action Name:** Update\_Cart.
**When to use:** Call this tool when the user wants to add a product to their cart, change the quantity of an existing line, or remove a line from the cart. After updating the cart, ask the user if they want to add more products or proceed with creating the order?
Test the action by asking your AI agent to add a product to the cart, change its quantity, and remove it again. Cart updates don't work in the Playground, so test from a live channel such as the Chat bubble.
Pair **Update cart** with [Create order](#4-create-order). The default "When to use" prompt has the AI agent offer to proceed to the order as soon as the cart changes.
***
### 3. Get cart
Display the current contents of a customer's shopping cart, including items, quantities, prices, and totals.
Showing customers what's in their cart, displaying cart totals, and helping customers review items before checkout.
**Common Use Cases:**
* "What's in my cart?"
* "Show me my cart total"
* "How many items are in my cart?"
#### Settings
**Template:** **Shopify get cart**.
**Action Name:** Get\_Cart.
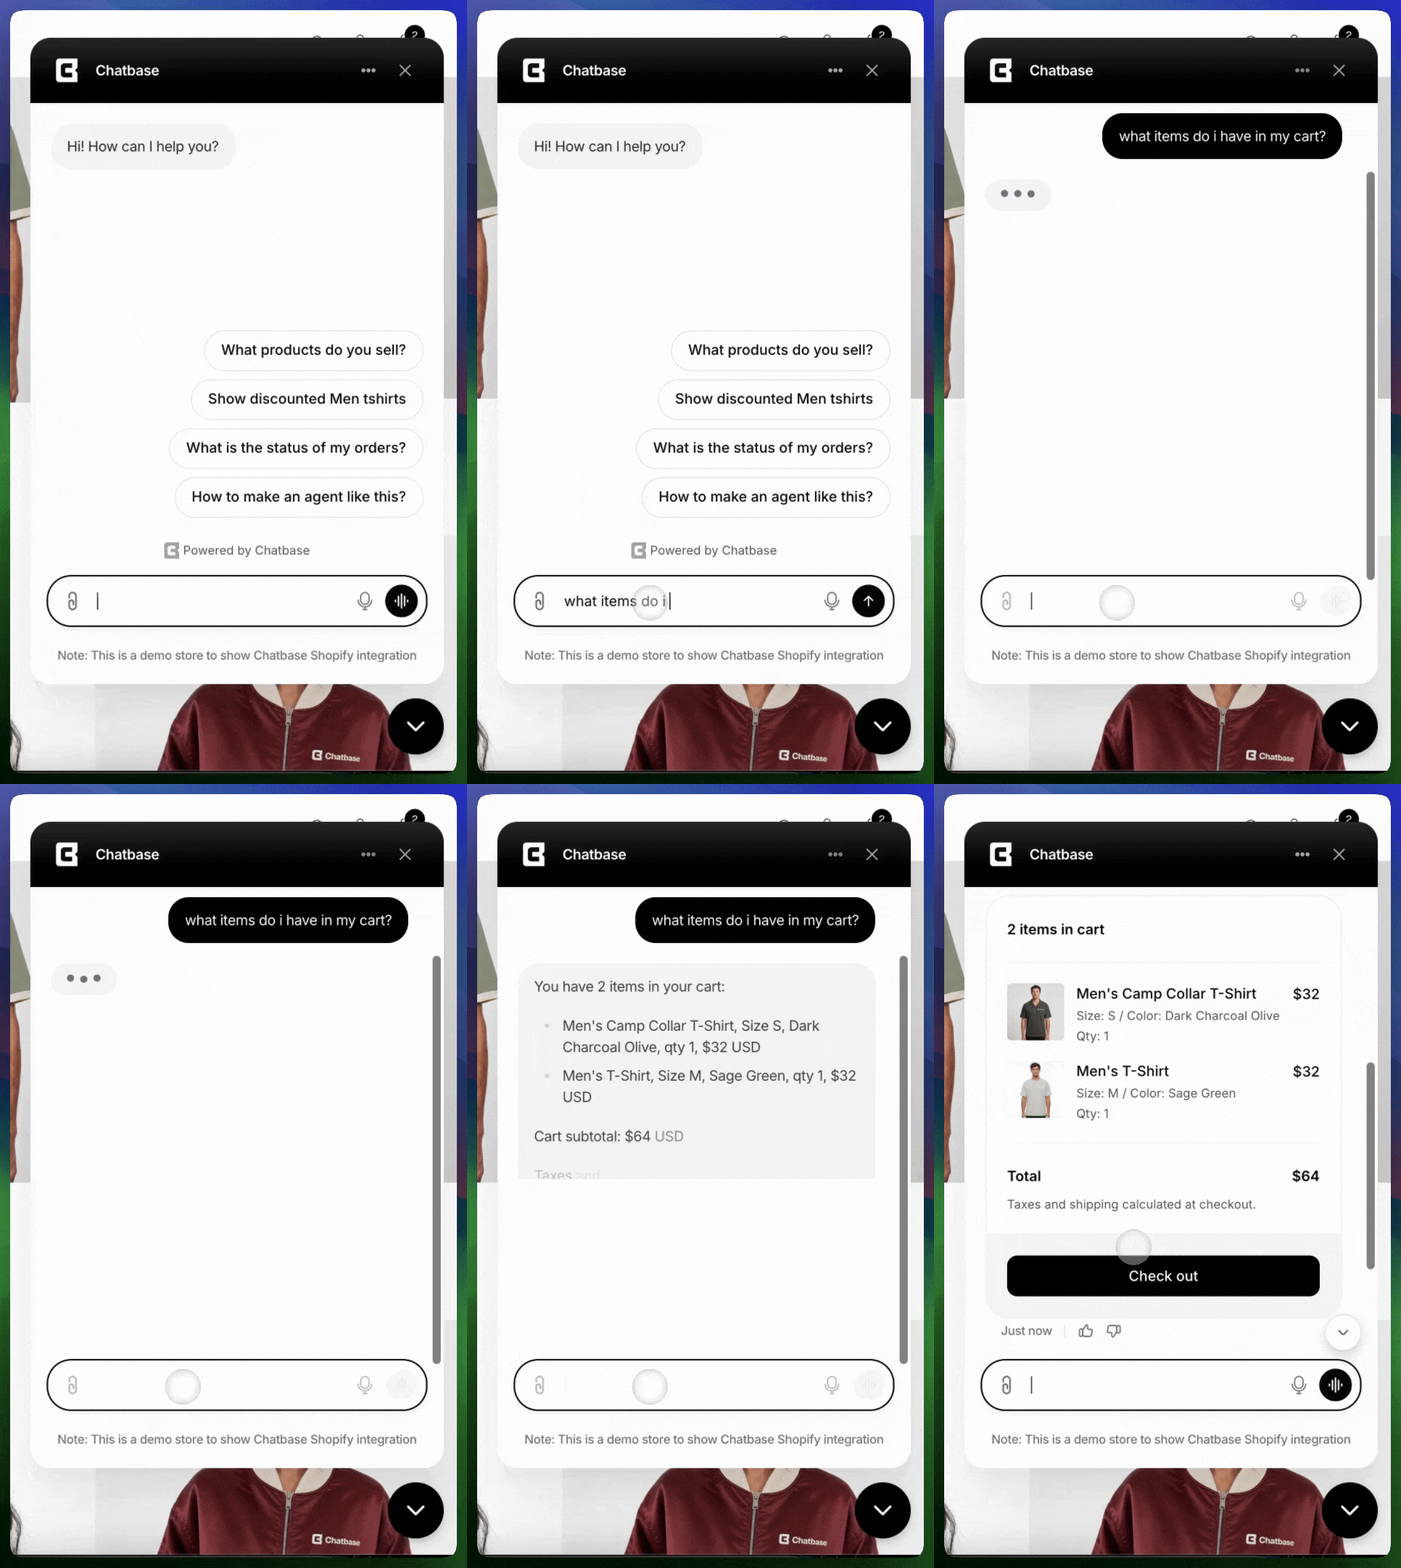
**When to use:** Call this tool when asked about the cart, including the items in the cart, the total price, the quantity of items.
Test the action by asking your AI agent to show cart contents.
 ***
### 4. Create order
Let your AI agent place a Shopify order for the shopper directly from the conversation. The order can be built from the shopper's cart or from specific items the AI agent (or a procedure) provides, and paid for with a Shopify checkout link, cash on delivery, or as a free order. Orders can be placed from any channel your AI agent is on: Chat bubble, Help page, Instagram, Messenger, and WhatsApp.
Completing a purchase without leaving the chat, "buy it now" flows, cash-on-delivery stores, and sending free replacement or gift orders.
**Common Use Cases:**
* "I'm ready to check out"
* "Place the order for what's in my cart"
#### Settings
**Template:** **Shopify create order**.
**Action Name:** Create\_Order.
**When to use:** Call this tool when the user wants to place an order.
If orders should only ever be placed as a step inside a [procedure](/docs/user-guides/chatbot/procedures/procedures-overview), and never on the AI agent's own initiative, turn on [**Only use in procedures**](/docs/user-guides/chatbot/actions/actions-overview#only-use-in-procedures).
#### Behavior
The **Behavior** section controls how the order is built, how it is paid for, and how it is recorded in Shopify.
**Order items**: where the items in the order come from.
| Option | What it does |
| -------------------------- | --------------------------------------------------------------------------------------------------------------------------------------------------------------------------------------------------------------------------- |
| **Use the cart** (default) | Creates the order from whatever the shopper has added to their cart. The cart is emptied once the order is placed. The [Update cart](#2-update-cart) action must also be enabled so the AI agent can add items to the cart. |
| **Skip the cart** | Creates the order from items the AI agent or a procedure provides. The cart is never read or changed. Usually used for replacements, gifts, and buy-it-now flows. |
**Order payment**: how the shopper pays.
| Option | What it does |
| ---------------------------- | ------------------------------------------------------------------------------------------------------------------------------------------- |
| **Online payment** (default) | Sends the shopper a secure Shopify-hosted checkout link. Shopify finalizes the order once they pay. |
| **Cash on delivery** | Charges the shopper when the order arrives. |
| **Free order** | Places the order at no cost to the shopper. No payment is collected and no checkout link is sent. Use this for replacements and free gifts. |
**Shipping address phone number**: whether the AI agent collects a phone number for the shipping address.
| Option | What it does |
| ---------------------- | ----------------------------------------------------------------------------- |
| **Required** (default) | The AI agent must collect a phone number before it places the order. |
| **Don't include** | The AI agent never asks for a phone number. |
| **Optional** | The AI agent asks for it, and still places the order if the shopper declines. |
**Order tags**: tags added to every order this action creates, so you can find them in Shopify admin. Defaults to `chatbase`. Add or remove tags as needed.
**Order note**: a note attached to the order in Shopify. Defaults to `Placed via Chatbase AI agent ( {{paymentModeLabel}} )`, where `{{paymentModeLabel}}` is replaced with the payment method used for the order. Click **Add variable** to insert other variables, or **Reset** to restore the default.
***
### 4. Create order
Let your AI agent place a Shopify order for the shopper directly from the conversation. The order can be built from the shopper's cart or from specific items the AI agent (or a procedure) provides, and paid for with a Shopify checkout link, cash on delivery, or as a free order. Orders can be placed from any channel your AI agent is on: Chat bubble, Help page, Instagram, Messenger, and WhatsApp.
Completing a purchase without leaving the chat, "buy it now" flows, cash-on-delivery stores, and sending free replacement or gift orders.
**Common Use Cases:**
* "I'm ready to check out"
* "Place the order for what's in my cart"
#### Settings
**Template:** **Shopify create order**.
**Action Name:** Create\_Order.
**When to use:** Call this tool when the user wants to place an order.
If orders should only ever be placed as a step inside a [procedure](/docs/user-guides/chatbot/procedures/procedures-overview), and never on the AI agent's own initiative, turn on [**Only use in procedures**](/docs/user-guides/chatbot/actions/actions-overview#only-use-in-procedures).
#### Behavior
The **Behavior** section controls how the order is built, how it is paid for, and how it is recorded in Shopify.
**Order items**: where the items in the order come from.
| Option | What it does |
| -------------------------- | --------------------------------------------------------------------------------------------------------------------------------------------------------------------------------------------------------------------------- |
| **Use the cart** (default) | Creates the order from whatever the shopper has added to their cart. The cart is emptied once the order is placed. The [Update cart](#2-update-cart) action must also be enabled so the AI agent can add items to the cart. |
| **Skip the cart** | Creates the order from items the AI agent or a procedure provides. The cart is never read or changed. Usually used for replacements, gifts, and buy-it-now flows. |
**Order payment**: how the shopper pays.
| Option | What it does |
| ---------------------------- | ------------------------------------------------------------------------------------------------------------------------------------------- |
| **Online payment** (default) | Sends the shopper a secure Shopify-hosted checkout link. Shopify finalizes the order once they pay. |
| **Cash on delivery** | Charges the shopper when the order arrives. |
| **Free order** | Places the order at no cost to the shopper. No payment is collected and no checkout link is sent. Use this for replacements and free gifts. |
**Shipping address phone number**: whether the AI agent collects a phone number for the shipping address.
| Option | What it does |
| ---------------------- | ----------------------------------------------------------------------------- |
| **Required** (default) | The AI agent must collect a phone number before it places the order. |
| **Don't include** | The AI agent never asks for a phone number. |
| **Optional** | The AI agent asks for it, and still places the order if the shopper declines. |
**Order tags**: tags added to every order this action creates, so you can find them in Shopify admin. Defaults to `chatbase`. Add or remove tags as needed.
**Order note**: a note attached to the order in Shopify. Defaults to `Placed via Chatbase AI agent ( {{paymentModeLabel}} )`, where `{{paymentModeLabel}}` is replaced with the payment method used for the order. Click **Add variable** to insert other variables, or **Reset** to restore the default.
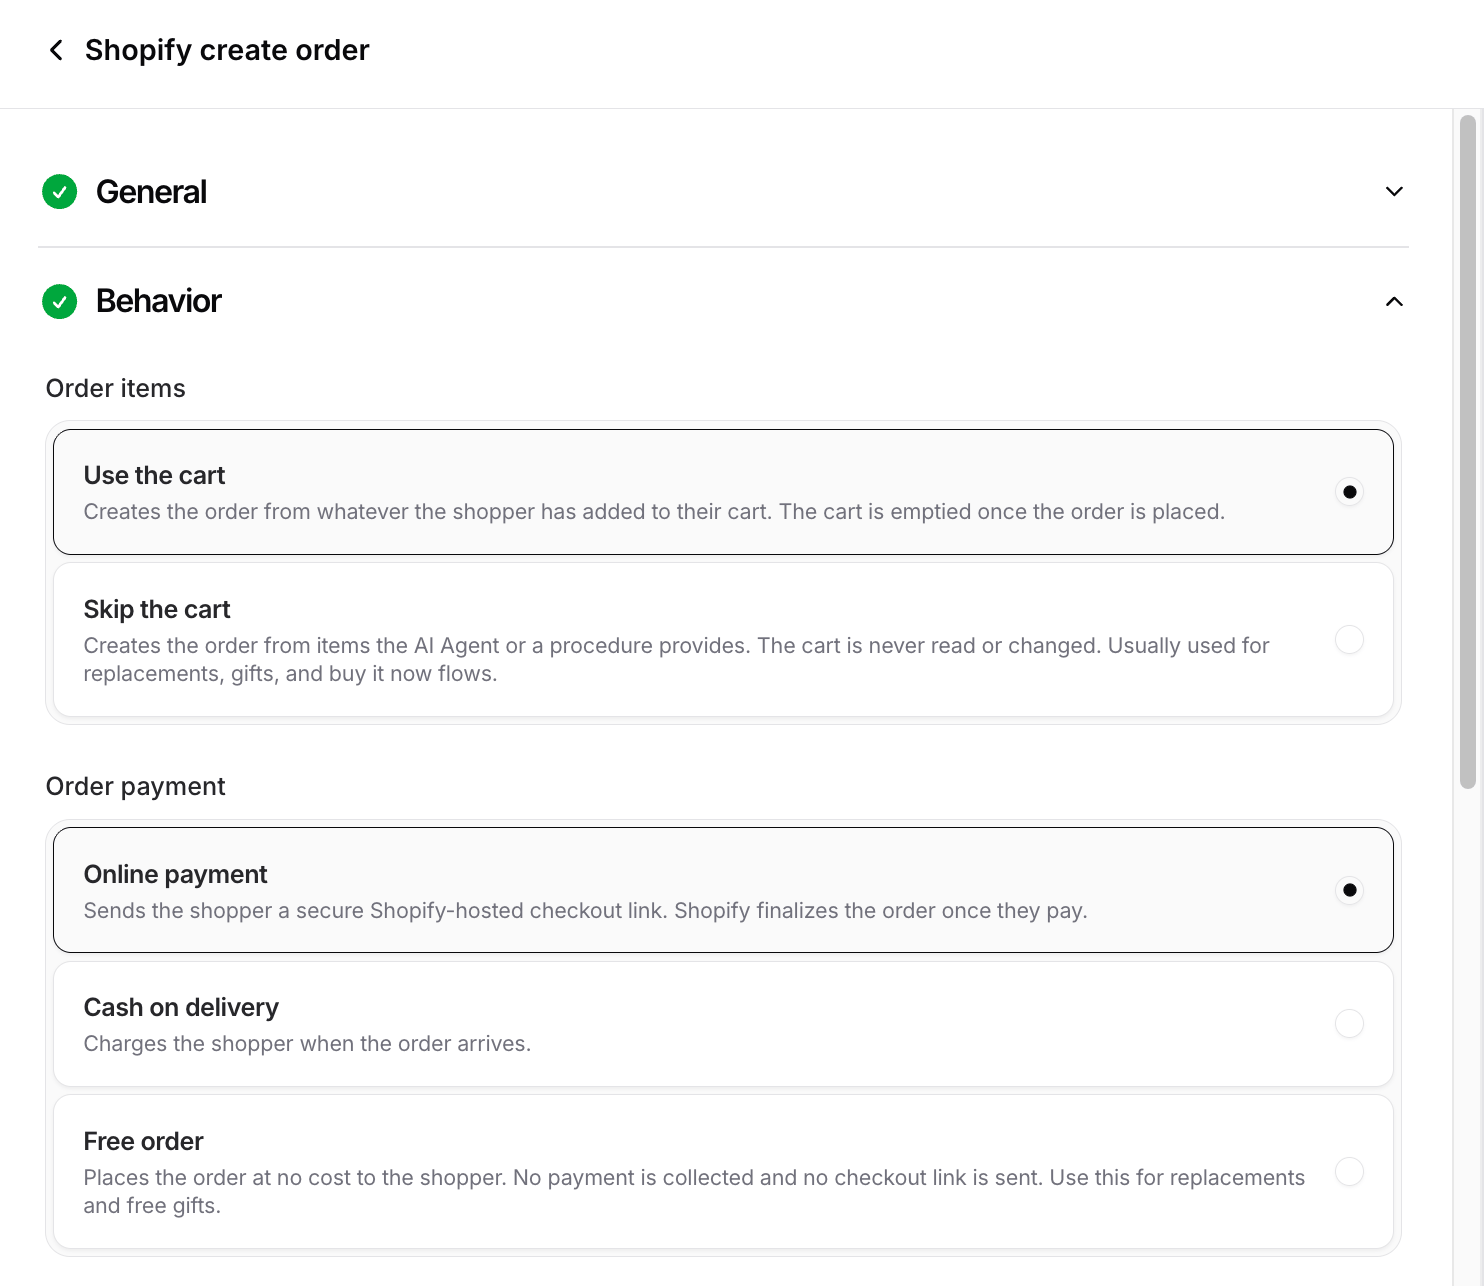
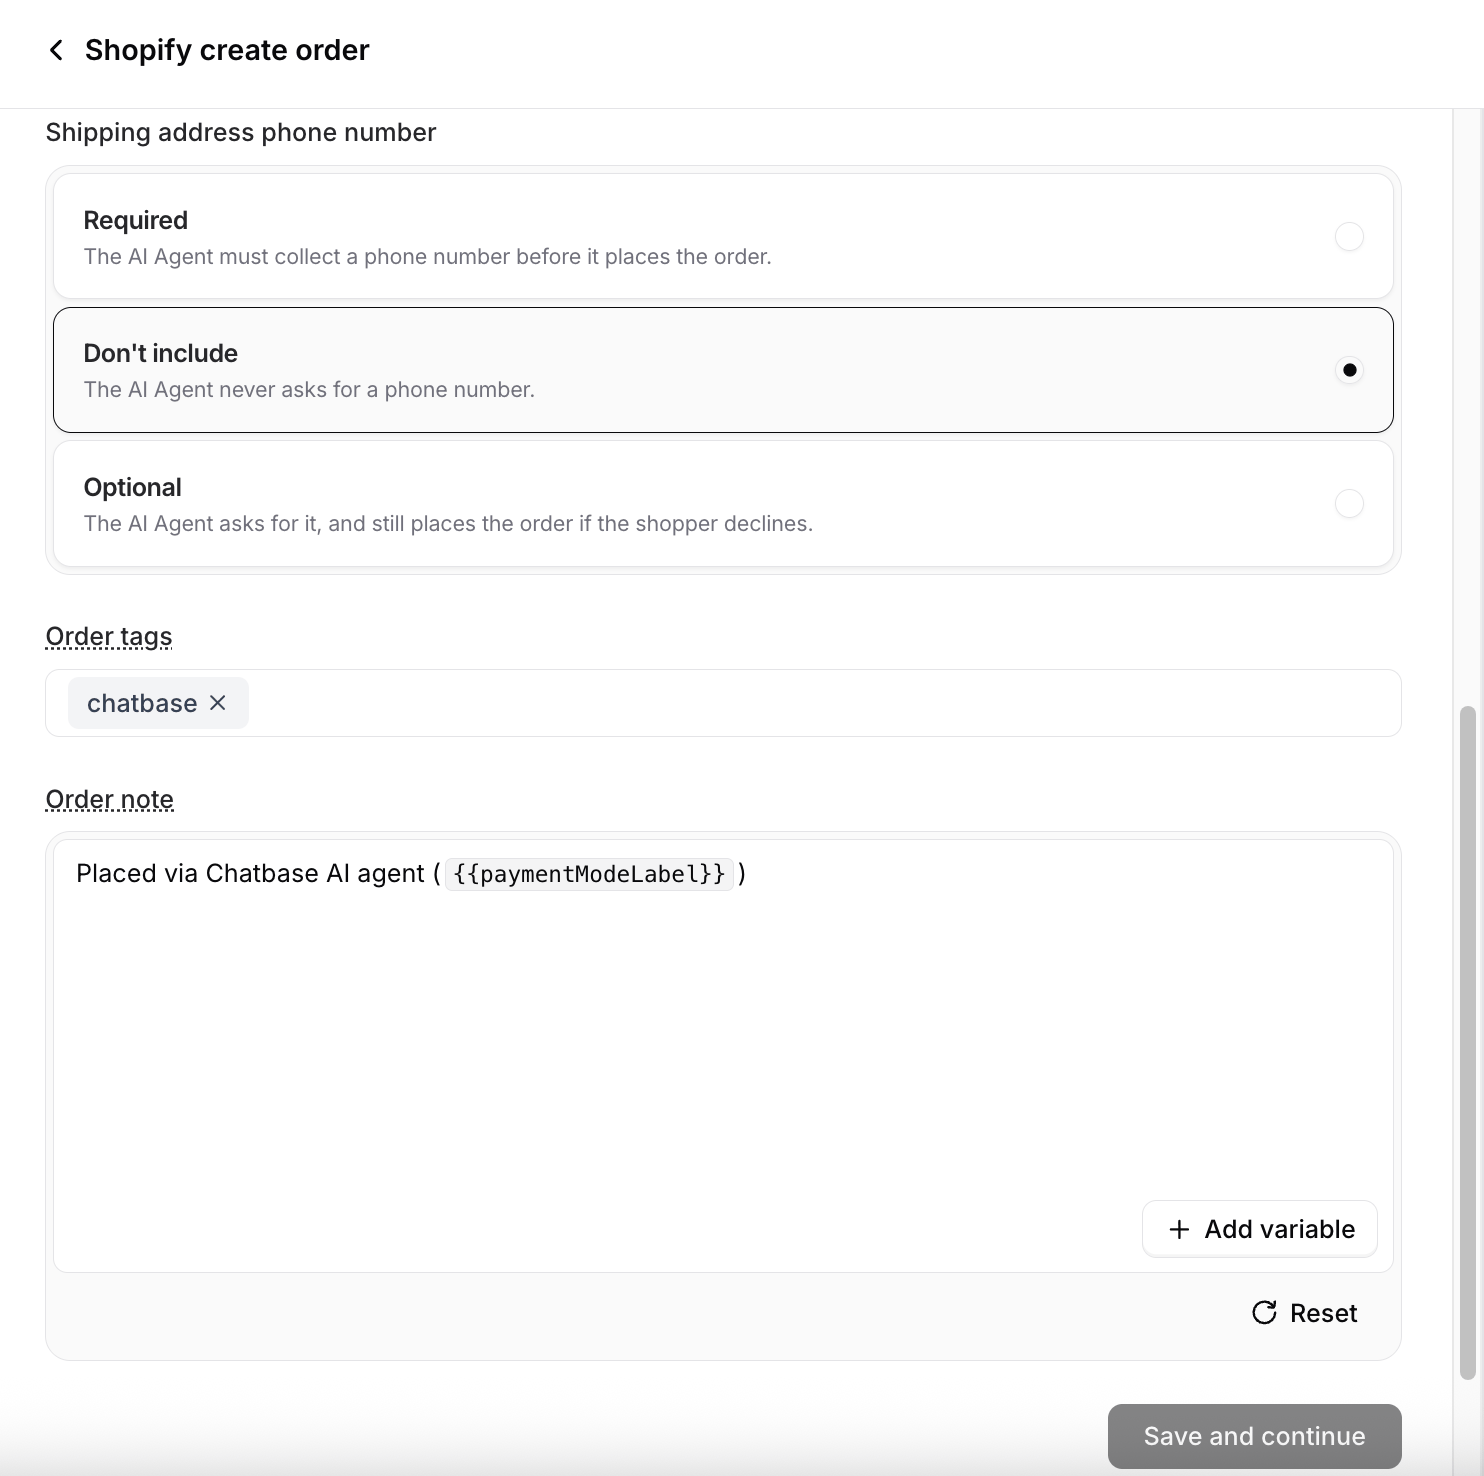 Test the action by adding an item to the cart and asking your AI agent to place the order. With **Online payment** selected, the AI agent should reply with a Shopify checkout link.
When testing from the Playground with **Online payment**, the AI agent isn't aware whether the payment was completed. On supported channels, the AI agent knows once the shopper pays. Updating the cart doesn't work in the Playground either, so test **Use the cart** orders from a live channel such as the Chat bubble.
**You can create the Create order action more than once**, each with its own **Behavior** settings, and give each a distinct action name. For example, keep `Create_Order` (**Use the cart** + **Online payment**) for regular checkout, and add `Create_Replacement_Order` (**Skip the cart** + **Free order**) for replacements and goodwill orders. Then reference the right one from a [procedure](/docs/user-guides/chatbot/procedures/procedures-overview) step with `@action_name`, so each flow places exactly the kind of order it should. Turn on **Only use in procedures** on the replacement variant so the AI agent never uses it outside that flow.
***
### 5. Create exchange (new order)
Handle exchange requests against a past order. The AI agent creates an exchange draft order that credits the returned items toward their replacements, then opens a Chatbase Helpdesk ticket so a human agent can approve or reject it before the order is placed. Approval is always required: nothing reaches Shopify until someone works the ticket.
This action only swaps items for replacements. It can't take a plain return, so if the customer wants their money back rather than a different product, use [Create return or exchange (same order)](#6-create-return-or-exchange-same-order) instead.
Size and color swaps, replacing a wrong or defective item, and any exchange where you want a person to approve before the replacement ships.
**Common Use Cases:**
* "I'd like to exchange these for a size 10"
* "Can I swap this for the black version?"
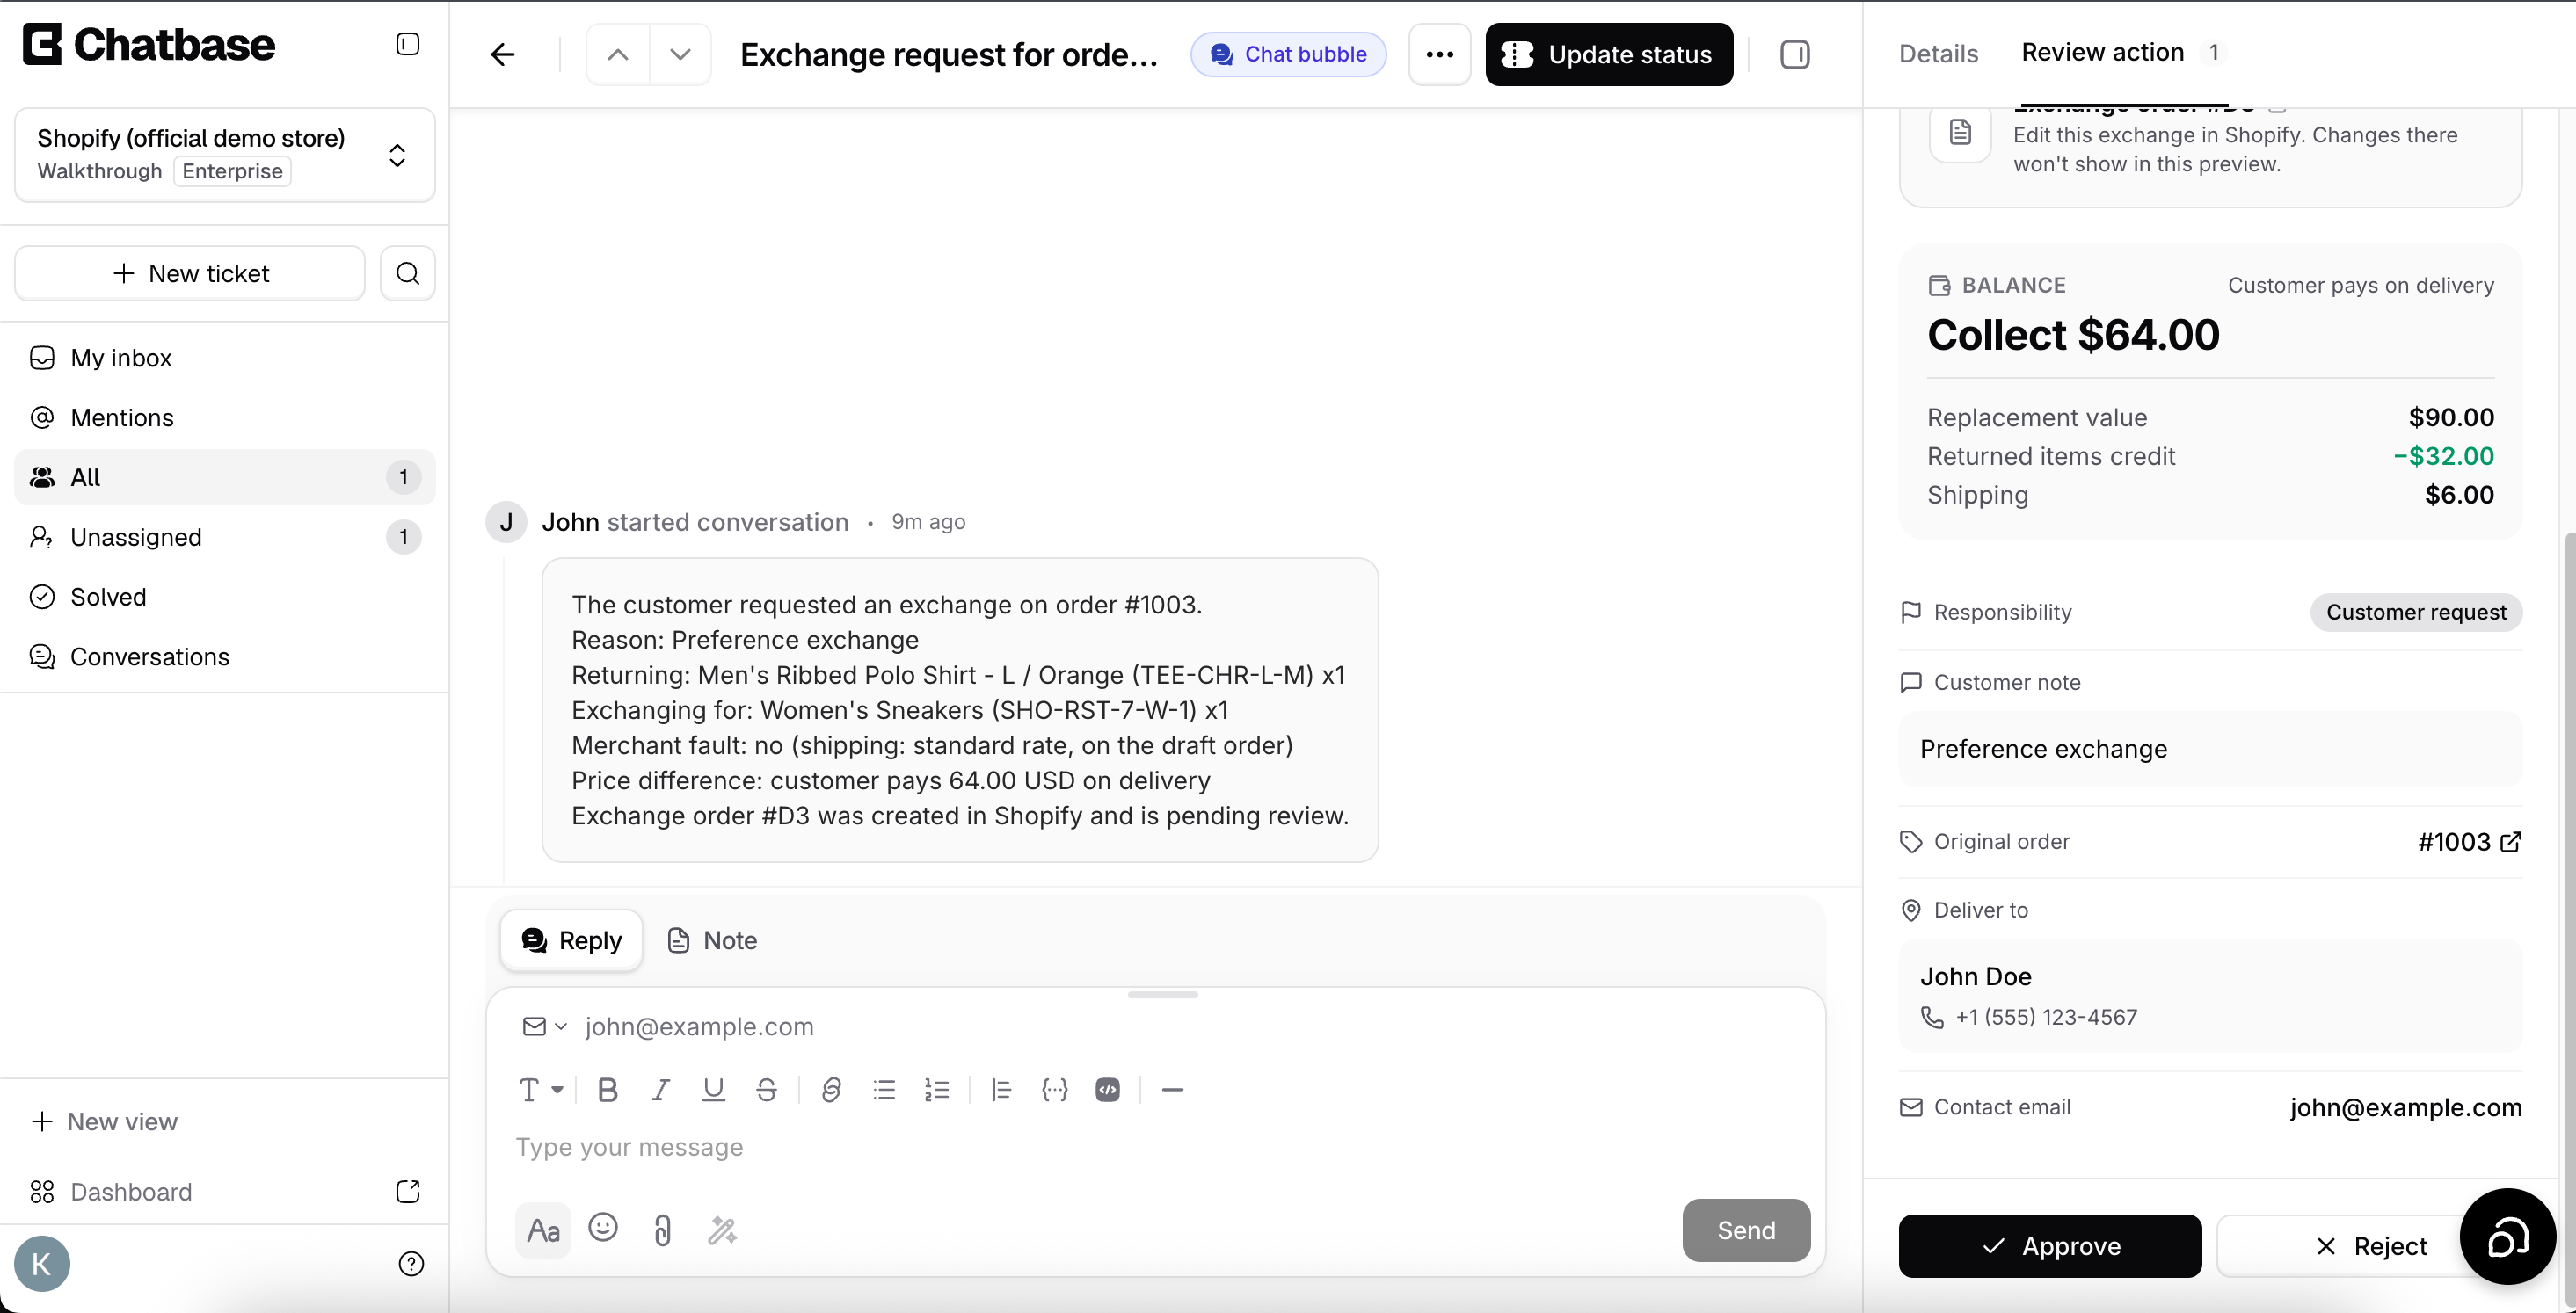
The exchange order isn't placed until a human agent approves it. The Chatbase Helpdesk ticket shows a summary of what is being returned and what it is being exchanged for; the human agent approves or rejects it with a single click, and approving pushes the exchange to Shopify. See the [Helpdesk overview](/docs/user-guides/chatbot/help-desk/help-desk-overview) for how tickets are handled.
Ticket Details:
Test the action by adding an item to the cart and asking your AI agent to place the order. With **Online payment** selected, the AI agent should reply with a Shopify checkout link.
When testing from the Playground with **Online payment**, the AI agent isn't aware whether the payment was completed. On supported channels, the AI agent knows once the shopper pays. Updating the cart doesn't work in the Playground either, so test **Use the cart** orders from a live channel such as the Chat bubble.
**You can create the Create order action more than once**, each with its own **Behavior** settings, and give each a distinct action name. For example, keep `Create_Order` (**Use the cart** + **Online payment**) for regular checkout, and add `Create_Replacement_Order` (**Skip the cart** + **Free order**) for replacements and goodwill orders. Then reference the right one from a [procedure](/docs/user-guides/chatbot/procedures/procedures-overview) step with `@action_name`, so each flow places exactly the kind of order it should. Turn on **Only use in procedures** on the replacement variant so the AI agent never uses it outside that flow.
***
### 5. Create exchange (new order)
Handle exchange requests against a past order. The AI agent creates an exchange draft order that credits the returned items toward their replacements, then opens a Chatbase Helpdesk ticket so a human agent can approve or reject it before the order is placed. Approval is always required: nothing reaches Shopify until someone works the ticket.
This action only swaps items for replacements. It can't take a plain return, so if the customer wants their money back rather than a different product, use [Create return or exchange (same order)](#6-create-return-or-exchange-same-order) instead.
Size and color swaps, replacing a wrong or defective item, and any exchange where you want a person to approve before the replacement ships.
**Common Use Cases:**
* "I'd like to exchange these for a size 10"
* "Can I swap this for the black version?"
The exchange order isn't placed until a human agent approves it. The Chatbase Helpdesk ticket shows a summary of what is being returned and what it is being exchanged for; the human agent approves or rejects it with a single click, and approving pushes the exchange to Shopify. See the [Helpdesk overview](/docs/user-guides/chatbot/help-desk/help-desk-overview) for how tickets are handled.
Ticket Details:
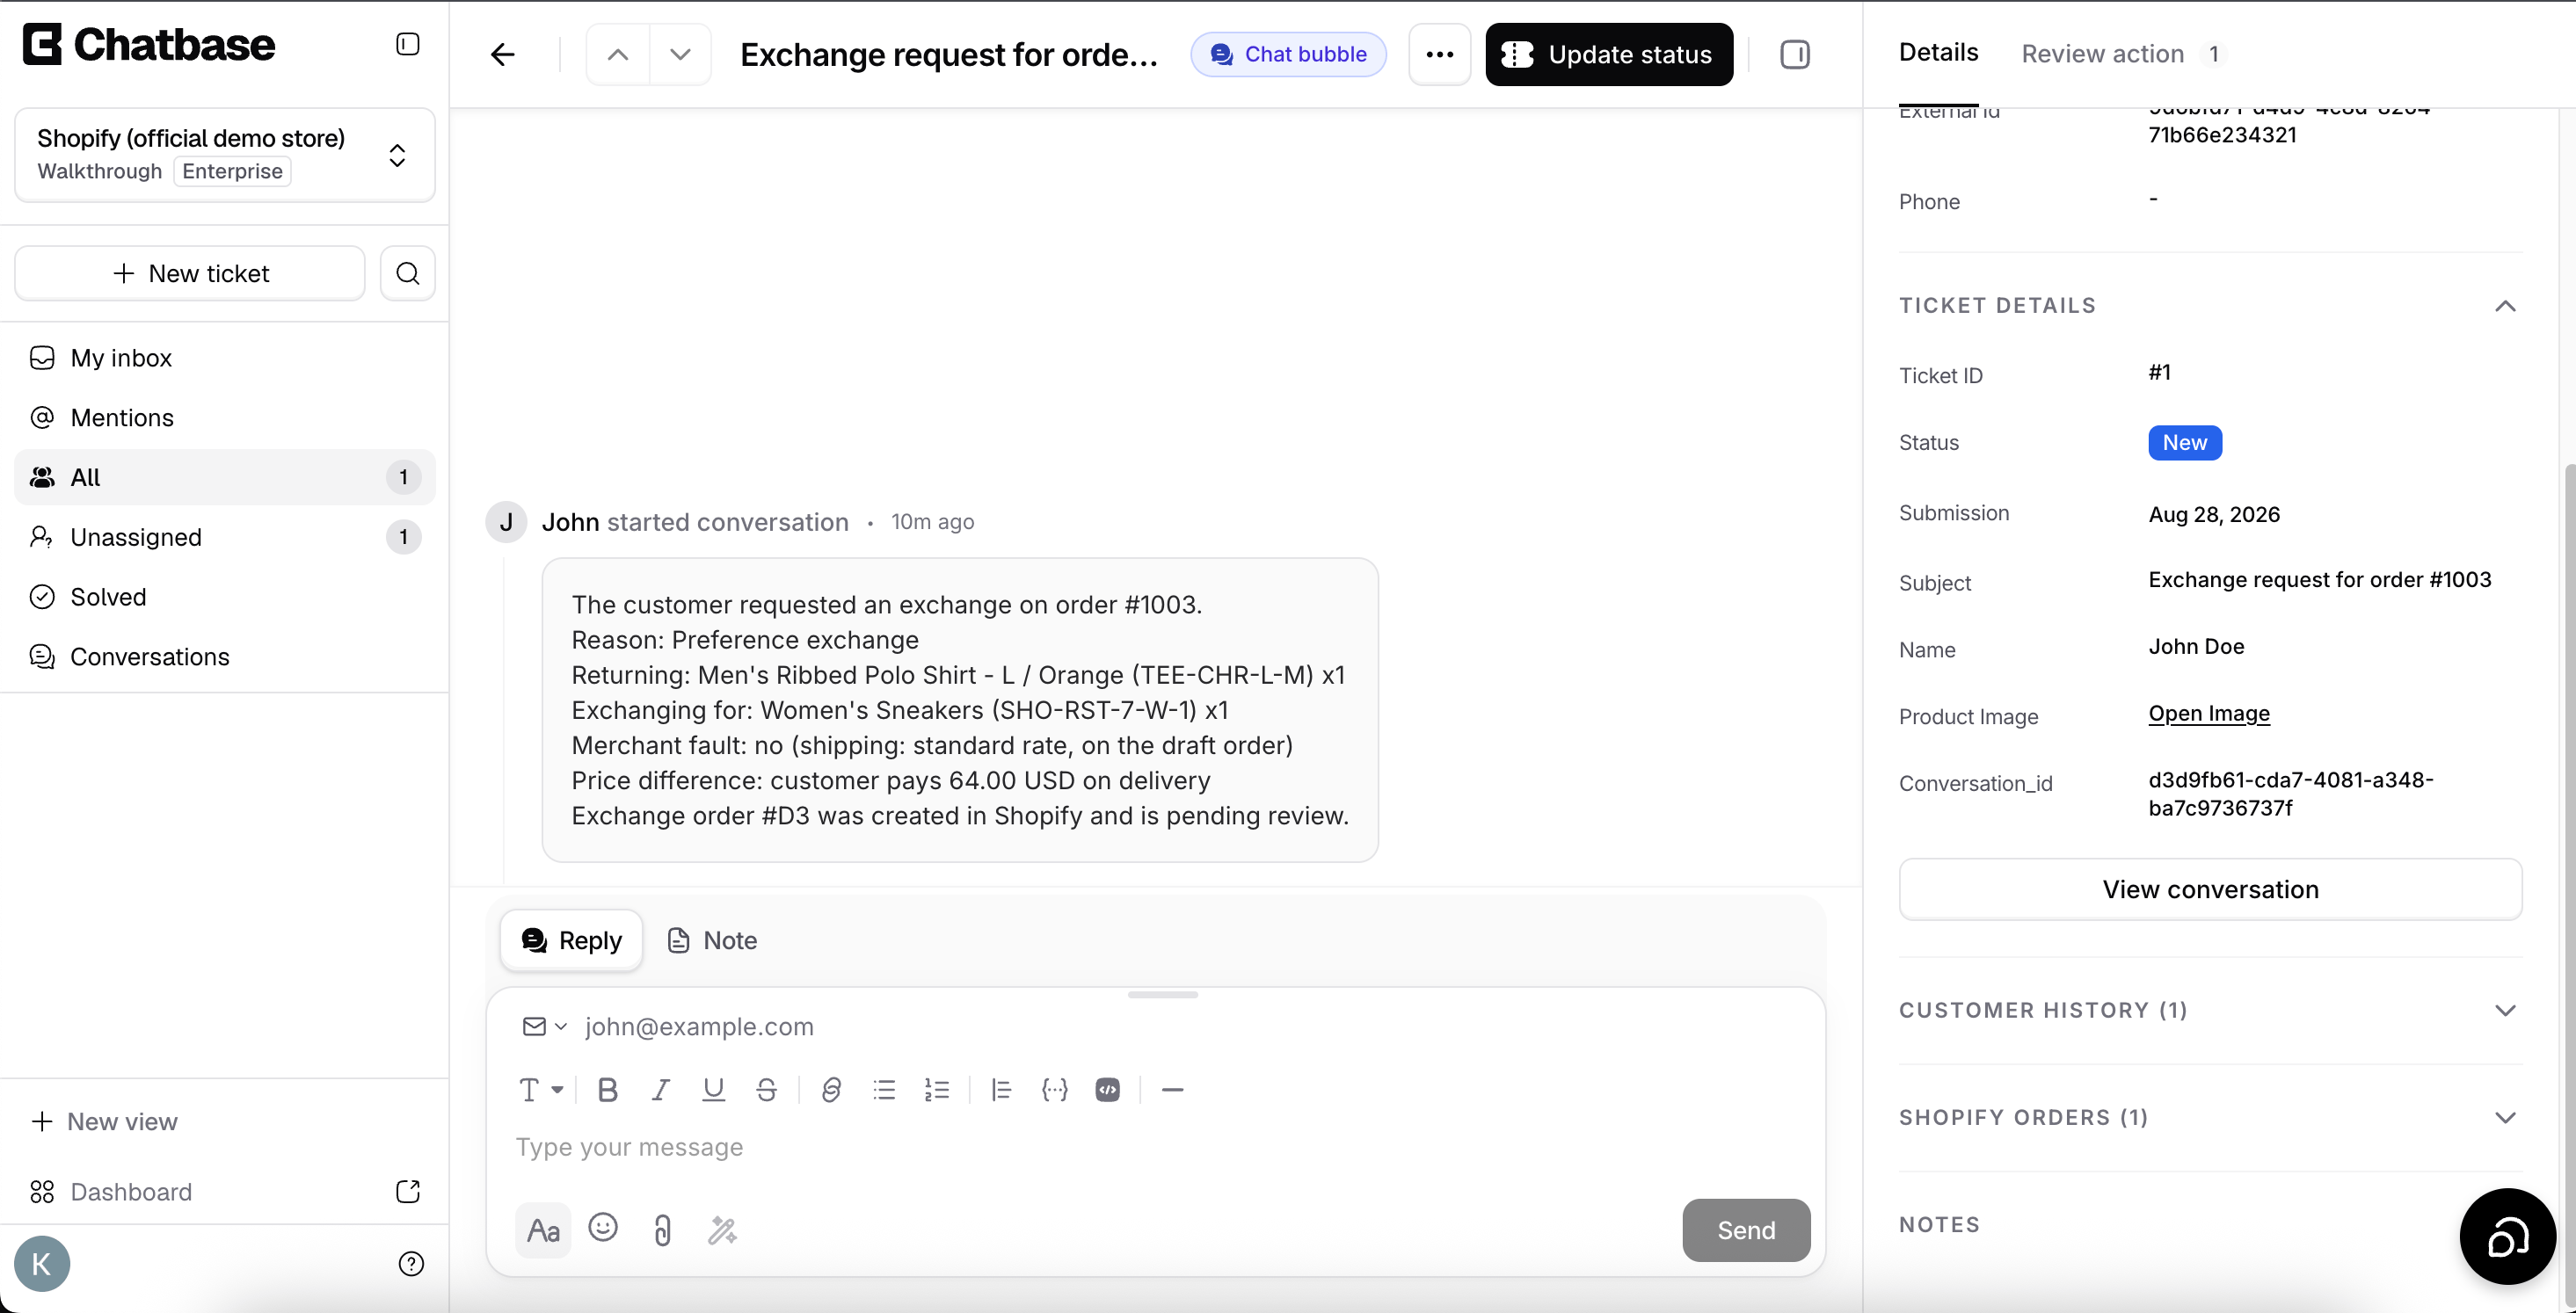 By clicking on "Review action", the human agent will see the exchange details and they can approve or reject the request.
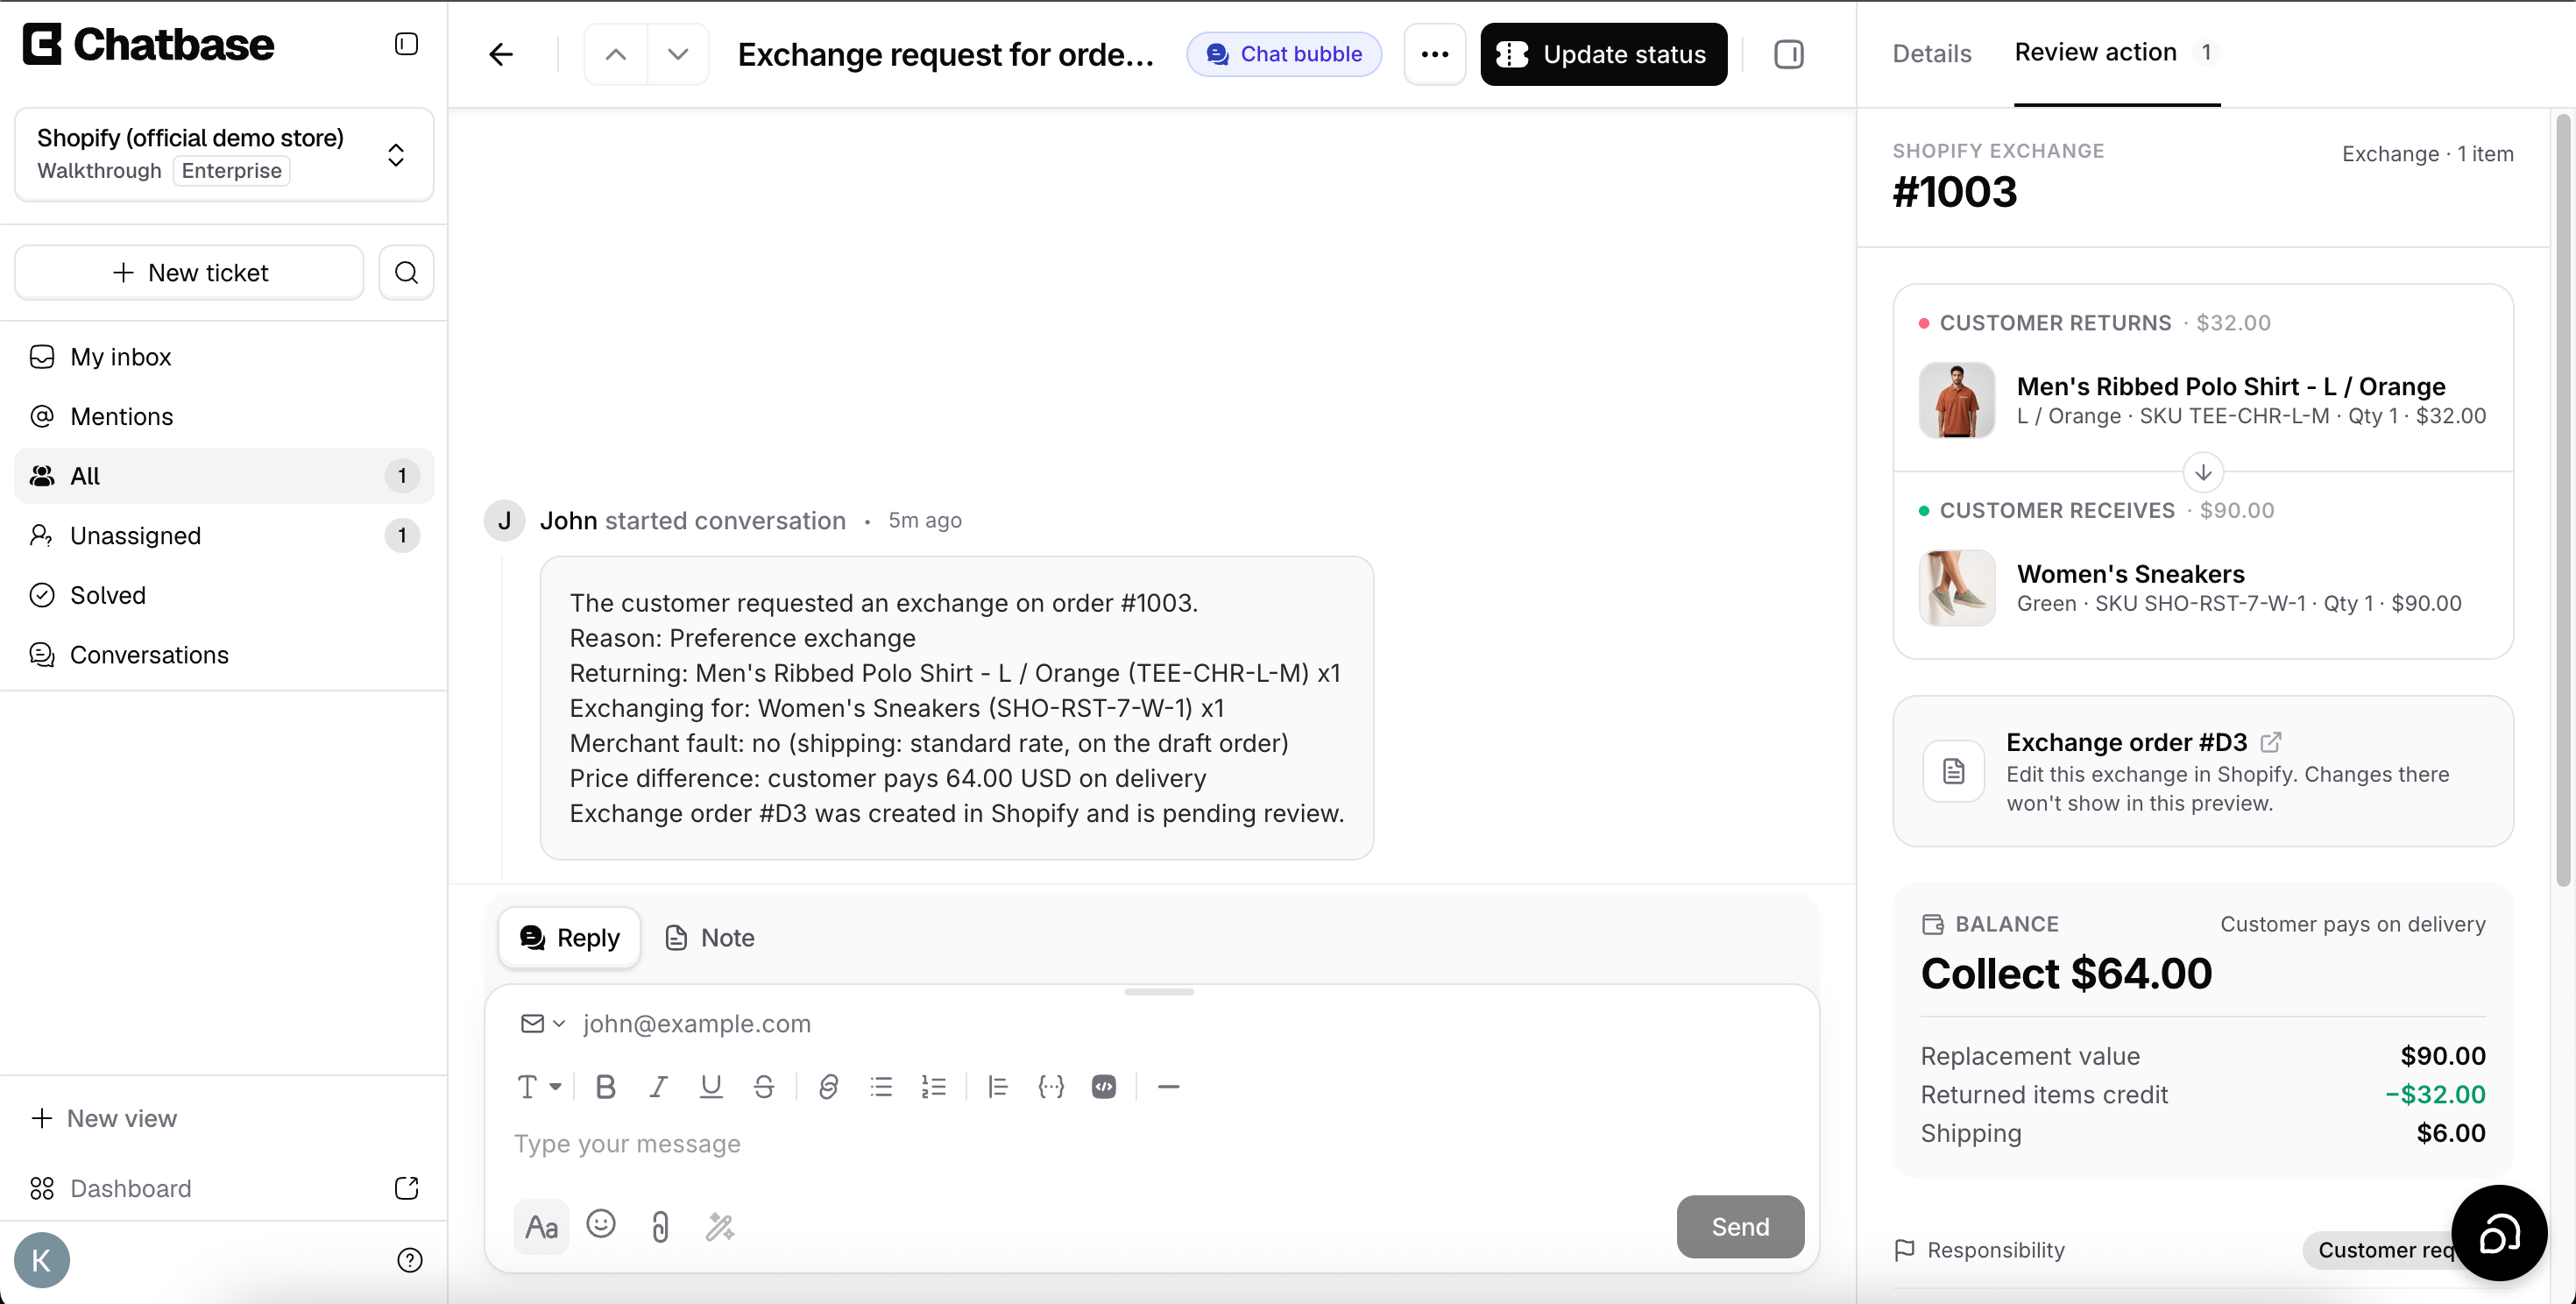
 #### Settings
**Template:** **Create exchange (new order)**. The action opens as **Shopify create exchange**.
**Action Name:** Create\_Exchange.
**When to use:** Call this tool when the user wants to do a product exchange.
#### Behavior
The **Behavior** section controls how the exchange draft order is recorded in Shopify.
**Order tags**: tags added to the exchange order, so you can find it in Shopify admin. Defaults to `chatbase`. Add or remove tags as needed.
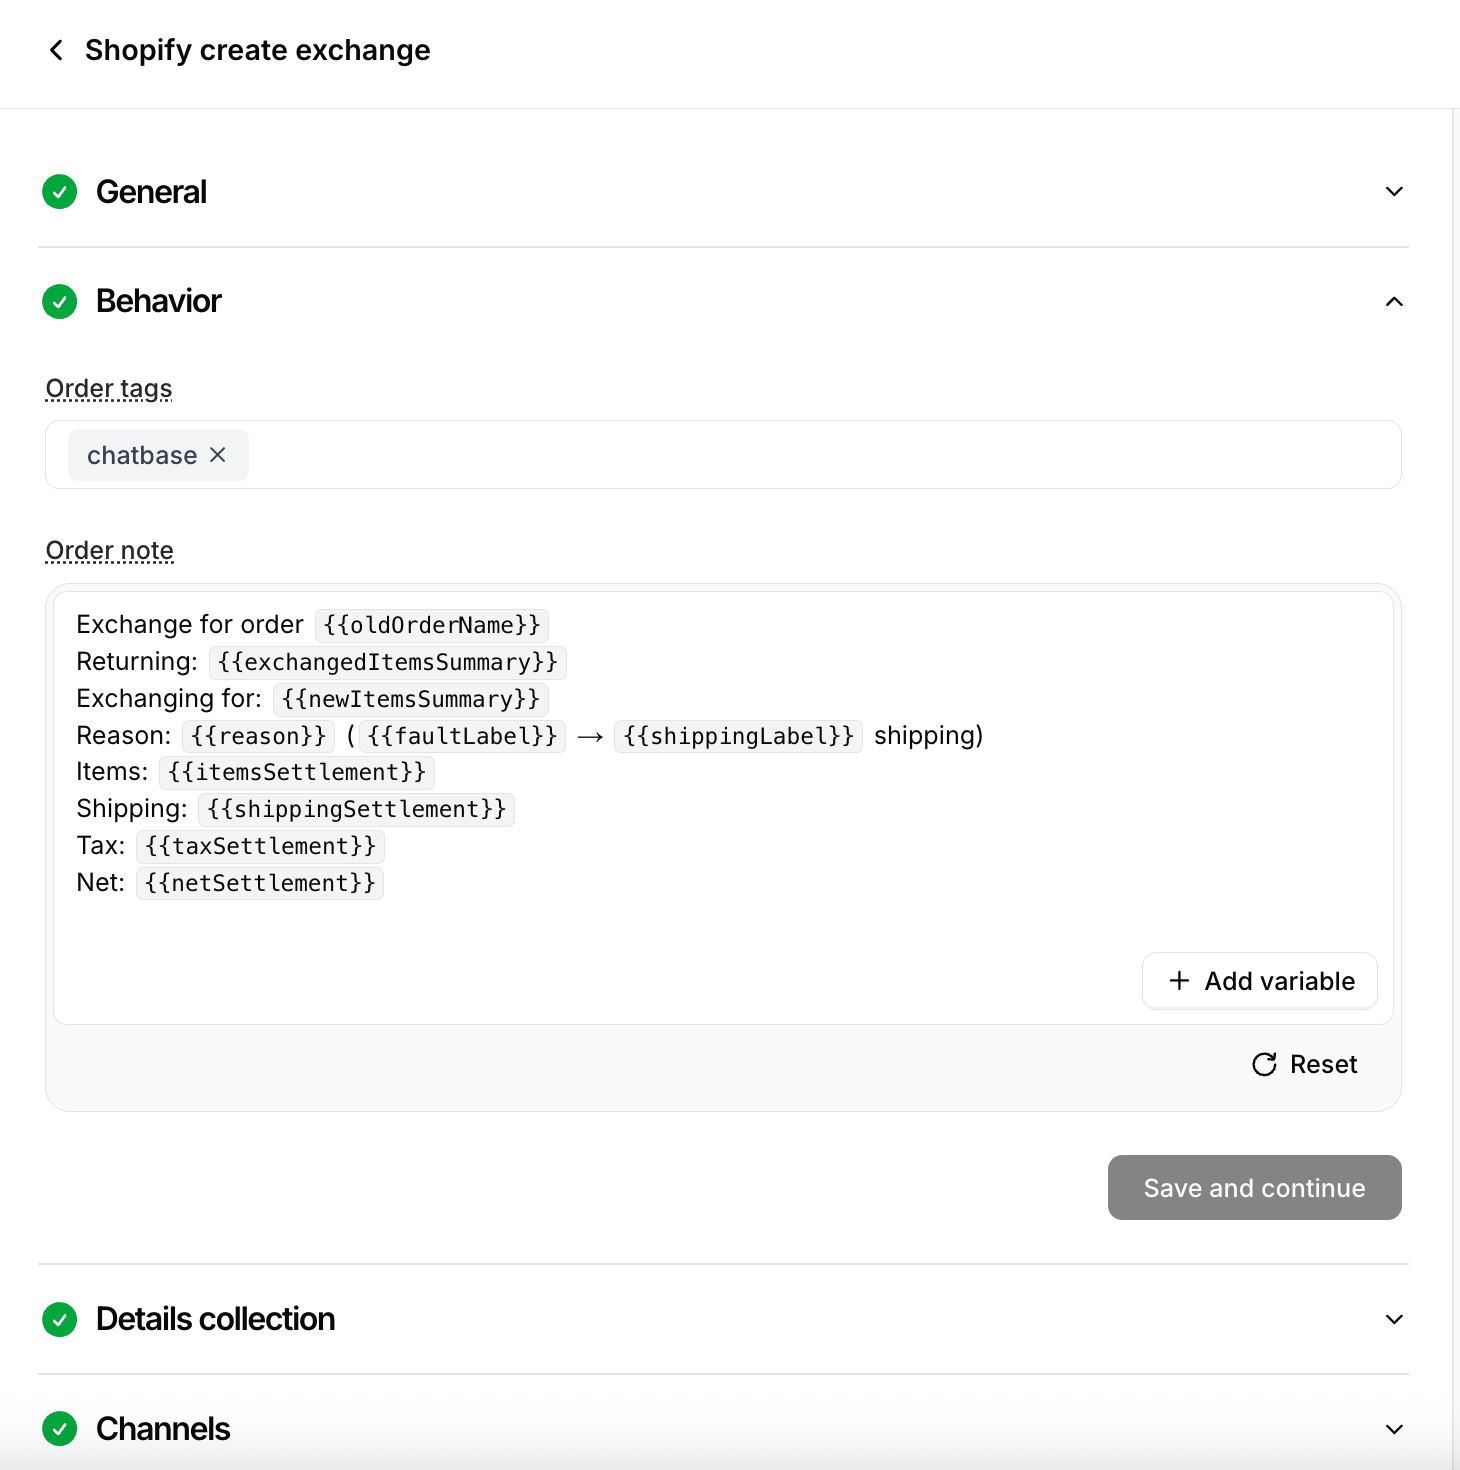
**Order note**: a note attached to the exchange order that summarizes what is being returned, what it is exchanged for, and the resulting balance. The default is:
```text theme={null}
Exchange for order {{oldOrderName}}
Returning: {{exchangedItemsSummary}}
Exchanging for: {{newItemsSummary}}
Reason: {{reason}} ({{faultLabel}} → {{shippingLabel}} shipping)
Items: {{itemsSettlement}}
Shipping: {{shippingSettlement}}
Tax: {{taxSettlement}}
Net: {{netSettlement}}
```
Click **Add variable** to insert any of the available order variables, or **Reset** to restore the default.
| Variable | Description |
| --------------------------- | --------------------------------------------------------------------- |
| `{{oldOrderName}}` | Name of the original order, for example `#1042` |
| `{{exchangedItemsSummary}}` | The returned items, for example `Red tee (SKU-1) x2` |
| `{{newItemsSummary}}` | The replacement items, in the same format |
| `{{reason}}` | The shopper's exchange reason |
| `{{faultLabel}}` | Whether the exchange is a `merchant fault` or a `customer request` |
| `{{shippingLabel}}` | Whether shipping on the exchange is `free` or `paid` |
| `{{itemsSettlement}}` | Settlement line for the item price difference |
| `{{shippingSettlement}}` | Settlement line for the shipping cost |
| `{{taxSettlement}}` | Settlement line for tax |
| `{{netSettlement}}` | The authoritative net amount to collect from or refund to the shopper |
| `{{conversationId}}` | The Chatbase conversation ID |
For example, the default **Reason** line renders as `Reason: Wrong size (merchant fault → free shipping)`.
#### Settings
**Template:** **Create exchange (new order)**. The action opens as **Shopify create exchange**.
**Action Name:** Create\_Exchange.
**When to use:** Call this tool when the user wants to do a product exchange.
#### Behavior
The **Behavior** section controls how the exchange draft order is recorded in Shopify.
**Order tags**: tags added to the exchange order, so you can find it in Shopify admin. Defaults to `chatbase`. Add or remove tags as needed.
**Order note**: a note attached to the exchange order that summarizes what is being returned, what it is exchanged for, and the resulting balance. The default is:
```text theme={null}
Exchange for order {{oldOrderName}}
Returning: {{exchangedItemsSummary}}
Exchanging for: {{newItemsSummary}}
Reason: {{reason}} ({{faultLabel}} → {{shippingLabel}} shipping)
Items: {{itemsSettlement}}
Shipping: {{shippingSettlement}}
Tax: {{taxSettlement}}
Net: {{netSettlement}}
```
Click **Add variable** to insert any of the available order variables, or **Reset** to restore the default.
| Variable | Description |
| --------------------------- | --------------------------------------------------------------------- |
| `{{oldOrderName}}` | Name of the original order, for example `#1042` |
| `{{exchangedItemsSummary}}` | The returned items, for example `Red tee (SKU-1) x2` |
| `{{newItemsSummary}}` | The replacement items, in the same format |
| `{{reason}}` | The shopper's exchange reason |
| `{{faultLabel}}` | Whether the exchange is a `merchant fault` or a `customer request` |
| `{{shippingLabel}}` | Whether shipping on the exchange is `free` or `paid` |
| `{{itemsSettlement}}` | Settlement line for the item price difference |
| `{{shippingSettlement}}` | Settlement line for the shipping cost |
| `{{taxSettlement}}` | Settlement line for tax |
| `{{netSettlement}}` | The authoritative net amount to collect from or refund to the shopper |
| `{{conversationId}}` | The Chatbase conversation ID |
For example, the default **Reason** line renders as `Reason: Wrong size (merchant fault → free shipping)`.
 #### Collect additional details (optional)
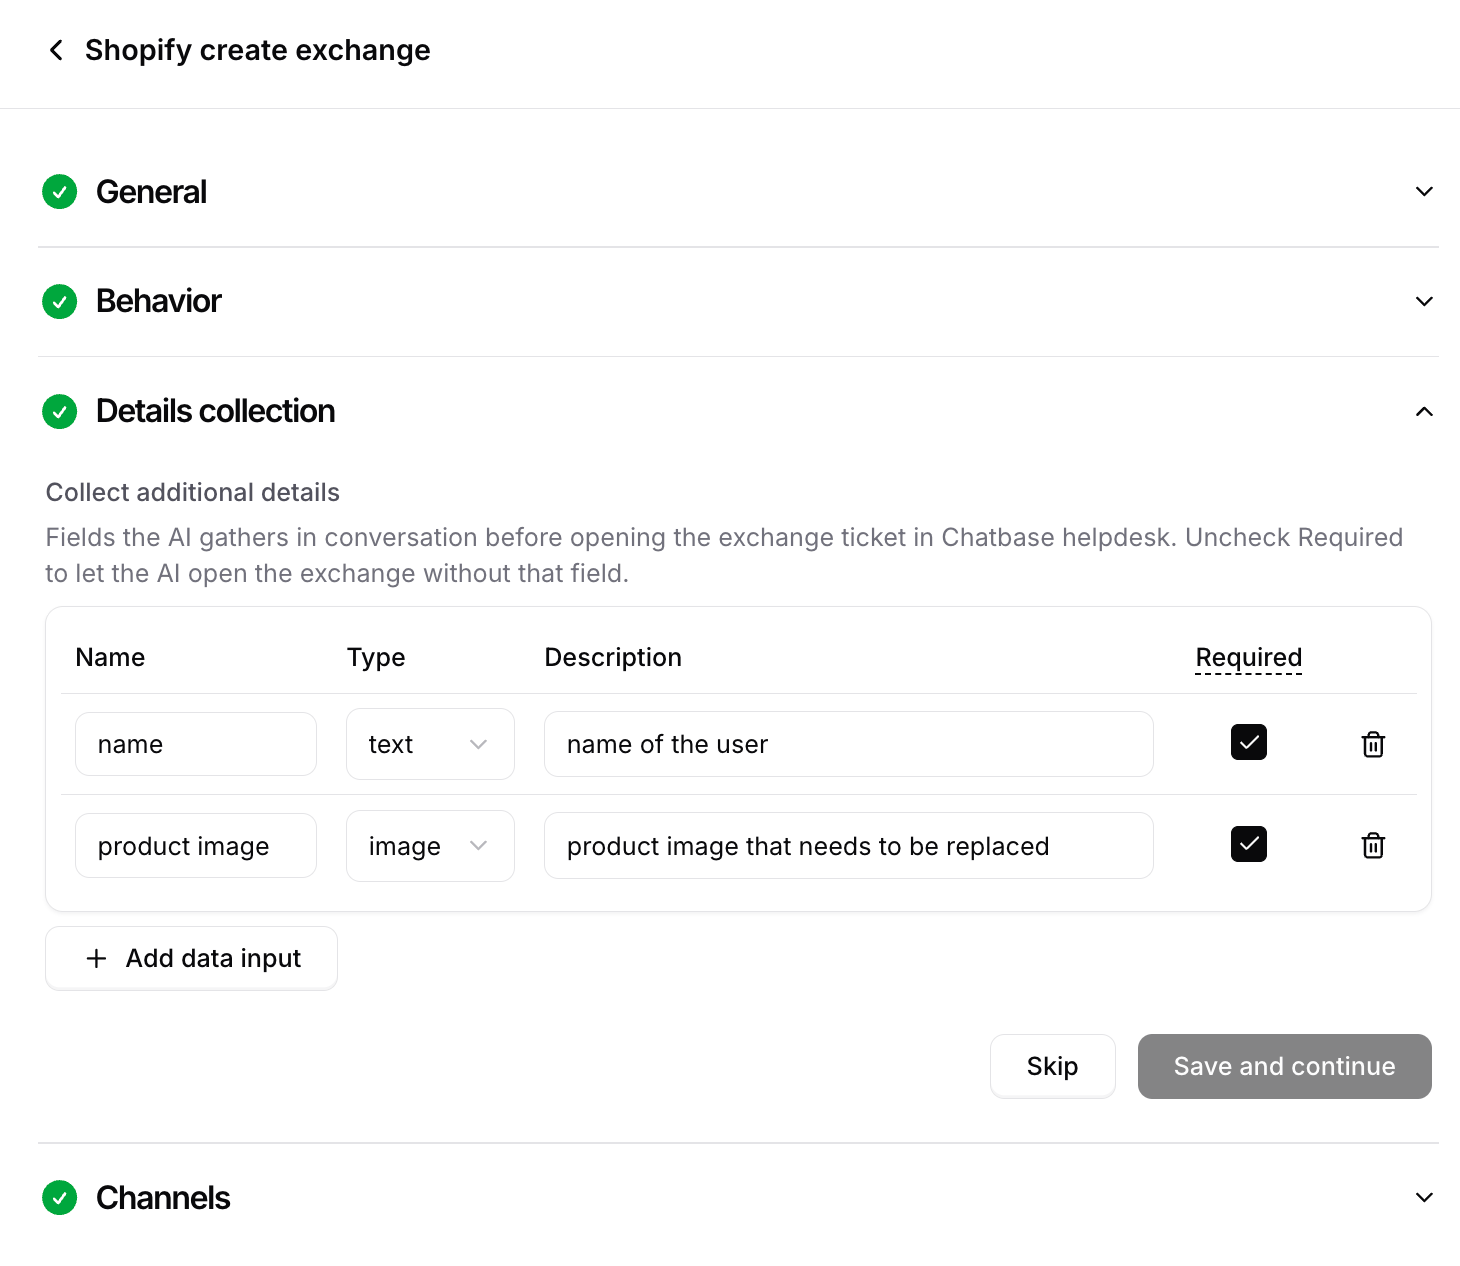
Under **Collect additional details**, define the fields the AI gathers in conversation before it opens the exchange ticket in the Chatbase Helpdesk, for example an image of the product that needs to be replaced.
Click **Add data input** and give each field a **Name**, a **Type** (for example, image), and a **Description** that tells the AI agent what to ask for. Leave **Required** checked to make the AI agent collect the field before it opens the exchange, or uncheck it to let the AI agent open the exchange without that field.
Click **Save and continue**, or **Skip** if you don't need any extra details.
#### Collect additional details (optional)
Under **Collect additional details**, define the fields the AI gathers in conversation before it opens the exchange ticket in the Chatbase Helpdesk, for example an image of the product that needs to be replaced.
Click **Add data input** and give each field a **Name**, a **Type** (for example, image), and a **Description** that tells the AI agent what to ask for. Leave **Required** checked to make the AI agent collect the field before it opens the exchange, or uncheck it to let the AI agent open the exchange without that field.
Click **Save and continue**, or **Skip** if you don't need any extra details.
 Test the action by asking your AI agent to exchange an item from a past order. A ticket should appear in your Helpdesk for approval, and the exchange order is placed only after an agent approves it.
Here's the full exchange flow, from the shopper's request in chat to the human agent approving the ticket in the Chatbase Helpdesk:
***
### 6. Create return or exchange (same order)
Handle a return against a past order without creating a new one. The AI agent opens the return directly on the customer's existing Shopify order: returned items are refunded, or swapped for replacements if you allow exchanges, by editing the original order. No new order or draft is created.
This is the only Shopify action that can take a plain return. [Create exchange (new order)](#5-create-exchange-new-order) only swaps items for replacements, so every refund request goes through this action.
Self-service refunds, and size or color swaps you're happy for the AI agent to complete on its own, inside a return window you set.
**This action runs automatically.** The AI agent opens the return in Shopify during the conversation, with no Helpdesk ticket and no approval step. An option to send returns to a Chatbase Helpdesk ticket for approval, the way [Create exchange (new order)](#5-create-exchange-new-order) works today, is coming soon.
**Common Use Cases:**
* "I want to return these shoes"
* "Can I send this back for a refund?"
* "I'd like to swap this for a size 10", when **Allow exchanges** is on
**Which of the two should I use?** For a refund, this action, since it's the only one that takes plain returns. For a swap, either one works, depending on whether you want to edit the same order or create a new one.
| Difference | [Create exchange (new order)](#5-create-exchange-new-order) | Create return or exchange (same order) |
| ----------------------- | --------------------------------------------------------------------------------------------------- | ------------------------------------------------------------------------------------------------------ |
| Plain returns (refunds) | Not supported. Exchanges only | Supported, and this is the only action that can take one |
| What it creates | An exchange draft order against the past order | A return on the existing order, which is then refunded or swapped |
| Human approval | Always required. A Chatbase Helpdesk ticket is approved or rejected before anything reaches Shopify | None for now. The AI agent completes it in the conversation; a Helpdesk approval option is coming soon |
| Extra details | Can collect fields such as a photo before opening the ticket | Not available |
| Time limit | None | **Return window (days)**, 30 by default |
Enable both if you want approval-gated exchanges for some cases and self-service returns for others, then use a [procedure](/docs/user-guides/chatbot/procedures/procedures-overview) to decide which one the AI agent reaches for.
#### Settings
**Template:** **Create return or exchange (same order)**. The action opens as **Shopify create return**.
**Action Name:** Create\_Return.
**When to use:** Call this tool when the customer wants to return, send back, or swap item(s) from a past order.
#### Behavior
The **Behavior** section sets the rules the AI agent follows when it opens the return.
**Return window (days)**: how long after delivery an item can still be returned. Defaults to `30`. Leave the field empty for no time limit.
**Allow exchanges**: off by default. Turn it on to let the AI agent swap returned items for other products in the same return, with Shopify settling any price difference. With it off, the action only refunds the returned items.
Test the action by asking your AI agent to return an item from a past, delivered order. The return should appear on that same order in Shopify admin, with no new order or draft created. Also try an order older than your return window and confirm the AI agent declines it.
***
### 7. Retrieve and display orders
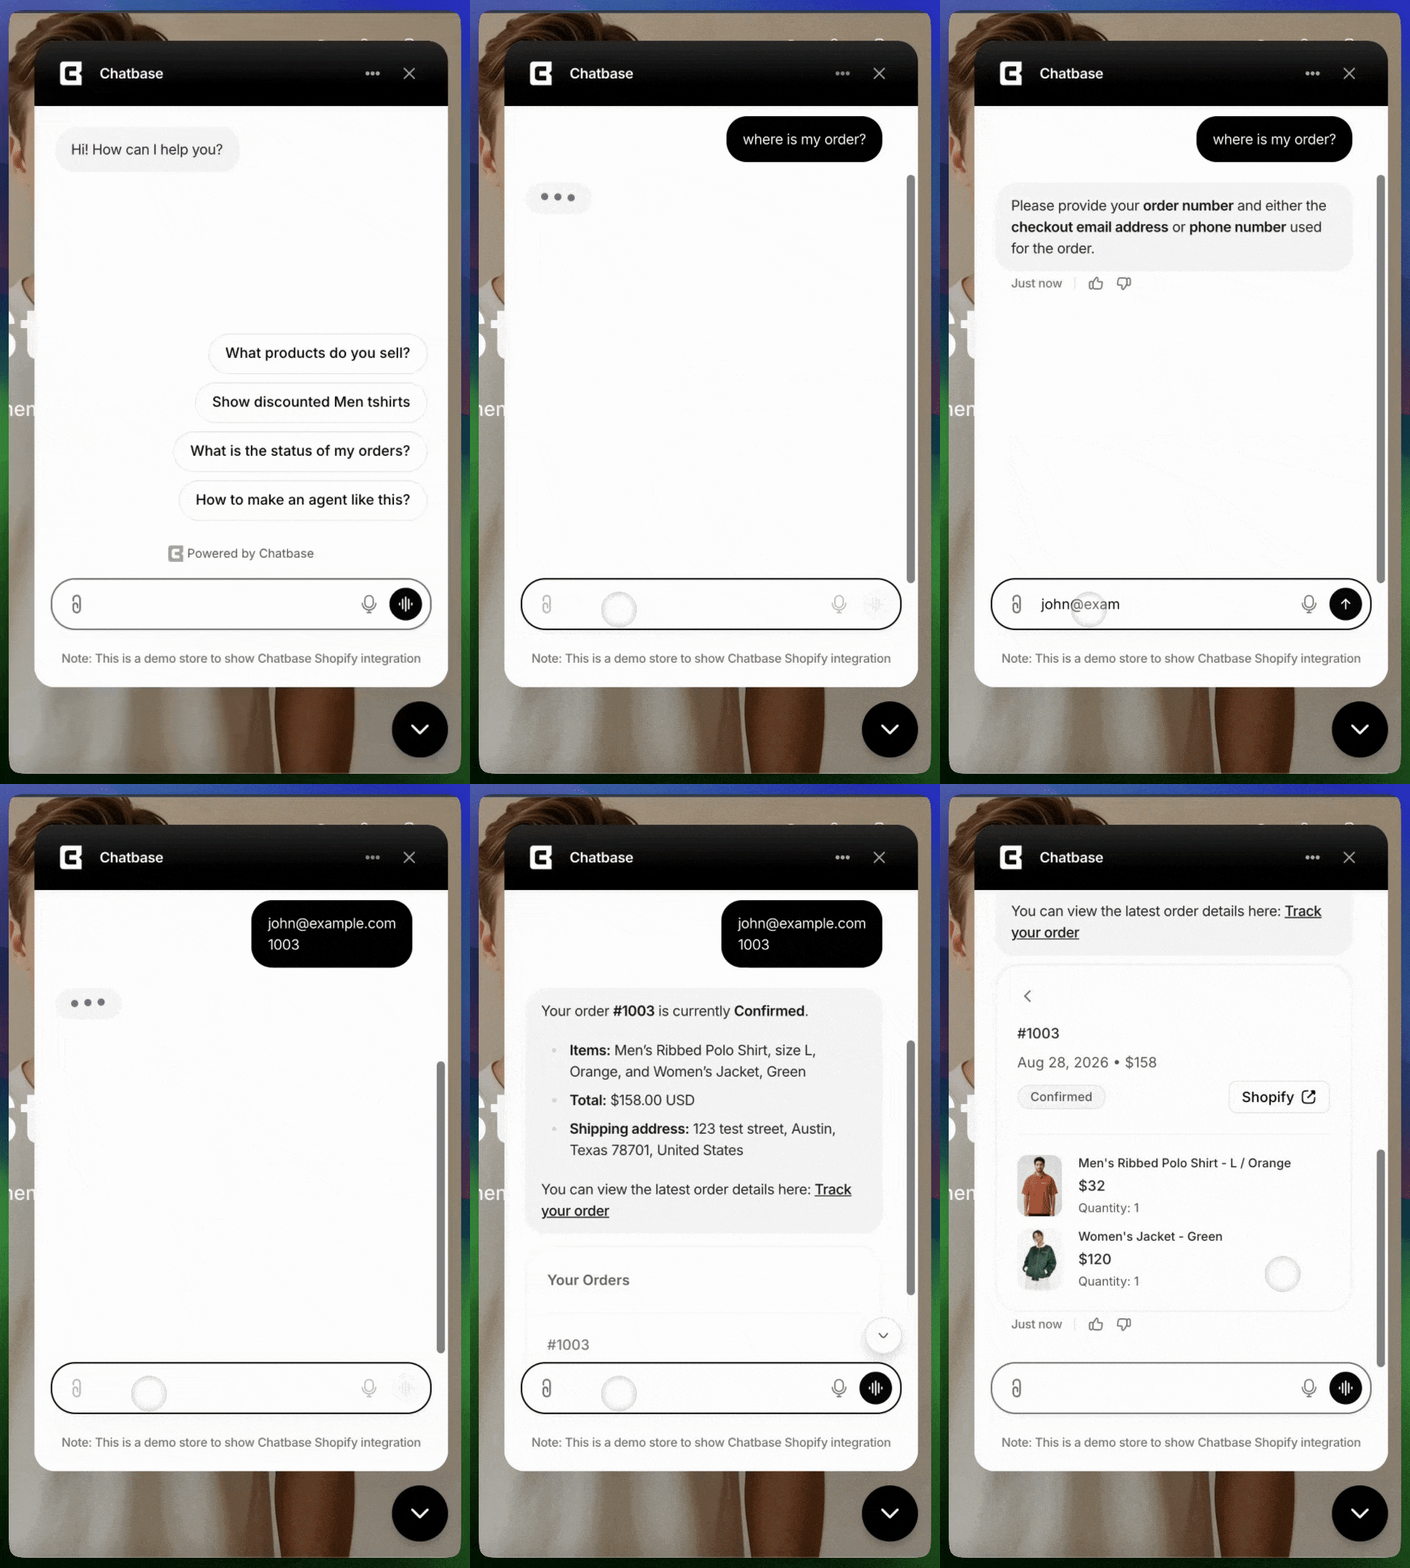
Retrieve order information for customers. Customers can check order status, view their purchase history, and get details about specific orders using various filters.
Answering order status inquiries, providing tracking information, displaying purchase history, and helping customers find specific order details.
**Common Use Cases:**
* "Where is my order?"
* "Show me my recent orders"
* "What's the status of order #1234?"
**Order status:** The AI agent pulls order status directly from Shopify, so it reflects the latest information Shopify has available on the order status page. Shipped orders appear as "**On its way**". To display delivery confirmation, ensure your store uses a trackable carrier (USPS, UPS, FedEx, etc.) or a third-party app that provides delivery updates to Shopify.
#### Settings
**Template:** **Retrieve and display orders**. The action opens as **Shopify get orders**.
**Action Name:** Get\_Orders.
**When to use:** If the user ask about orders, use this tool. Summarize the tool's result in your response, ensuring no images are included within the text response.
Test the action by asking your AI agent about order status to verify it retrieves the correct information.
Test the action by asking your AI agent to exchange an item from a past order. A ticket should appear in your Helpdesk for approval, and the exchange order is placed only after an agent approves it.
Here's the full exchange flow, from the shopper's request in chat to the human agent approving the ticket in the Chatbase Helpdesk:
***
### 6. Create return or exchange (same order)
Handle a return against a past order without creating a new one. The AI agent opens the return directly on the customer's existing Shopify order: returned items are refunded, or swapped for replacements if you allow exchanges, by editing the original order. No new order or draft is created.
This is the only Shopify action that can take a plain return. [Create exchange (new order)](#5-create-exchange-new-order) only swaps items for replacements, so every refund request goes through this action.
Self-service refunds, and size or color swaps you're happy for the AI agent to complete on its own, inside a return window you set.
**This action runs automatically.** The AI agent opens the return in Shopify during the conversation, with no Helpdesk ticket and no approval step. An option to send returns to a Chatbase Helpdesk ticket for approval, the way [Create exchange (new order)](#5-create-exchange-new-order) works today, is coming soon.
**Common Use Cases:**
* "I want to return these shoes"
* "Can I send this back for a refund?"
* "I'd like to swap this for a size 10", when **Allow exchanges** is on
**Which of the two should I use?** For a refund, this action, since it's the only one that takes plain returns. For a swap, either one works, depending on whether you want to edit the same order or create a new one.
| Difference | [Create exchange (new order)](#5-create-exchange-new-order) | Create return or exchange (same order) |
| ----------------------- | --------------------------------------------------------------------------------------------------- | ------------------------------------------------------------------------------------------------------ |
| Plain returns (refunds) | Not supported. Exchanges only | Supported, and this is the only action that can take one |
| What it creates | An exchange draft order against the past order | A return on the existing order, which is then refunded or swapped |
| Human approval | Always required. A Chatbase Helpdesk ticket is approved or rejected before anything reaches Shopify | None for now. The AI agent completes it in the conversation; a Helpdesk approval option is coming soon |
| Extra details | Can collect fields such as a photo before opening the ticket | Not available |
| Time limit | None | **Return window (days)**, 30 by default |
Enable both if you want approval-gated exchanges for some cases and self-service returns for others, then use a [procedure](/docs/user-guides/chatbot/procedures/procedures-overview) to decide which one the AI agent reaches for.
#### Settings
**Template:** **Create return or exchange (same order)**. The action opens as **Shopify create return**.
**Action Name:** Create\_Return.
**When to use:** Call this tool when the customer wants to return, send back, or swap item(s) from a past order.
#### Behavior
The **Behavior** section sets the rules the AI agent follows when it opens the return.
**Return window (days)**: how long after delivery an item can still be returned. Defaults to `30`. Leave the field empty for no time limit.
**Allow exchanges**: off by default. Turn it on to let the AI agent swap returned items for other products in the same return, with Shopify settling any price difference. With it off, the action only refunds the returned items.
Test the action by asking your AI agent to return an item from a past, delivered order. The return should appear on that same order in Shopify admin, with no new order or draft created. Also try an order older than your return window and confirm the AI agent declines it.
***
### 7. Retrieve and display orders
Retrieve order information for customers. Customers can check order status, view their purchase history, and get details about specific orders using various filters.
Answering order status inquiries, providing tracking information, displaying purchase history, and helping customers find specific order details.
**Common Use Cases:**
* "Where is my order?"
* "Show me my recent orders"
* "What's the status of order #1234?"
**Order status:** The AI agent pulls order status directly from Shopify, so it reflects the latest information Shopify has available on the order status page. Shipped orders appear as "**On its way**". To display delivery confirmation, ensure your store uses a trackable carrier (USPS, UPS, FedEx, etc.) or a third-party app that provides delivery updates to Shopify.
#### Settings
**Template:** **Retrieve and display orders**. The action opens as **Shopify get orders**.
**Action Name:** Get\_Orders.
**When to use:** If the user ask about orders, use this tool. Summarize the tool's result in your response, ensuring no images are included within the text response.
Test the action by asking your AI agent about order status to verify it retrieves the correct information.
 See [Signed-in and guest customers](#signed-in-and-guest-customers) for how guests verify an order before the AI agent will return it.
***
### 8. Tag an order
Record the outcome of a conversation directly on the customer's order in Shopify. The AI agent adds tags you choose to the signed-in customer's own orders, so the result of the chat is visible on the order itself in Shopify admin.
Marking orders as, for example, "damaged", "missing item", or "address confirmed" straight from the chat, so your team and your Shopify workflows can act on them.
**Common Use Cases:**
* Flagging an order when the customer reports a damaged or missing item
* Recording that the customer confirmed their delivery details
* Marking an order for follow-up by your team
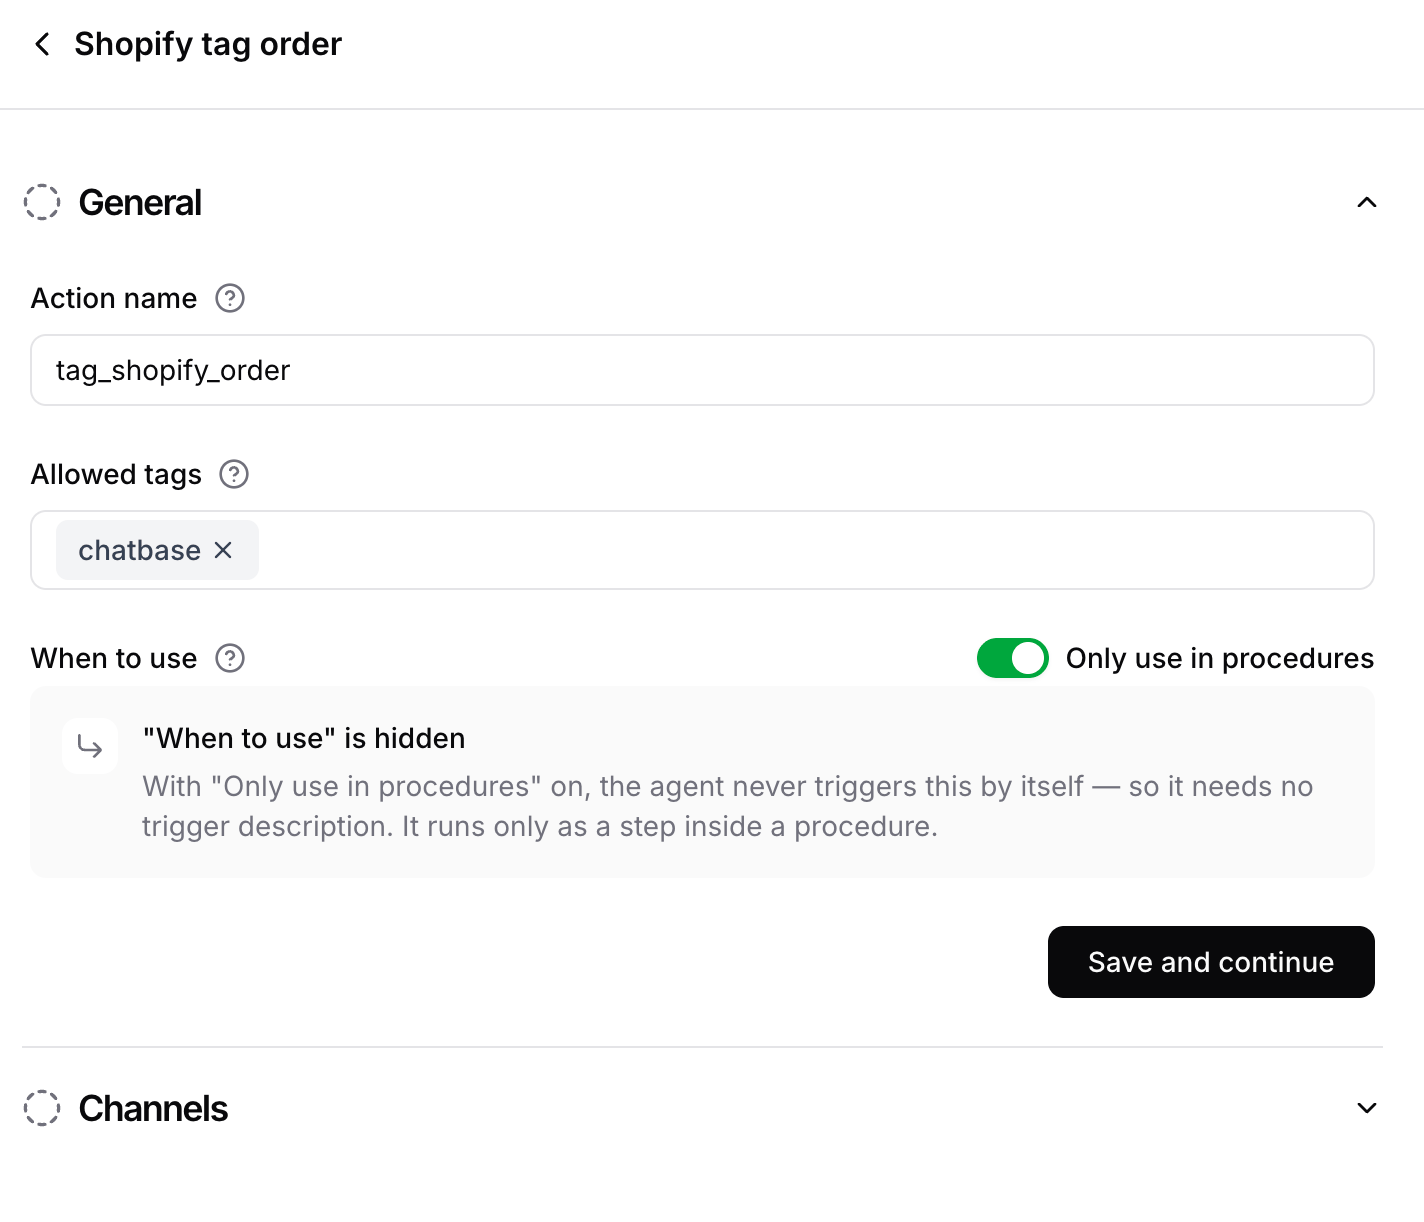
#### Settings
**Template:** **Shopify tag order**.
**Action Name:** tag\_shopify\_order.
**Allowed tags:** the tags the AI agent is allowed to apply to an order. Defaults to `chatbase`. Add the tags you want the AI agent to choose from, for example `damaged`, or `return-requested`, and remove any you don't want used. The AI agent only applies tags from this list.
**When to use:** Call this tool when something the customer says about an order should be recorded on the order.
See [Signed-in and guest customers](#signed-in-and-guest-customers) for how guests verify an order before the AI agent will return it.
***
### 8. Tag an order
Record the outcome of a conversation directly on the customer's order in Shopify. The AI agent adds tags you choose to the signed-in customer's own orders, so the result of the chat is visible on the order itself in Shopify admin.
Marking orders as, for example, "damaged", "missing item", or "address confirmed" straight from the chat, so your team and your Shopify workflows can act on them.
**Common Use Cases:**
* Flagging an order when the customer reports a damaged or missing item
* Recording that the customer confirmed their delivery details
* Marking an order for follow-up by your team
#### Settings
**Template:** **Shopify tag order**.
**Action Name:** tag\_shopify\_order.
**Allowed tags:** the tags the AI agent is allowed to apply to an order. Defaults to `chatbase`. Add the tags you want the AI agent to choose from, for example `damaged`, or `return-requested`, and remove any you don't want used. The AI agent only applies tags from this list.
**When to use:** Call this tool when something the customer says about an order should be recorded on the order.
 Test the action by signing in to your store, telling the AI agent something about one of your orders, and confirming the tag appears on that order in Shopify admin. This action requires an authenticated customer, so it can't be tested in the Action Preview.
**Damaged or missing items.** A common procedure pairs this action with [Create order](#4-create-order): tag the original order (for example `damaged`) so the case is recorded on it in Shopify, then ship a free replacement with a Create order variant set to **Skip the cart** + **Free order**.
***
### 9. Check account and send activation email
Check whether the customer is signed in to your Shopify store and, if their account was never activated, email them a link to activate it. This helps shoppers get signed in before using actions that need an authenticated customer, such as updating their profile or billing address.
Guiding guests toward a signed-in session, recovering customers who never activated their account, and unblocking account requests that require authentication.
**Common Use Cases:**
* "How do I log in to my account?"
* "I never got an activation email"
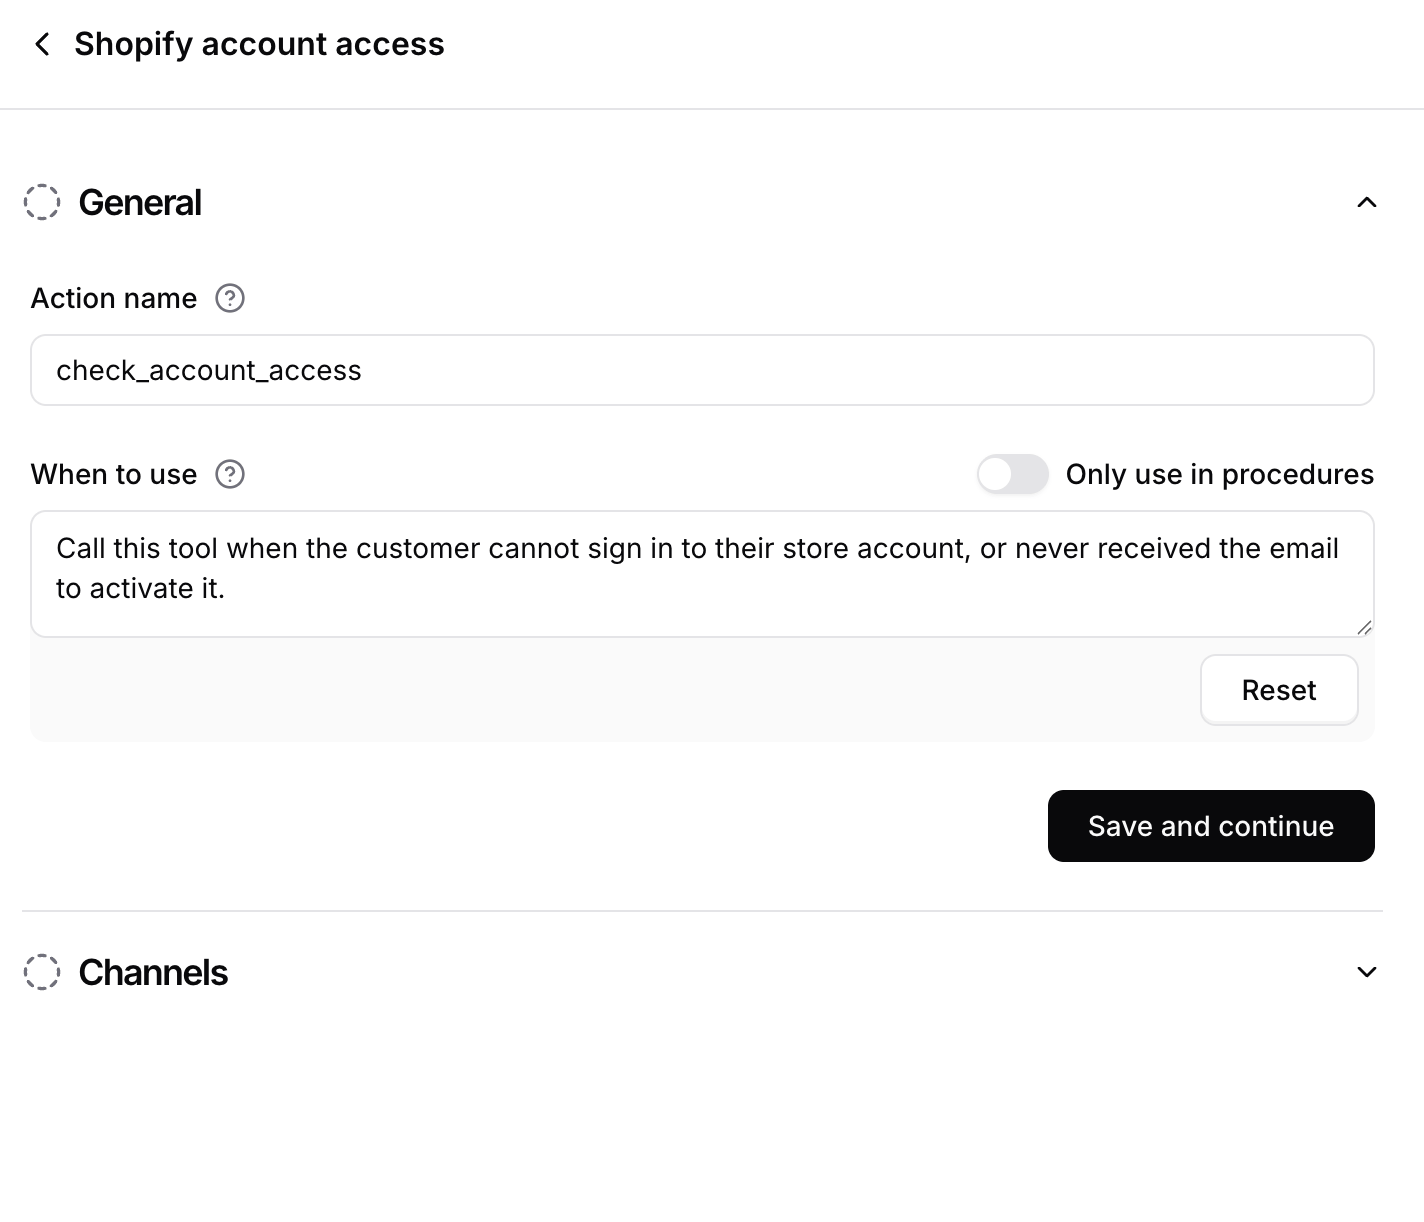
#### Settings
**Template:** **Check account & send activation email**. The action opens as **Shopify account access**.
**Action Name:** check\_account\_access.
**When to use:** Call this tool when the customer cannot sign in to their store account, or never received the email to activate it. If it succeeds, tell the user that if the account exists, we sent an email.
Test the action by signing in to your store, telling the AI agent something about one of your orders, and confirming the tag appears on that order in Shopify admin. This action requires an authenticated customer, so it can't be tested in the Action Preview.
**Damaged or missing items.** A common procedure pairs this action with [Create order](#4-create-order): tag the original order (for example `damaged`) so the case is recorded on it in Shopify, then ship a free replacement with a Create order variant set to **Skip the cart** + **Free order**.
***
### 9. Check account and send activation email
Check whether the customer is signed in to your Shopify store and, if their account was never activated, email them a link to activate it. This helps shoppers get signed in before using actions that need an authenticated customer, such as updating their profile or billing address.
Guiding guests toward a signed-in session, recovering customers who never activated their account, and unblocking account requests that require authentication.
**Common Use Cases:**
* "How do I log in to my account?"
* "I never got an activation email"
#### Settings
**Template:** **Check account & send activation email**. The action opens as **Shopify account access**.
**Action Name:** check\_account\_access.
**When to use:** Call this tool when the customer cannot sign in to their store account, or never received the email to activate it. If it succeeds, tell the user that if the account exists, we sent an email.
 Test the action by telling your AI agent you can't sign in to your account. The AI agent should confirm that an activation email has been sent if the account exists.
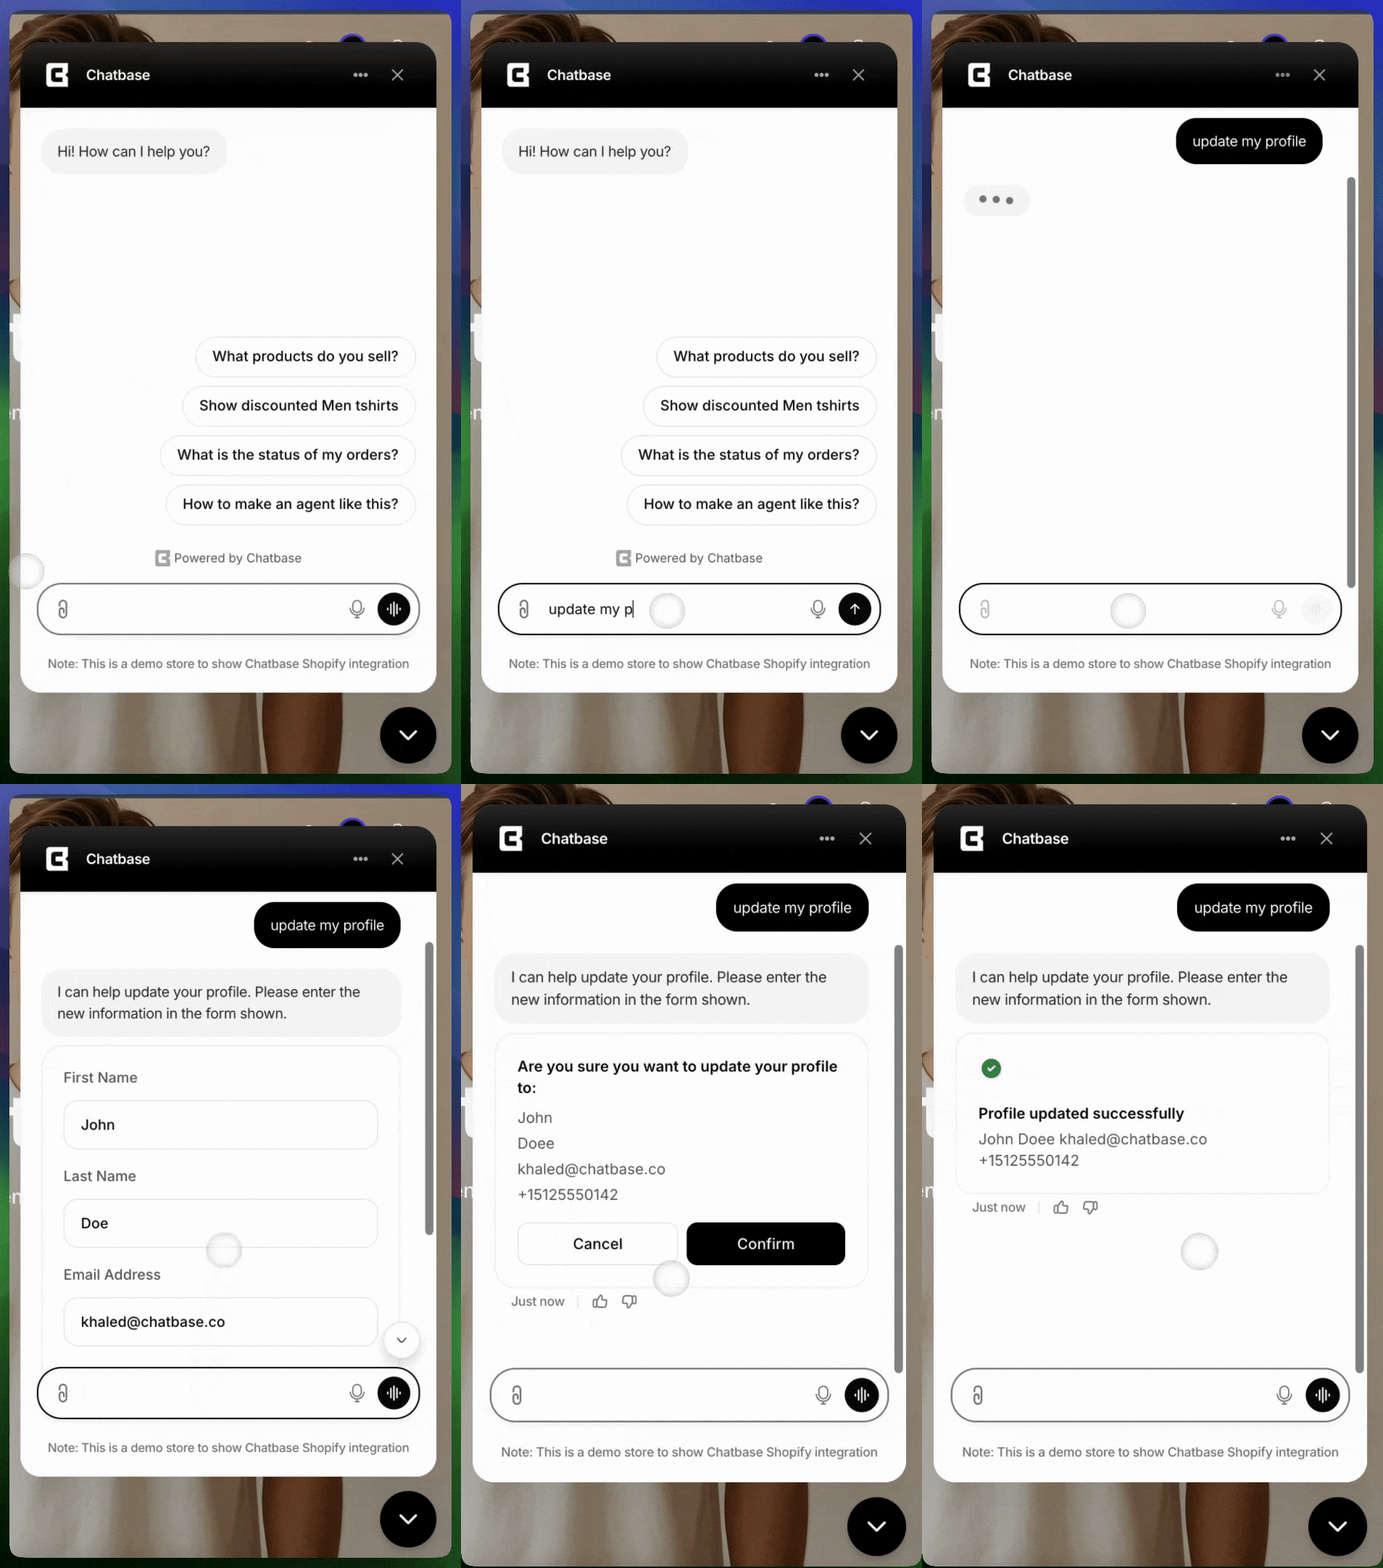
***
### 10. Update customer profile
Enable signed-in customers to modify their account profile information through the AI agent.
Account management, updating contact information, and helping customers keep their profile current.
**Common Use Cases:**
* "Update my email address"
* "Change my phone number"
* "Update my account information"
#### Settings
**Template:** **Update shopify customer profile**. The action opens as **Shopify update profile**.
**Action Name:** Update\_Profile.
**When to use:** Call this tool when asked about changing customer profile, including first name, last name, email, or phone number.
Test the action by asking your AI agent to update profile information. This action requires an authenticated customer, so it can't be tested in the Action Preview.
Test the action by telling your AI agent you can't sign in to your account. The AI agent should confirm that an activation email has been sent if the account exists.
***
### 10. Update customer profile
Enable signed-in customers to modify their account profile information through the AI agent.
Account management, updating contact information, and helping customers keep their profile current.
**Common Use Cases:**
* "Update my email address"
* "Change my phone number"
* "Update my account information"
#### Settings
**Template:** **Update shopify customer profile**. The action opens as **Shopify update profile**.
**Action Name:** Update\_Profile.
**When to use:** Call this tool when asked about changing customer profile, including first name, last name, email, or phone number.
Test the action by asking your AI agent to update profile information. This action requires an authenticated customer, so it can't be tested in the Action Preview.
 ***
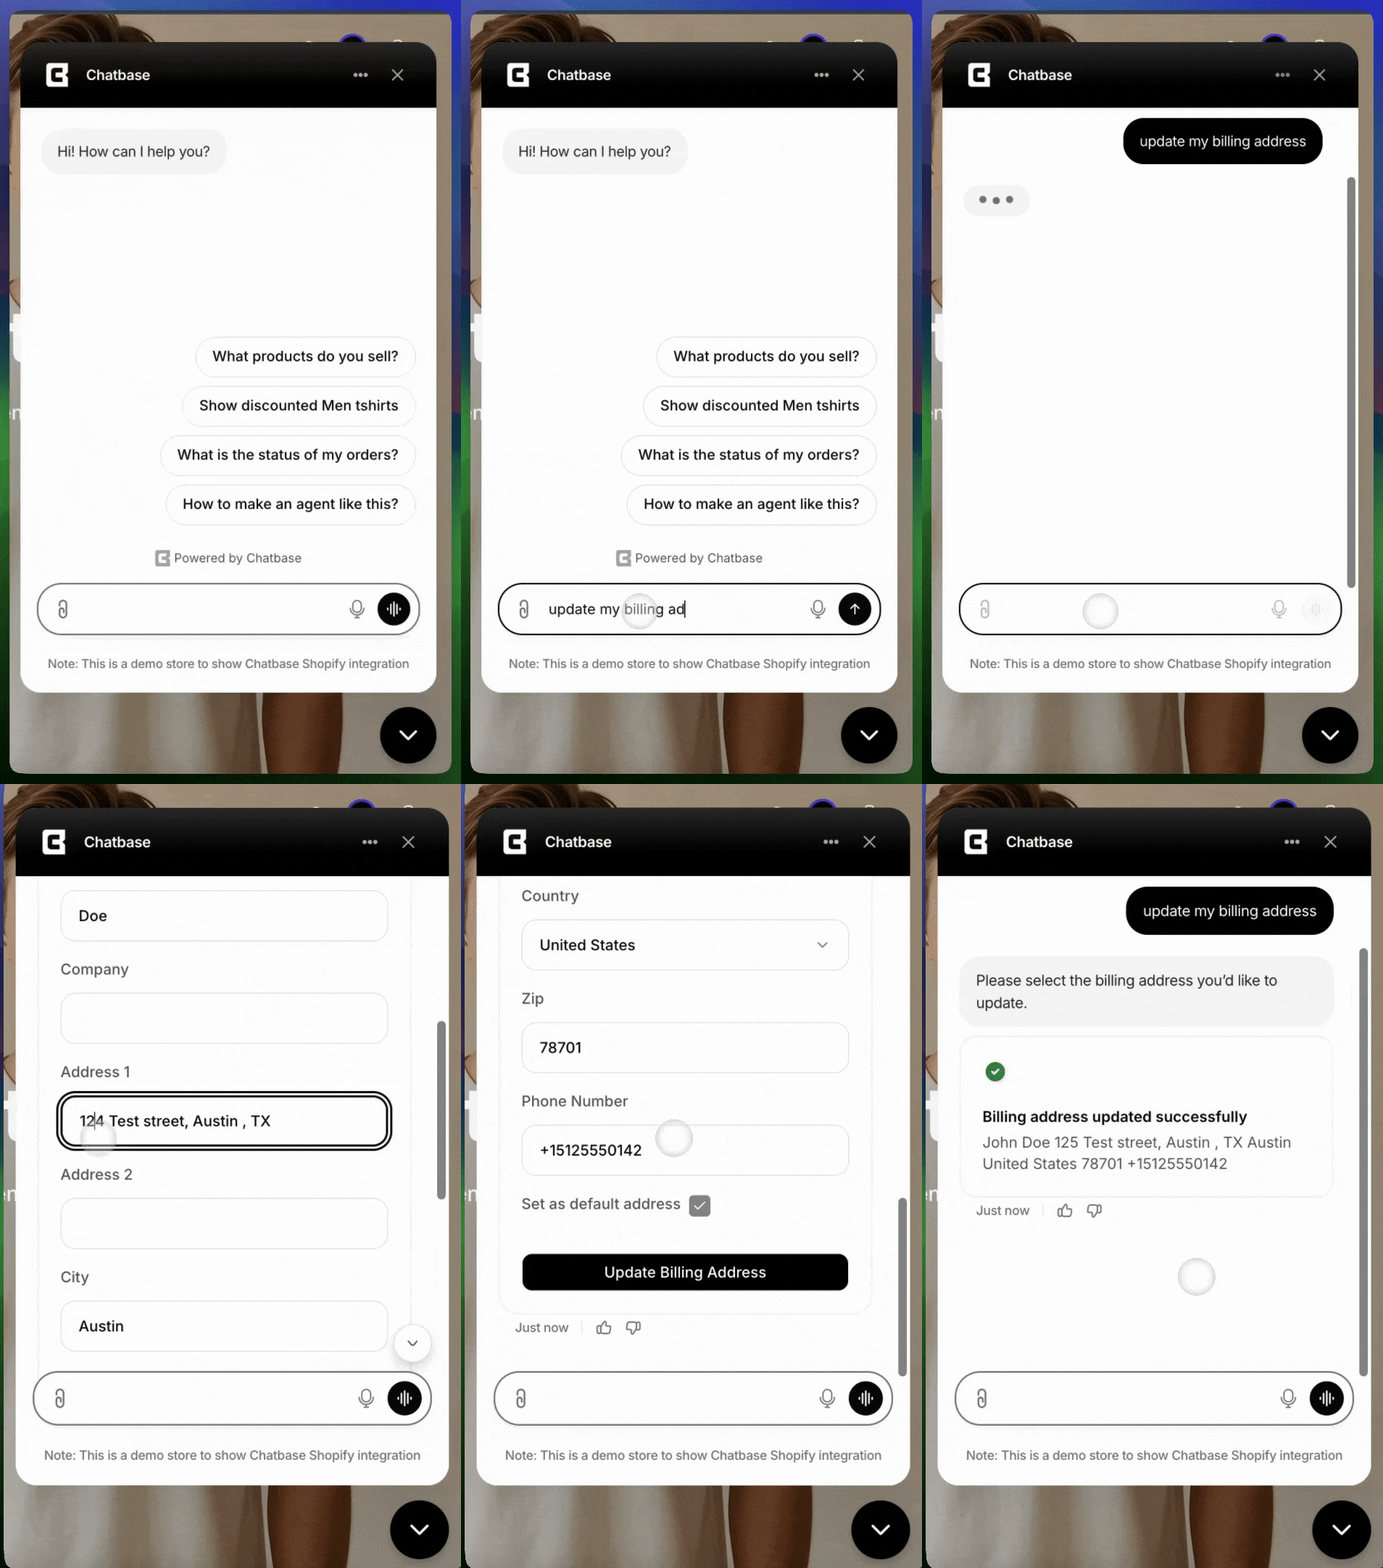
### 11. Update customer billing address
Allow customers to add new billing addresses or update existing ones directly through the chat interface.
Self-service address updates, helping customers correct billing information, and streamlining account management.
**Common Use Cases:**
* "Update my billing address"
* "Change my payment address"
* "I moved and need to update my address"
* "I want to add a new address and set it as default"
This action changes the address on the **customer's account**. It does not change the shipping address on an order that has already been placed. See [Limitations](#limitations).
#### Settings
**Template:** **Update shopify customer billing address**. The action opens as **Shopify update address**.
**Action Name:** Update\_Address.
**When to use:** Call this tool when asked about adding or updating billing addresses or changing the default address.
Test the action by asking your AI agent to update a billing address. This action requires an authenticated customer, so it can't be tested in the Action Preview.
***
### 11. Update customer billing address
Allow customers to add new billing addresses or update existing ones directly through the chat interface.
Self-service address updates, helping customers correct billing information, and streamlining account management.
**Common Use Cases:**
* "Update my billing address"
* "Change my payment address"
* "I moved and need to update my address"
* "I want to add a new address and set it as default"
This action changes the address on the **customer's account**. It does not change the shipping address on an order that has already been placed. See [Limitations](#limitations).
#### Settings
**Template:** **Update shopify customer billing address**. The action opens as **Shopify update address**.
**Action Name:** Update\_Address.
**When to use:** Call this tool when asked about adding or updating billing addresses or changing the default address.
Test the action by asking your AI agent to update a billing address. This action requires an authenticated customer, so it can't be tested in the Action Preview.
 ***
## Keeping high-stakes actions on rails
Some Shopify actions spend money or change a customer's record: a **Free order**, an exchange, a return, a tag that triggers a Shopify workflow. For those, you usually want the action to fire at a point you control rather than whenever the AI agent judges it appropriate. Two settings do that together:
1. **[Only use in procedures](/docs/user-guides/chatbot/actions/actions-overview#only-use-in-procedures)** on the action, so it can never fire on the AI agent's own initiative. It runs only when a [procedure](/docs/user-guides/chatbot/procedures/procedures-overview) step references it with `@action_name`.
2. **Eligibility checks in the procedure**, ahead of the step that calls the action, so the conditions live in a flow you wrote instead of in the AI agent's judgment.
A free-replacement procedure might look like this:
```text theme={null}
1. Use @Get_Orders to find the order the customer is asking about.
2. If the order was placed more than 30 days ago, use @escalate_to_human and stop.
3. Ask the customer for a photo of the damaged item.
4. Use @tag_shopify_order to add the `damaged` tag to the order.
5. Use @Create_Replacement_Order to send the replacement at no charge.
```
Because the AI agent can't reach step 5 without passing steps 2 to 4, your replacement window and evidence requirement are enforced by the procedure, not left to the model. Use the same pattern for any action whose cost or customer impact you want bounded.
## Limitations
* **Placed orders can only be edited by a return.** No Shopify action cancels an order or changes the shipping address on an existing order. [Create return or exchange (same order)](#6-create-return-or-exchange-same-order) is the only action that touches an existing order, and only to return or swap items on it. Route those requests to a person with [Escalations](/docs/user-guides/chatbot/actions/escalate-to-human). [Update customer billing address](#11-update-customer-billing-address) changes the customer's account address, not an order's shipping address.
* **Changes are written to Shopify only.** Orders, exchanges, and tags the AI agent creates land in Shopify. They don't propagate to a 3PL, fulfillment app, or ERP that keeps its own copy of the order, and anything already handed to fulfillment won't reflect them.
* **Exchange orders wait for a human.** [Create exchange (new order)](#5-create-exchange-new-order) never pushes the exchange to Shopify on its own; the draft sits on a Chatbase Helpdesk ticket until an agent approves it. If nobody works the ticket, the exchange is never placed.
* **Same-order returns don't wait for a human, for now.** [Create return or exchange (same order)](#6-create-return-or-exchange-same-order) completes in the conversation, so anything you don't want the AI agent doing on its own belongs behind a procedure. A Helpdesk approval option for this action is coming soon.
* **Returns are bounded by the return window.** [Create return or exchange (same order)](#6-create-return-or-exchange-same-order) refuses items that fall outside the **Return window (days)** you set, and can only refund, not swap, unless **Allow exchanges** is on.
* **Create order with Use the cart depends on Update cart.** Without [Update cart](#2-update-cart) enabled, the AI agent has no way to put items in the cart for that order.
* **Order status is only as good as your tracking data.** The AI agent reports what Shopify knows. Delivery confirmation requires a trackable carrier or an app that feeds delivery updates back to Shopify.
* **Re-sync fetches in-stock products.** Product changes sync in real time after the first import, but a manual **Re-sync products** pulls the in-stock products, so out-of-stock items aren't included in that pass.
* **The Playground isn't a real store session.** Cart updates don't work there, the AI agent isn't told whether an **Online payment** order was paid, and actions that need an authenticated customer can't run in the Action Preview at all. Test those from a live channel.
* **Not every action runs on every channel.** Channels that are incompatible with an action aren't selectable in its **Channels** step.
## Troubleshooting
**Possible causes:**
* The action is toggled off, or turned off for the channel the customer is on
* **Only use in procedures** is on, but no procedure step references the action with `@action_name`
* The **When to use** description is too vague to match what the customer asked
* The customer isn't signed in and the action requires authentication
**Solutions:**
* Enable the action and check its **Channels** step
* Add the `@action_name` reference to the procedure step that should trigger it, or turn **Only use in procedures** off
* Rewrite **When to use** with the phrases customers actually type
* Check [Signed-in and guest customers](#signed-in-and-guest-customers), and add [Check account and send activation email](#9-check-account-and-send-activation-email) to get guests signed in
**Possible causes:**
* The initial sync hasn't finished, or the product was out of stock at the last **Re-sync products**
* The product is unavailable or unpublished in Shopify
* Your website training source still contains older scraped product pages that compete with the synced data
**Solutions:**
* Open the action's **Products** section and check the synced product count, then click **Re-sync products**
* Confirm the product is in stock and published in Shopify admin
* Exclude product pages from your website training source, since the sync already supplies that data
**Possible causes:**
* The customer isn't signed in to your Shopify store: all three actions act on the signed-in customer's own record
* You're testing in the Action Preview, which has no authenticated customer
* The customer's account exists but was never activated
**Solutions:**
* Test from a live channel such as the Chat bubble while signed in to your store
* Enable [Check account and send activation email](#9-check-account-and-send-activation-email) so the AI agent can send an activation link
* For **Tag an order**, confirm the tag is in the action's **Allowed tags** list; the AI agent only applies tags from that list
**Possible cause:** your theme isn't listening for the cart events Chatbase dispatches, so its cart count only refreshes on page load.
**Solution:** add a listener for one of the cart events in your theme's JavaScript. See [Keeping Your Theme's Cart Icon in Sync](#keeping-your-themes-cart-icon-in-sync).
**Possible cause:** with **Online payment**, the AI agent sends a Shopify-hosted checkout link and Shopify finalizes the order only once the shopper completes checkout. Until then there's no paid order.
**Solutions:**
* Check whether the shopper opened and completed the checkout link
* Remember that in the Playground the AI agent isn't told when payment completes; on supported channels it is
* For flows where no payment should be collected, use a **Free order** variant instead
**Possible causes:**
* The Helpdesk ticket is still awaiting review: the exchange is only pushed when an agent clicks **Approve**
* The ticket was rejected
* Required fields under **Collect additional details** were never gathered, so the AI agent didn't open the exchange
**Solutions:**
* Open the ticket in the Helpdesk and check the **Review action** tab
* Search Shopify admin for the action's **Order tags** to find exchange orders that were created
* Loosen or remove **Required** on data inputs the AI agent can't reliably collect
**Possible causes:**
* The order falls outside the **Return window (days)** set on the action
* **Allow exchanges** is off, so the action can only refund the returned items
* **Only use in procedures** is on, but no procedure step calls the action with `@Create_Return`
**Solutions:**
* Raise the **Return window (days)**, or clear the field for no time limit
* Turn on **Allow exchanges** in the action's **Behavior** section to let the AI agent swap items instead of refunding them
* Reference the action from the procedure step that should trigger it, or turn **Only use in procedures** off
## Best Practices
Write specific "When to use" descriptions to help the AI agent accurately determine when to trigger each action. Include example phrases customers might use.
Test each action with various customer queries before going live. Verify that product searches return accurate results.
In case you notice discrepancies in available products, click **Re-sync products** in the action's **Products** section.
For multi-step flows like exchanges or damaged-item replacements, build a [procedure](/docs/user-guides/chatbot/procedures/procedures-overview) that calls the right Shopify actions in order, so the AI agent doesn't improvise on high-stakes flows. See [Keeping high-stakes actions on rails](#keeping-high-stakes-actions-on-rails).
Turn off actions that need a signed-in customer on channels where shoppers never are, so the AI agent doesn't offer something it can't complete.
Keep the **Allowed tags** list short and meaningful, so the tags the AI agent writes are ones your team and your Shopify workflows actually act on.
***
## Keeping high-stakes actions on rails
Some Shopify actions spend money or change a customer's record: a **Free order**, an exchange, a return, a tag that triggers a Shopify workflow. For those, you usually want the action to fire at a point you control rather than whenever the AI agent judges it appropriate. Two settings do that together:
1. **[Only use in procedures](/docs/user-guides/chatbot/actions/actions-overview#only-use-in-procedures)** on the action, so it can never fire on the AI agent's own initiative. It runs only when a [procedure](/docs/user-guides/chatbot/procedures/procedures-overview) step references it with `@action_name`.
2. **Eligibility checks in the procedure**, ahead of the step that calls the action, so the conditions live in a flow you wrote instead of in the AI agent's judgment.
A free-replacement procedure might look like this:
```text theme={null}
1. Use @Get_Orders to find the order the customer is asking about.
2. If the order was placed more than 30 days ago, use @escalate_to_human and stop.
3. Ask the customer for a photo of the damaged item.
4. Use @tag_shopify_order to add the `damaged` tag to the order.
5. Use @Create_Replacement_Order to send the replacement at no charge.
```
Because the AI agent can't reach step 5 without passing steps 2 to 4, your replacement window and evidence requirement are enforced by the procedure, not left to the model. Use the same pattern for any action whose cost or customer impact you want bounded.
## Limitations
* **Placed orders can only be edited by a return.** No Shopify action cancels an order or changes the shipping address on an existing order. [Create return or exchange (same order)](#6-create-return-or-exchange-same-order) is the only action that touches an existing order, and only to return or swap items on it. Route those requests to a person with [Escalations](/docs/user-guides/chatbot/actions/escalate-to-human). [Update customer billing address](#11-update-customer-billing-address) changes the customer's account address, not an order's shipping address.
* **Changes are written to Shopify only.** Orders, exchanges, and tags the AI agent creates land in Shopify. They don't propagate to a 3PL, fulfillment app, or ERP that keeps its own copy of the order, and anything already handed to fulfillment won't reflect them.
* **Exchange orders wait for a human.** [Create exchange (new order)](#5-create-exchange-new-order) never pushes the exchange to Shopify on its own; the draft sits on a Chatbase Helpdesk ticket until an agent approves it. If nobody works the ticket, the exchange is never placed.
* **Same-order returns don't wait for a human, for now.** [Create return or exchange (same order)](#6-create-return-or-exchange-same-order) completes in the conversation, so anything you don't want the AI agent doing on its own belongs behind a procedure. A Helpdesk approval option for this action is coming soon.
* **Returns are bounded by the return window.** [Create return or exchange (same order)](#6-create-return-or-exchange-same-order) refuses items that fall outside the **Return window (days)** you set, and can only refund, not swap, unless **Allow exchanges** is on.
* **Create order with Use the cart depends on Update cart.** Without [Update cart](#2-update-cart) enabled, the AI agent has no way to put items in the cart for that order.
* **Order status is only as good as your tracking data.** The AI agent reports what Shopify knows. Delivery confirmation requires a trackable carrier or an app that feeds delivery updates back to Shopify.
* **Re-sync fetches in-stock products.** Product changes sync in real time after the first import, but a manual **Re-sync products** pulls the in-stock products, so out-of-stock items aren't included in that pass.
* **The Playground isn't a real store session.** Cart updates don't work there, the AI agent isn't told whether an **Online payment** order was paid, and actions that need an authenticated customer can't run in the Action Preview at all. Test those from a live channel.
* **Not every action runs on every channel.** Channels that are incompatible with an action aren't selectable in its **Channels** step.
## Troubleshooting
**Possible causes:**
* The action is toggled off, or turned off for the channel the customer is on
* **Only use in procedures** is on, but no procedure step references the action with `@action_name`
* The **When to use** description is too vague to match what the customer asked
* The customer isn't signed in and the action requires authentication
**Solutions:**
* Enable the action and check its **Channels** step
* Add the `@action_name` reference to the procedure step that should trigger it, or turn **Only use in procedures** off
* Rewrite **When to use** with the phrases customers actually type
* Check [Signed-in and guest customers](#signed-in-and-guest-customers), and add [Check account and send activation email](#9-check-account-and-send-activation-email) to get guests signed in
**Possible causes:**
* The initial sync hasn't finished, or the product was out of stock at the last **Re-sync products**
* The product is unavailable or unpublished in Shopify
* Your website training source still contains older scraped product pages that compete with the synced data
**Solutions:**
* Open the action's **Products** section and check the synced product count, then click **Re-sync products**
* Confirm the product is in stock and published in Shopify admin
* Exclude product pages from your website training source, since the sync already supplies that data
**Possible causes:**
* The customer isn't signed in to your Shopify store: all three actions act on the signed-in customer's own record
* You're testing in the Action Preview, which has no authenticated customer
* The customer's account exists but was never activated
**Solutions:**
* Test from a live channel such as the Chat bubble while signed in to your store
* Enable [Check account and send activation email](#9-check-account-and-send-activation-email) so the AI agent can send an activation link
* For **Tag an order**, confirm the tag is in the action's **Allowed tags** list; the AI agent only applies tags from that list
**Possible cause:** your theme isn't listening for the cart events Chatbase dispatches, so its cart count only refreshes on page load.
**Solution:** add a listener for one of the cart events in your theme's JavaScript. See [Keeping Your Theme's Cart Icon in Sync](#keeping-your-themes-cart-icon-in-sync).
**Possible cause:** with **Online payment**, the AI agent sends a Shopify-hosted checkout link and Shopify finalizes the order only once the shopper completes checkout. Until then there's no paid order.
**Solutions:**
* Check whether the shopper opened and completed the checkout link
* Remember that in the Playground the AI agent isn't told when payment completes; on supported channels it is
* For flows where no payment should be collected, use a **Free order** variant instead
**Possible causes:**
* The Helpdesk ticket is still awaiting review: the exchange is only pushed when an agent clicks **Approve**
* The ticket was rejected
* Required fields under **Collect additional details** were never gathered, so the AI agent didn't open the exchange
**Solutions:**
* Open the ticket in the Helpdesk and check the **Review action** tab
* Search Shopify admin for the action's **Order tags** to find exchange orders that were created
* Loosen or remove **Required** on data inputs the AI agent can't reliably collect
**Possible causes:**
* The order falls outside the **Return window (days)** set on the action
* **Allow exchanges** is off, so the action can only refund the returned items
* **Only use in procedures** is on, but no procedure step calls the action with `@Create_Return`
**Solutions:**
* Raise the **Return window (days)**, or clear the field for no time limit
* Turn on **Allow exchanges** in the action's **Behavior** section to let the AI agent swap items instead of refunding them
* Reference the action from the procedure step that should trigger it, or turn **Only use in procedures** off
## Best Practices
Write specific "When to use" descriptions to help the AI agent accurately determine when to trigger each action. Include example phrases customers might use.
Test each action with various customer queries before going live. Verify that product searches return accurate results.
In case you notice discrepancies in available products, click **Re-sync products** in the action's **Products** section.
For multi-step flows like exchanges or damaged-item replacements, build a [procedure](/docs/user-guides/chatbot/procedures/procedures-overview) that calls the right Shopify actions in order, so the AI agent doesn't improvise on high-stakes flows. See [Keeping high-stakes actions on rails](#keeping-high-stakes-actions-on-rails).
Turn off actions that need a signed-in customer on channels where shoppers never are, so the AI agent doesn't offer something it can't complete.
Keep the **Allowed tags** list short and meaningful, so the tags the AI agent writes are ones your team and your Shopify workflows actually act on.